Azure Data Factory Interview Question and Answers
1. What is Azure Data Factory?
Azure Data factory is a cloud based ETL/ELT tool.
Azure Data Factory is a cloud-based integration service offered by Microsoft that lets you create data-driven workflows for orchestrating and automating data movement and data transformation overcloud. Data Factory services also offer to create and running data pipelines that move and transform data and then run the pipeline on a specified schedule.
2. What is Linked Service?
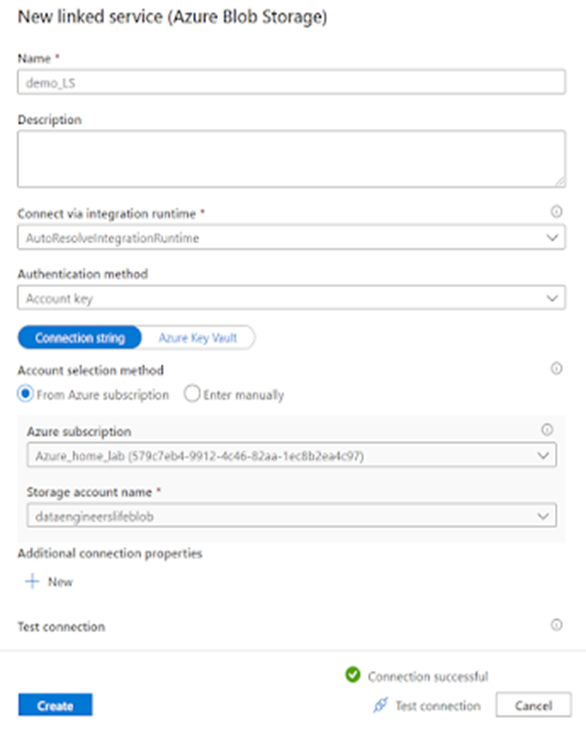
A linked service is a connection to a specific service or data store that can either be a source of data, or a destination (also called target or sink).
A linked service will store the connection string, but also any method on how to authenticate with the service. Once a linked service is created, you can reuse it everywhere. For example, if you have a data warehouse in Azure SQL database, you will only need to define this connection once.
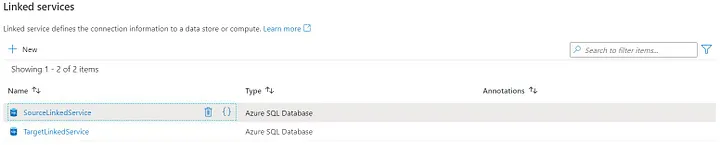
Linked services can be found in the Manage section of ADF Studio (lowest icon in the left menu bar.
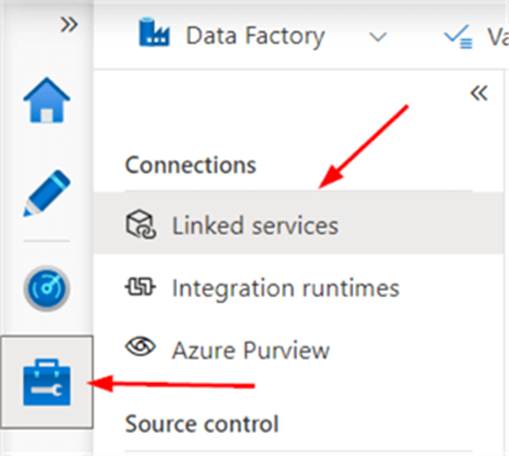
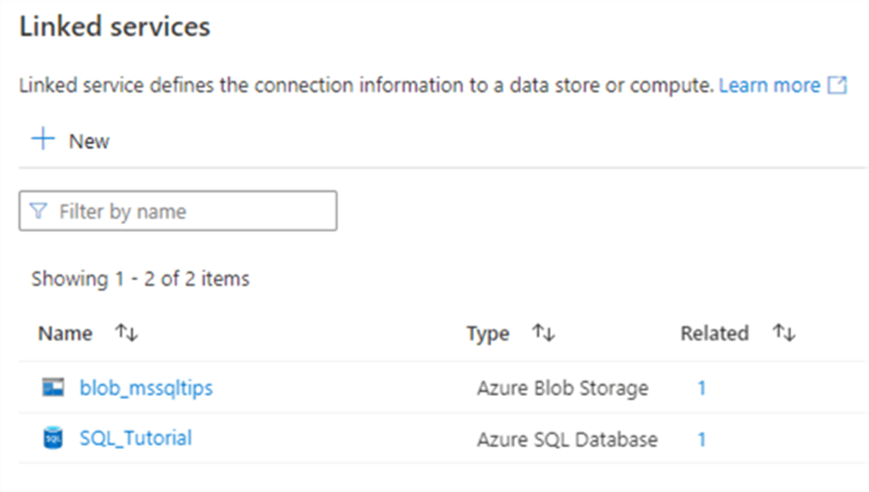
There we can find the two linked services we created in the previous part:
3. What is the difference between Linked Service and Dataset?
Dataset:
Datasets can be considered as the source and target of a pipeline. A pipeline can have multiple Datasets, sometimes extracting a file, transforming it, and then writing it to a different folder within the same storage account. Thus a Dataset is just a term to describe tables, file storages, or ERP systems.
Linked Services:
Linked Services can be through of as the connection string, or the authorization that the pipeline uses to connect to a Dataset. A linked service can be the key value of a blob storage account, the username and password of a database, or a Service account that is used to log into a BW system. While it is possible to have more than one Linked Service attached to the same Dataset, usually you will see a one to one relationship.
4. What is Integration Runtime? What are the different type?
Integration runtime is the infrastructure that is used for computations. Azure Data Factory uses it to offer many integration capabilities. They can be data flows and data movement, activity dispatch, and SSIS package execution.
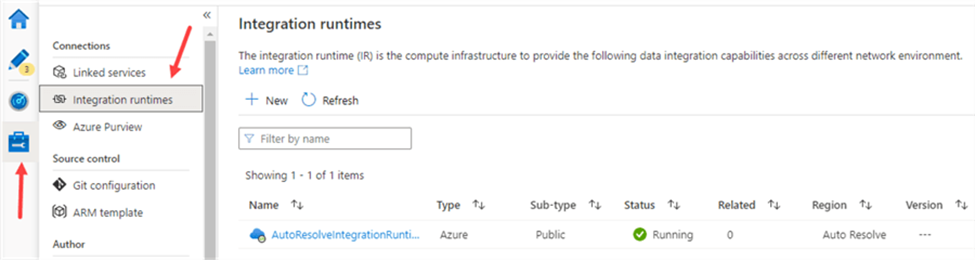
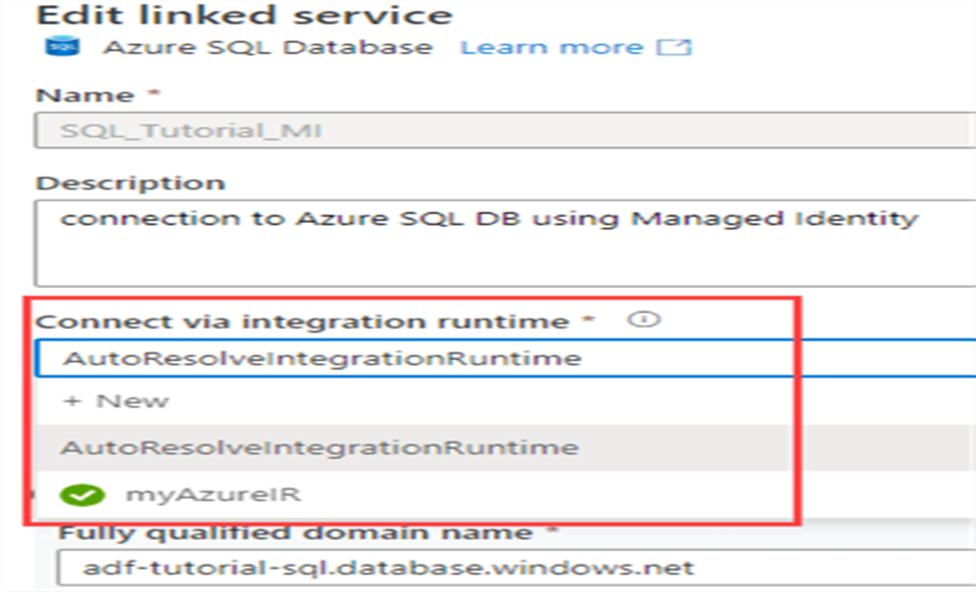
The most important integration runtime is the one we’ve been using all this time: the Azure-IR. Every installation of ADF has a default IR: the AutoResolveIntegrationRuntime. You can find it when you go to the Manage section of ADF and then click on Integration Runtimes.
There are 3 types of the integration runtime available in the Azure data factory. We can choose based upon our requirement the specific integration runtime best fitted in specific scenario. The three types are :
- Azure IR
- Self-hosted
- Azure-SSIS
Azure IR:
The Azure-IR is a fully managed, serverless compute service. You don’t have to do anything to manage, except pay for the duration it has been running compute. You can always use the default Azure-IR, but you can also create a new one.
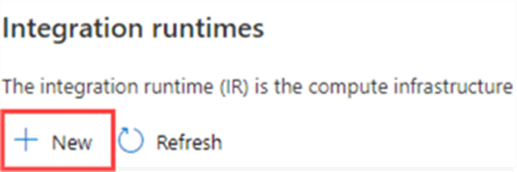
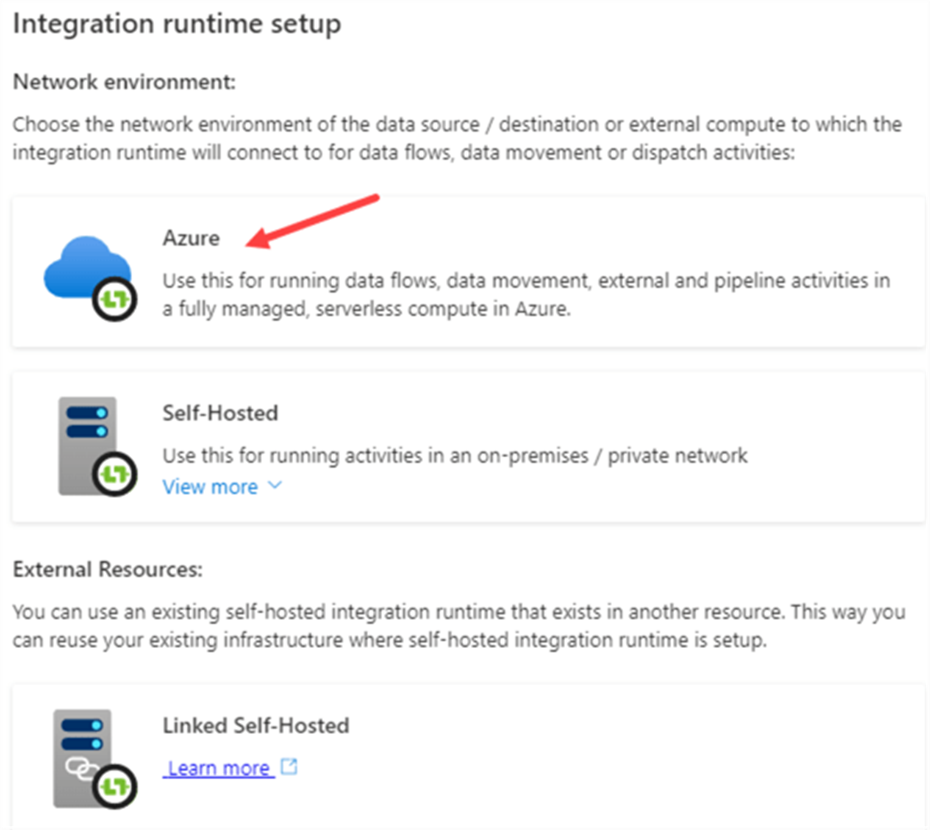
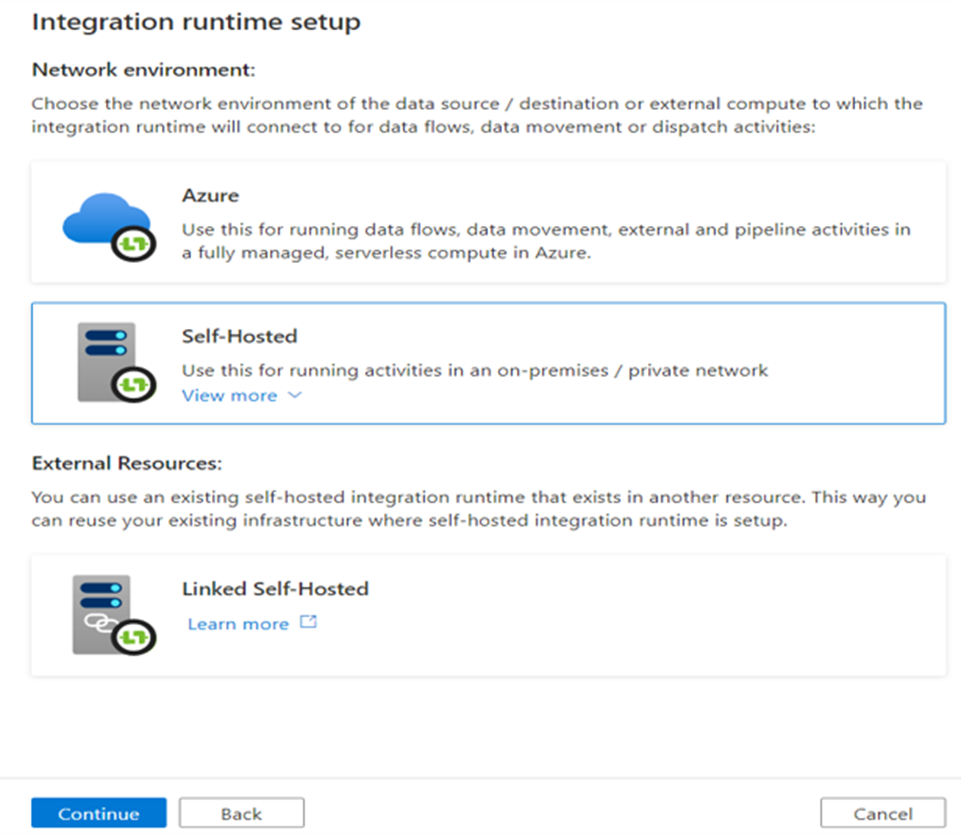
In the new window, choose the option with “Azure, Self-Hosted”

In the next step, choose Azure again.
In the following screen, enter a name for the new IR. Also choose your closest region.
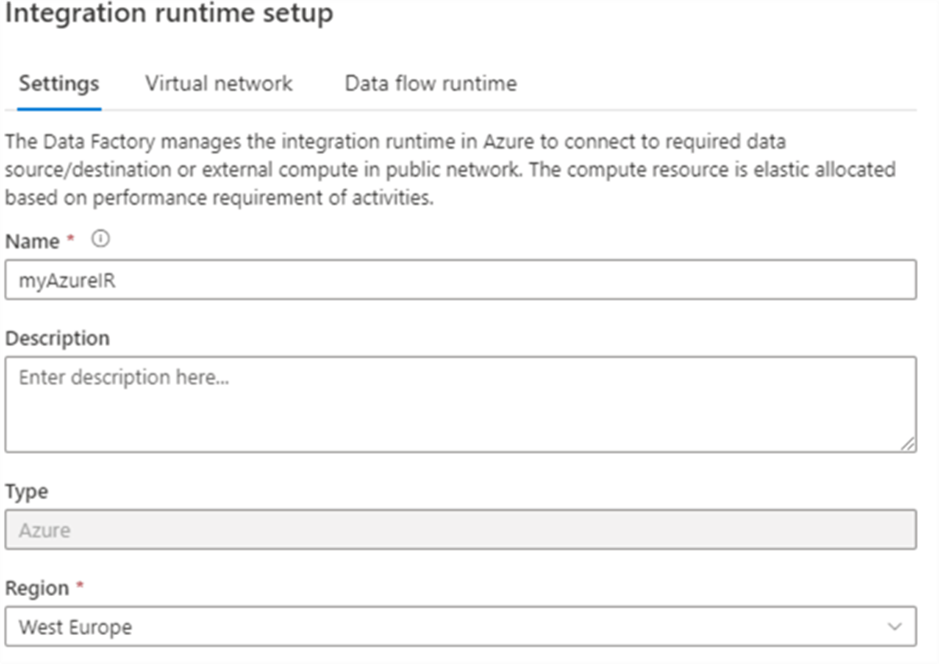
You can also configure the IR to use a Virtual Network, but this is an advanced setting
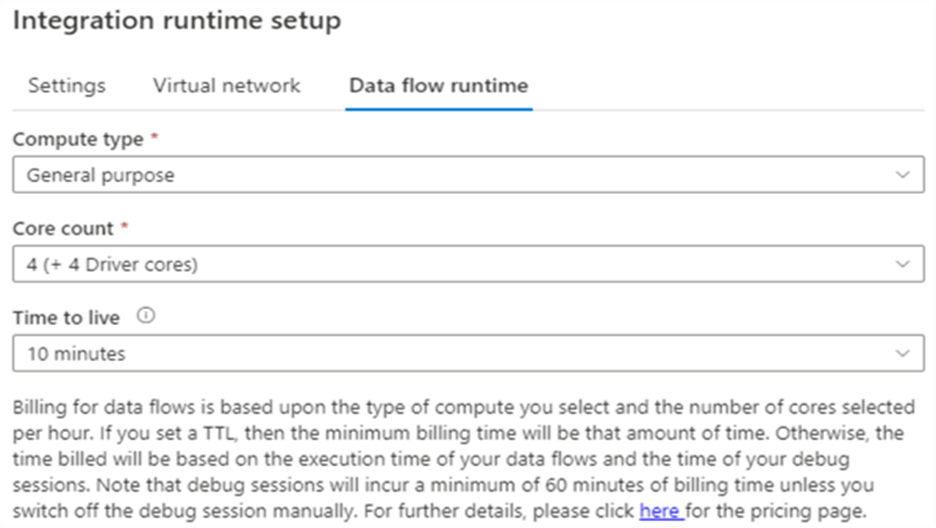
Keep in mind that billing for pipeline durations is several magnitudes higher when you’re using a virtual network. In the third pane, we can configure the compute power for data flows.
There are two main reasons to create your own Azure-IR:
- You want to specify a specific region for your compute. For example, if regulations specify your data can never leave a certain reason, you need to create your own Azure-IR located in that region.
- You want to specify a data flow runtime with different settings than the default one. Especially the Time To Live setting is something that is worth changing (shorter if you want to save on costs, longer if you don’t want to restart you cluster too often during development/debugging).
The Self-hosted IR
Suppose you have data on-premises that you need to access from ADF. How can ADF reach this data store when it is in the Azure cloud? The self-hosted IR provides us with a solution. You install the self-hosted IR on one of your local machines. This IR will then act as a gateway through which ADF can reach the on-premises data.
Another use case for the self-hosted IR is when you want to run compute on your own machines instead of in the Azure cloud. This might be an option if you want to save costs (the billing for pipeline durations is lower on the self-hosted IR than one the Azure-IR) or if you want to control everything yourself. ADF will then act as an orchestrator, while all of the compute is running on your own local servers.
After clicking on New then select Self-Hosted.
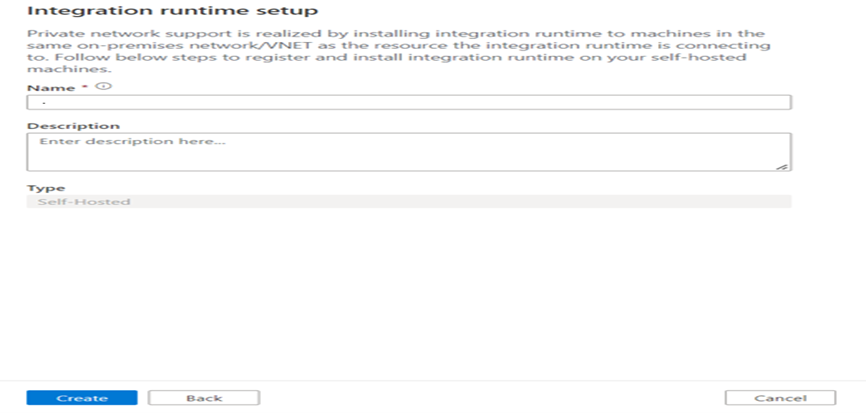
Specify the name of the Integration Runtime and click on create.
After the creation of IR open it and copy key 1 or key 2.
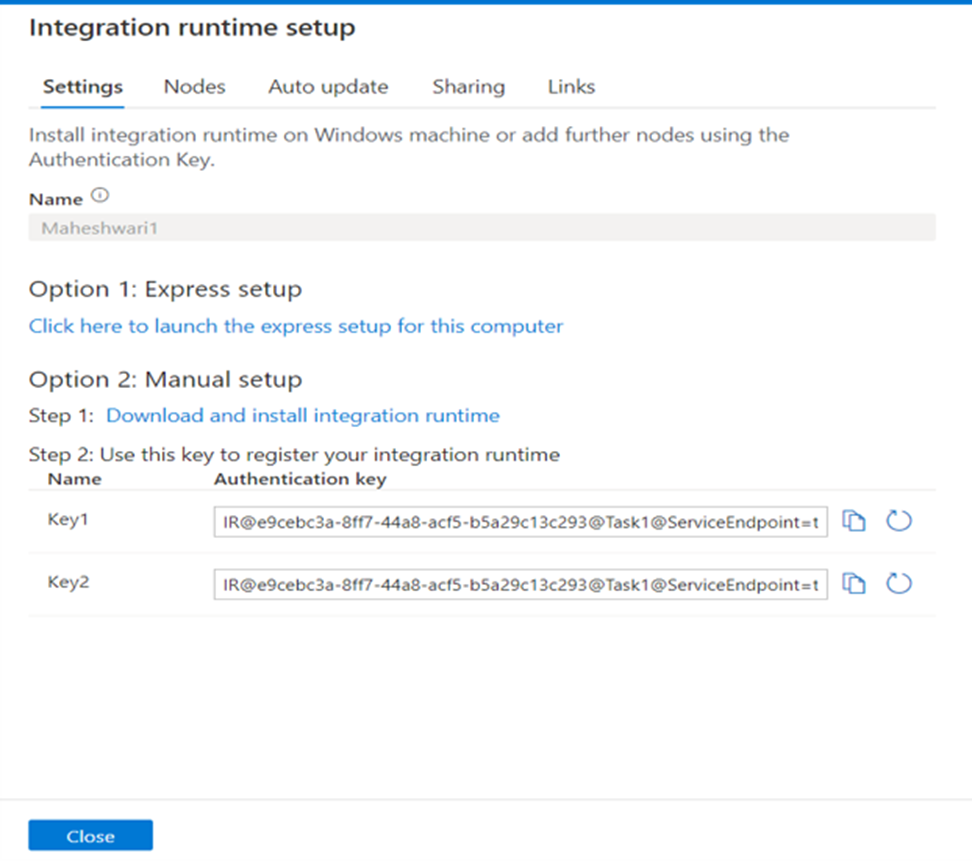
Paste that key into Installed Microsoft Integration Runtime On your PC.
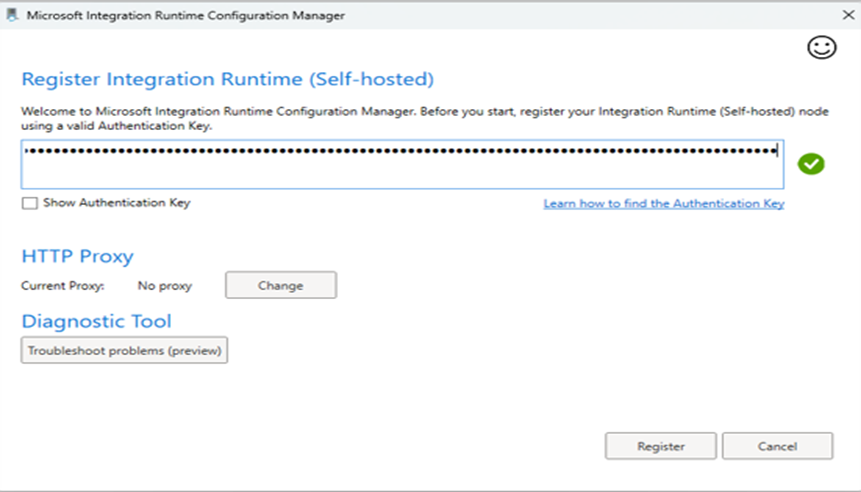
After pasting the key click on Register.

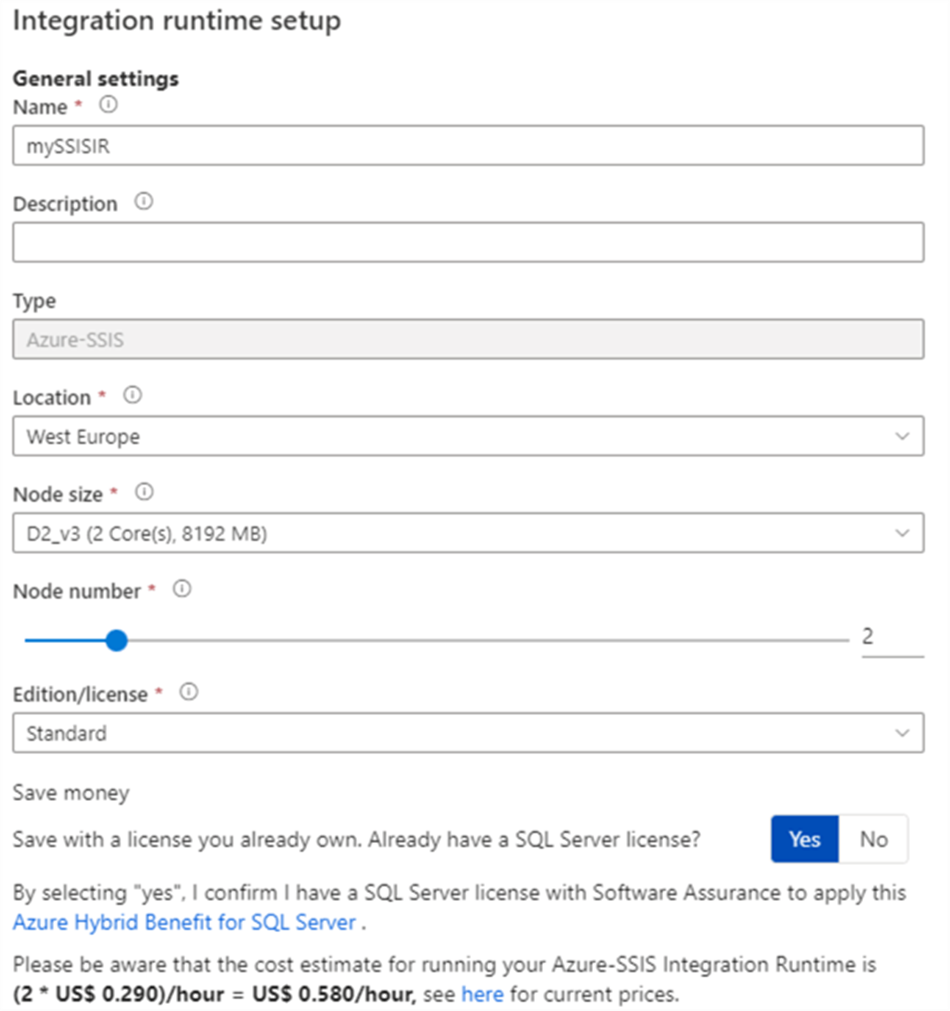
The Azure-SSIS IR
ADF provides us with the opportunity to run Integration Services packages inside the ADF environment. This can be useful if you want to quickly migrate SSIS project to the Azure cloud, without a complete rewrite of your projects. The Azure-SSIS IR provides us with a scale-out cluster of virtual machines that can run SSIS packages. You create an SSIS catalog in either Azure SQL database or in Azure SQL Server Managed Instance.
5. What Are the different types of trigger in ADF?
Totally there are 3 types of triggers available in Azure Data Factory,
- Schedule triggers
- Tumbling window triggers
- Event triggers
Schedule Trigger:
Schedule triggers are common triggers that can execute a pipeline on the time schedule we set. Schedule triggers offer more flexibility by giving many options to schedule like Minute, Hour, Day(s), Week(s), or Month(s). We can define the start and end date for when the trigger should be active, and it will run only from the moment it is created. The schedule can also be set to run on future calendar dates and times like every 15th and last Saturday of the month or every month’s first and fourth Monday etc.
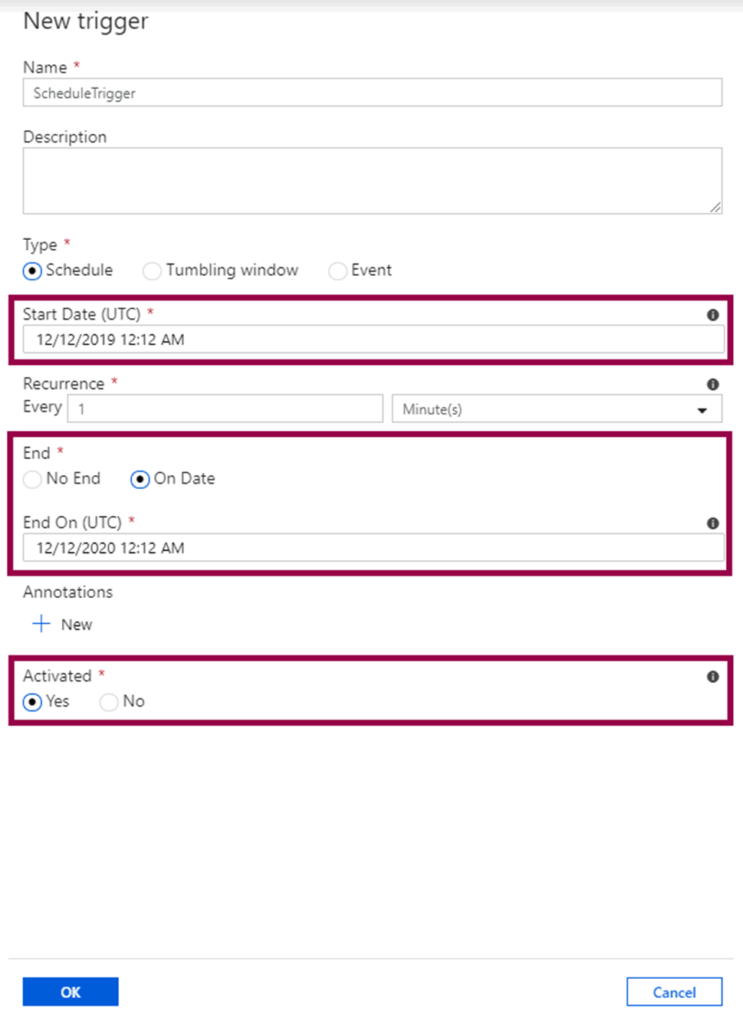
The New Trigger pane will open. The default trigger type is Schedule, but you can also choose Tumbling Window and Event:
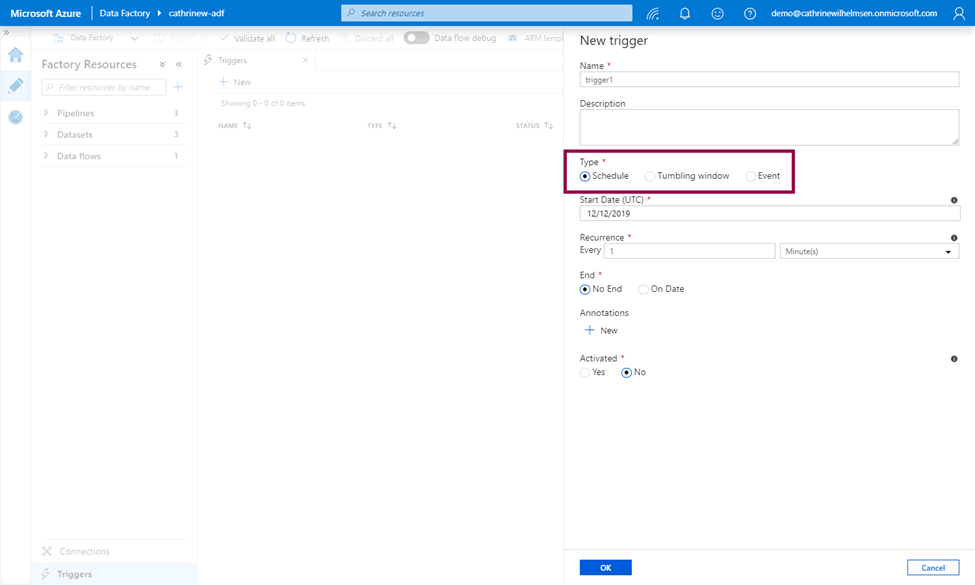
Choose the start date, optionally an end date, and whether or not to activate the trigger immediately after you publish it:
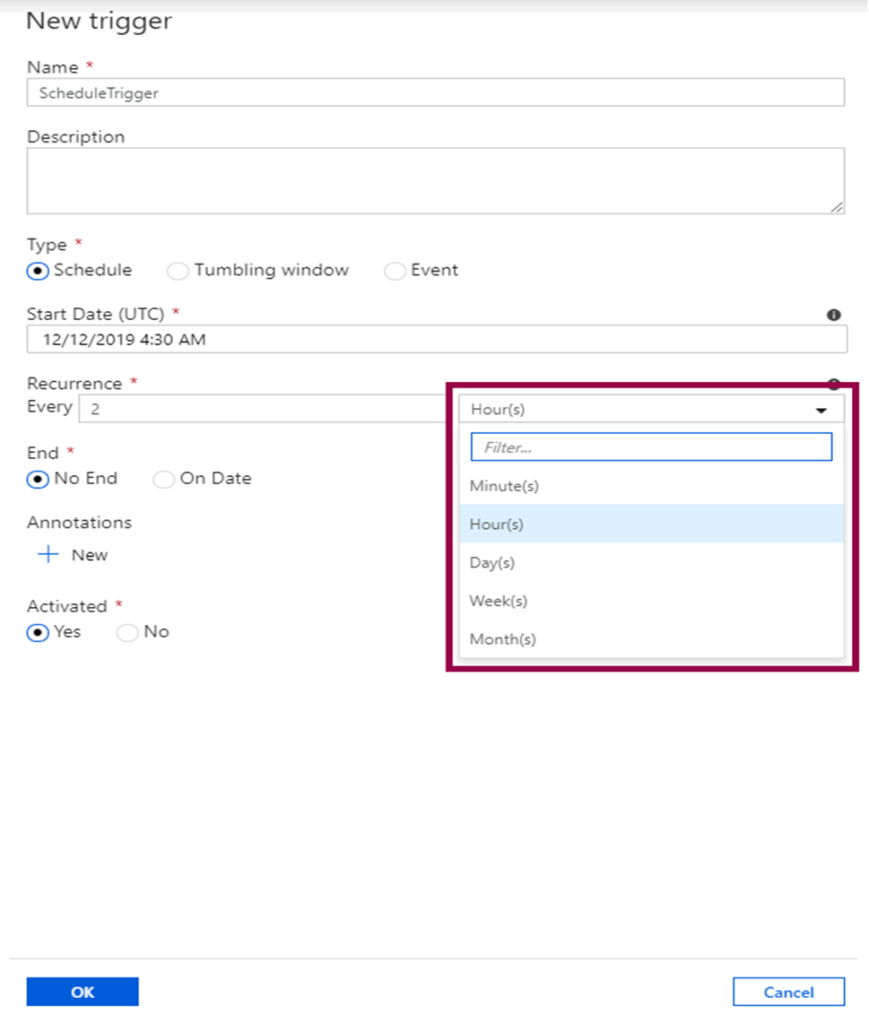
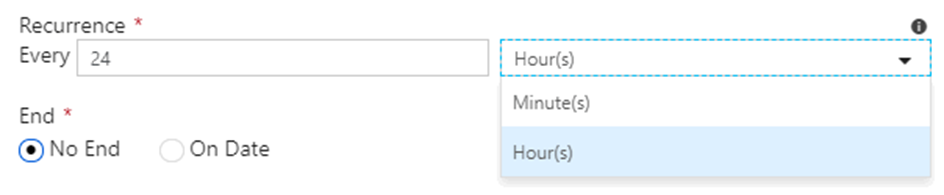
Choose the recurrence, either minutes, hours, days, weeks, or months:
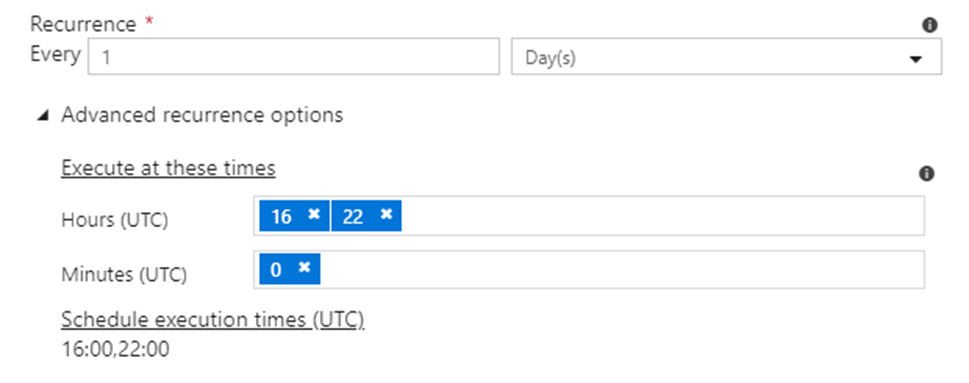
Depending on the recurrence you choose, you can also configure the advanced settings.
If you choose days, you can configure the times:
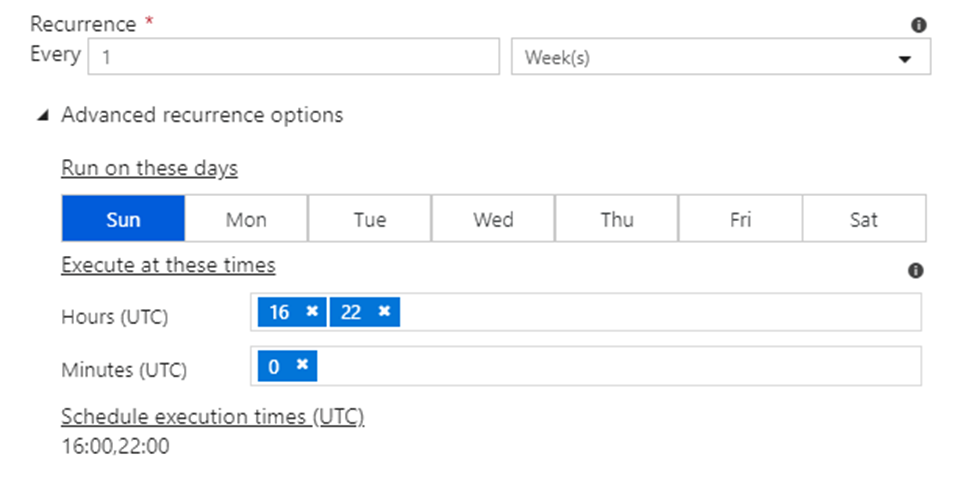
If you choose weeks, you can configure both the days and times:
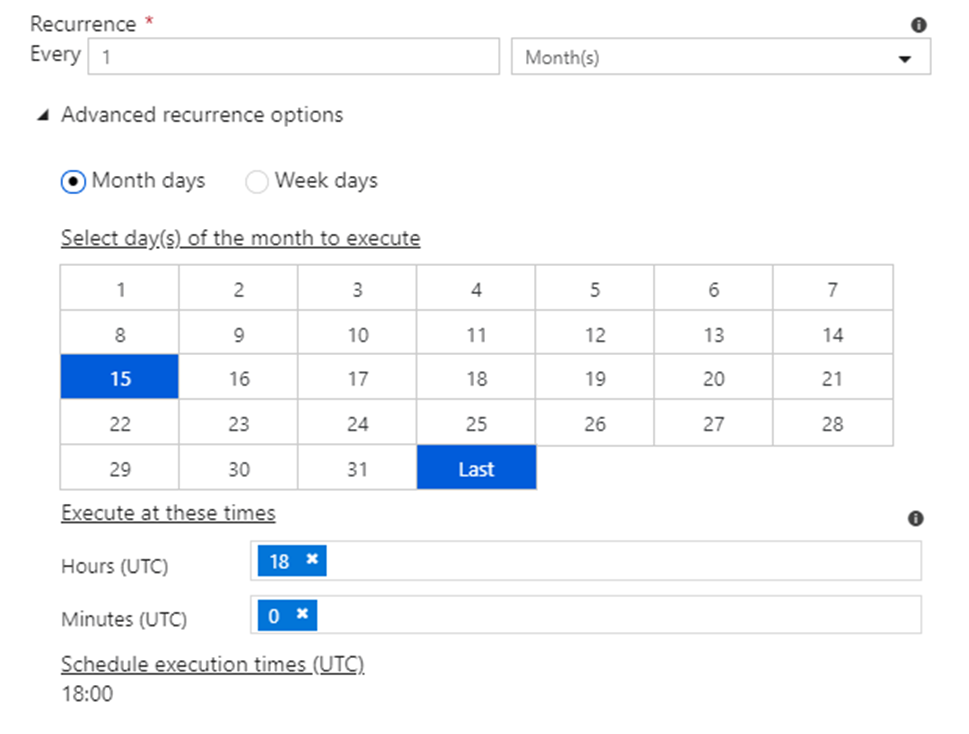
Months has two options. You can either configure month days and times, such as the 15th day and the last day.
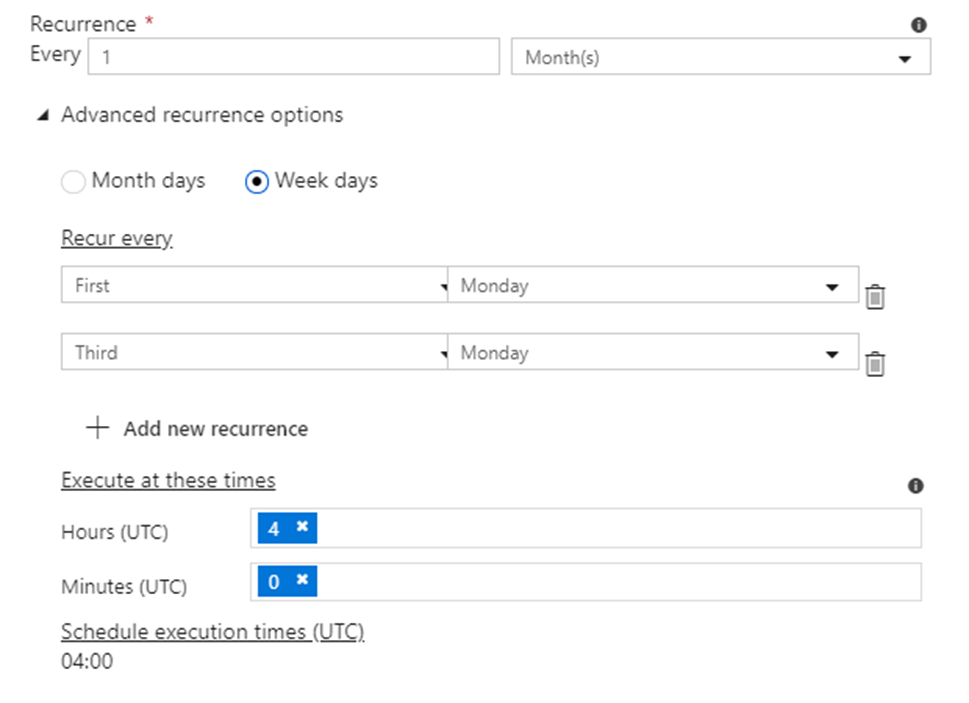
or week days and times, like the first Monday or the last Sunday.
Tumbling Window Trigger:
Tumbling window triggers run at a specific time or on a periodic interval from a mentioned start time. It is very useful compared to scheduled triggers when you are dealing with historical data to copy or move. For instance, if you want the data to be copied from the SQL database, it will take the pipeline to run in the past and get that piece of data copied. It works by breaking the tumbling window trigger for every hour (if you have defined it for 1 hour) and pass on the start/end time for each time window into the SQL query, post which the data between the start/end time are returned to be saved into a destination of your choice.
Tumbling window triggers have the same settings as schedule triggers for start date, end date, and activation. However, the recurrence setting is different, you can only choose minutes or hours:
You can also specify several advanced settings:

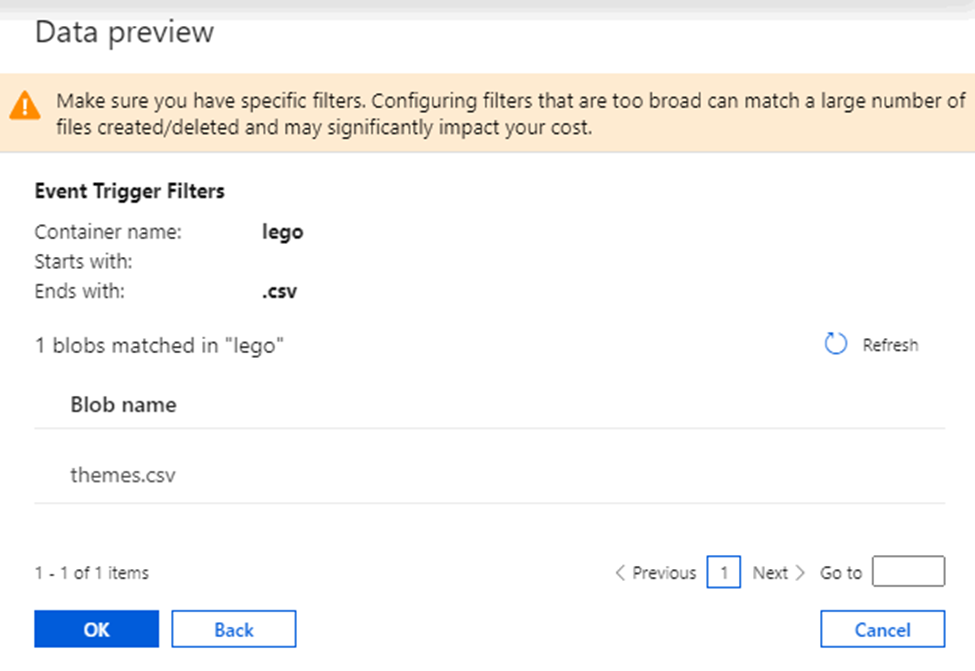
Event Triggers:
Using event-based triggers we can schedule to run the pipelines in response to an event from azure blob storage. The most common use case is configuring to events like file arrival or deletion in blob storage. Azure data factory works on its integration with Azure event grid which works on similar lines but slightly different methodology. Event-based triggers work with not only blob but with ADLS too. Event triggers work on many to many relationships, a single trigger can start multiple pipelines and multiple triggers can start a single pipeline.
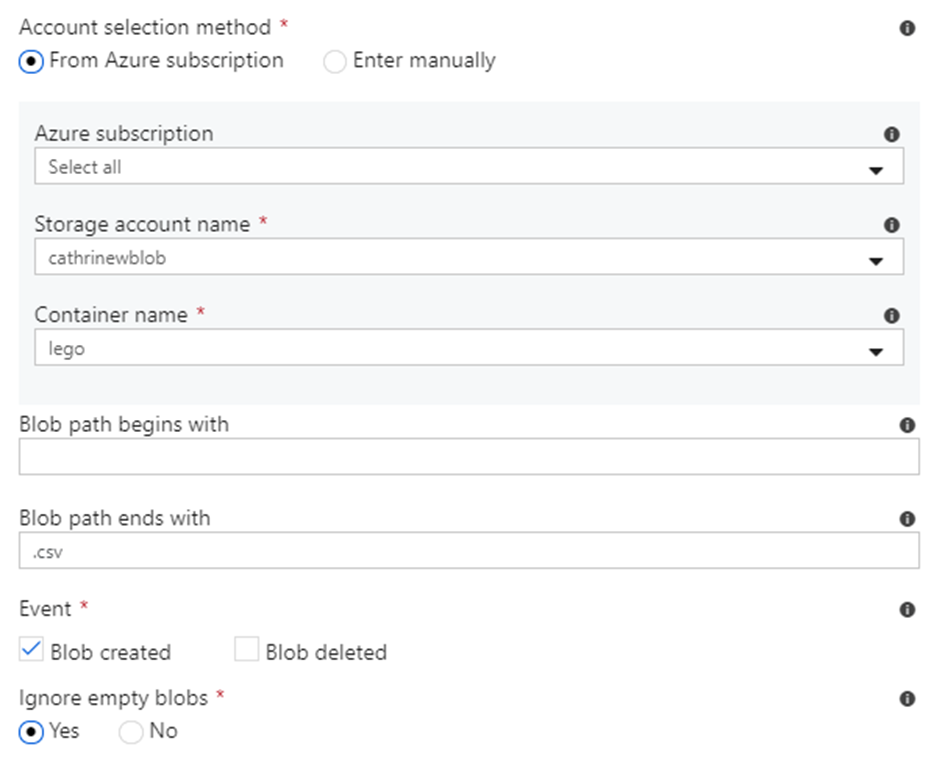
Event triggers do not have settings for start date and end date, but you can choose whether or not to activate the trigger immediately after you publish it. The main settings for event triggers are container and blob path. Blob path can begin with a folder path and/or end with a file name or extension:
Trigger Now
Trigger now isn’t really a trigger type, it’s more like a trigger action. You can manually trigger a pipeline, just like debugging pipelines. After you have triggered a pipeline, you can to open up the Monitor page to check
the status and see the output.
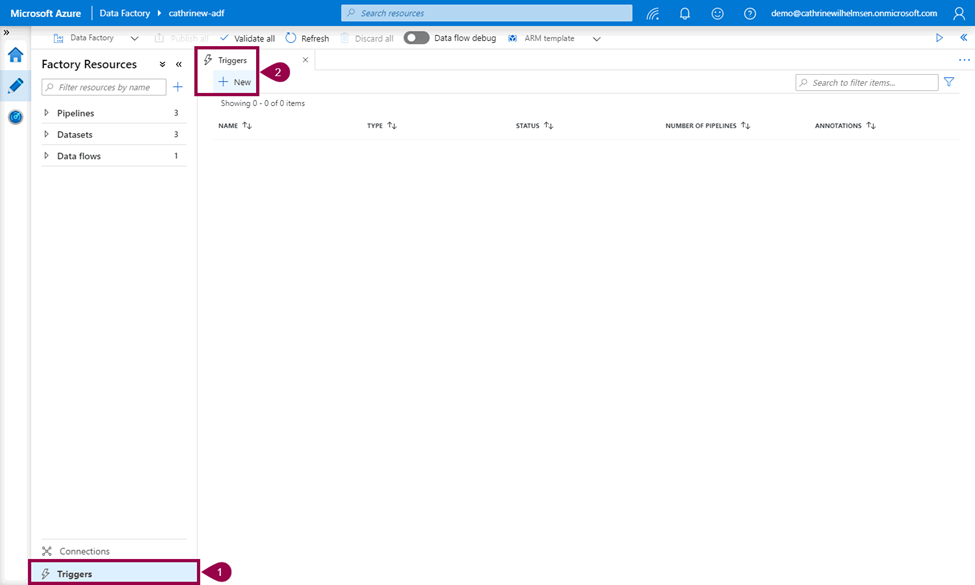
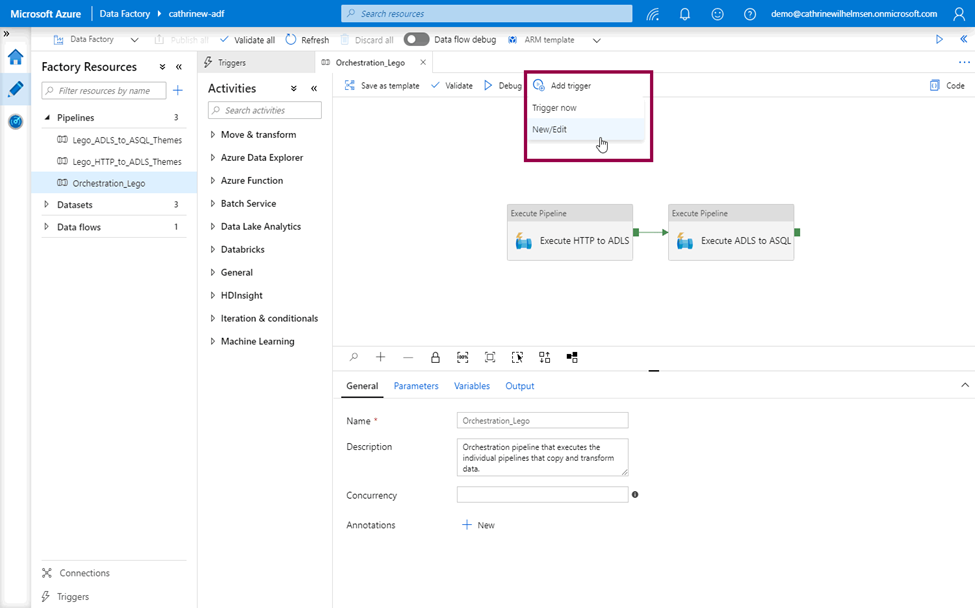
Adding triggers to pipelines
Once you have created your triggers, open the pipeline that you want to trigger. From here, you can trigger now or click add trigger, then New/Edit:
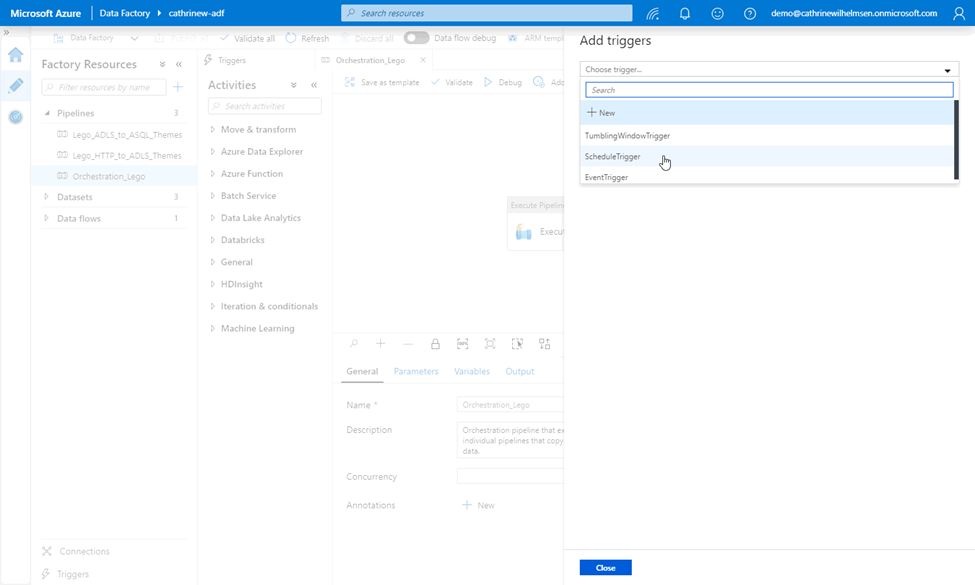
This opens the add triggers pane, where you can select the trigger:
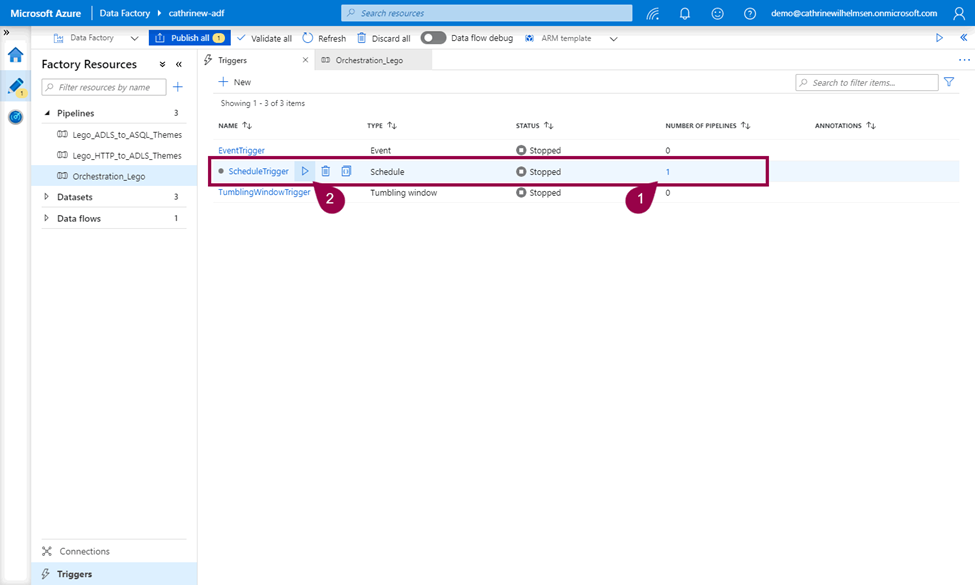
In the triggers tab, you can now see that the trigger has a pipeline attached to it, and you can click to activate it:
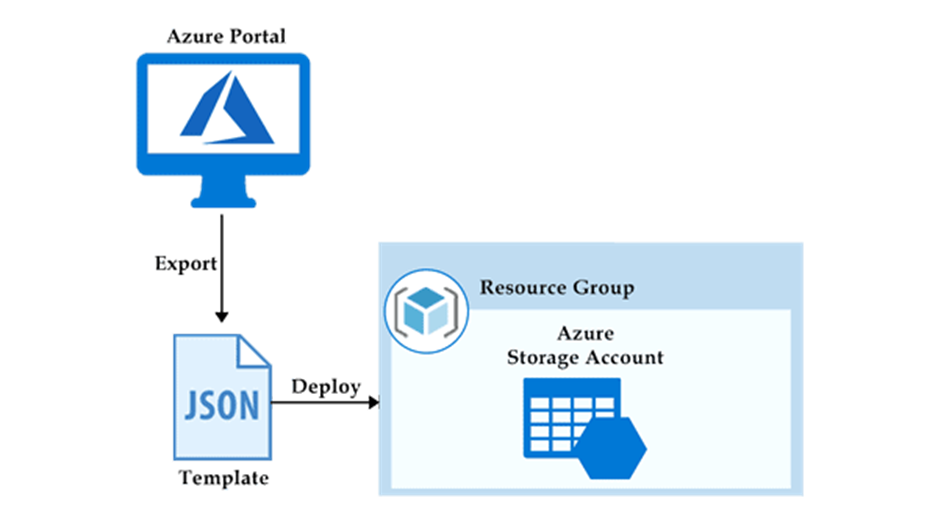
6. What are the ARM template in ADF? What are they used for?
ARM templates are a form of infrastructure as code, a concept where you define the infrastructure you need to be deployed. You no longer need to click around the portal creating virtual machines or writing scripts to deploy a storage account. Instead, the template defines the resources, and the Azure ARM management layer is responsible for creating the infrastructure.
These templates use a declarative syntax to let you define your deployment in the form of JSON (JavaScript Object Notation) files.
The primary benefits of using ARM are:
- Consistency: ARM provides a consistent way to create, deploy, and manage Azure resources.
- Modularity: ARM enables you to define your infrastructure as a set of reusable templates, making it easier to manage and maintain.
- Automation: ARM enables you to automate the deployment and management of your infrastructure, saving time and reducing errors. If you have deploy the pipeline on UAT and you want to do the same in production you can use this template.
- Tagging: ARM enables you to tag your resources, making it easier to organize, track, and manage them.
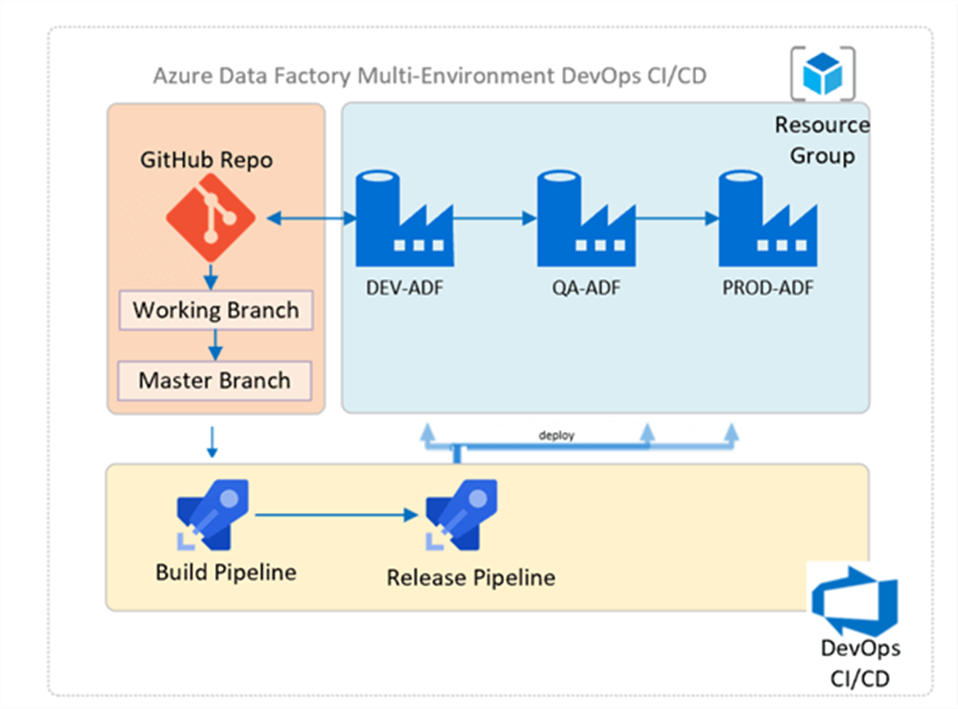
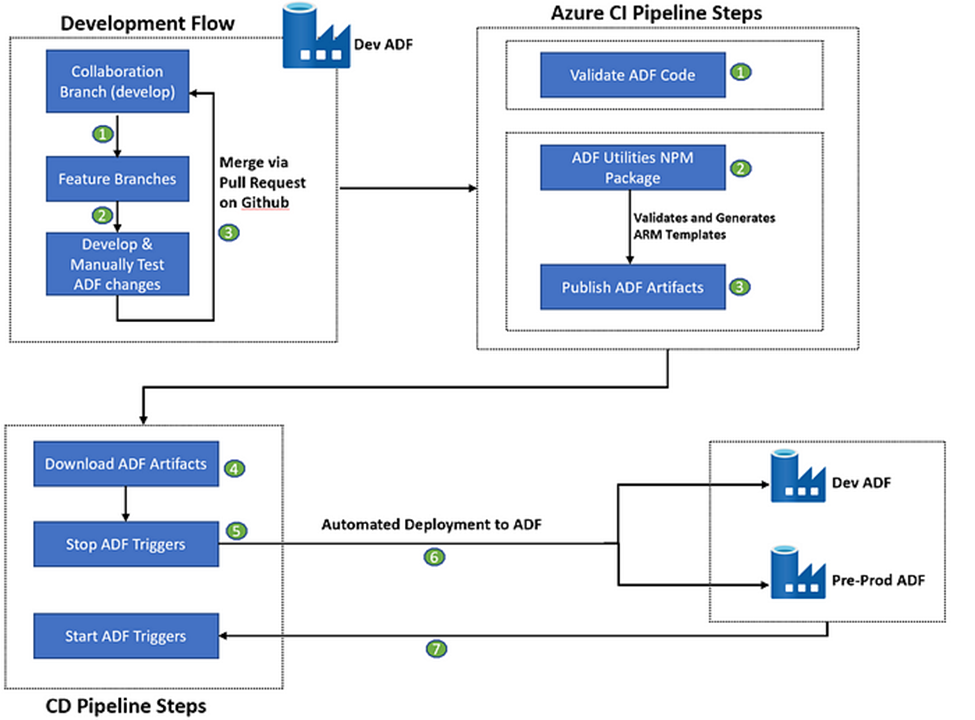
7. How do you deploy Data factory code to higher environment?
- Create a feature branch
- Create PR to merge code to Dev branch.
- Publish the code from dev to generate Arm Templates.
- This can trigger an automated CI-CD Dev-Ops pipeline to pass code to higher environments.
For More Details follow –
8. What are the difficulties that you have faced while copying data from on premise to cloud? How do you resolve it?
There are following challenges:
Throughput/Speed:
We face speed limit during data copy.
When you copy binary files and other files as-is, the copy data process is fast and simple, like copying files on your computer. You take one file, and copy it into a different location:

However, the copy data activity is powerful. You are not limited to copying files as-is, the copy data activity can do some pretty cool things during copying:

Serialization and deserialization can be explained as converting file formats during copying. For example, we can use a CSV file as a source and copy it into an Azure SQL Database destination. To do that, we need to read the source data in CSV format and transfer it as bits and bytes over the network (serialization), then convert that stream of bits and bytes to a SQL format so we can load it into our database (deserialization).
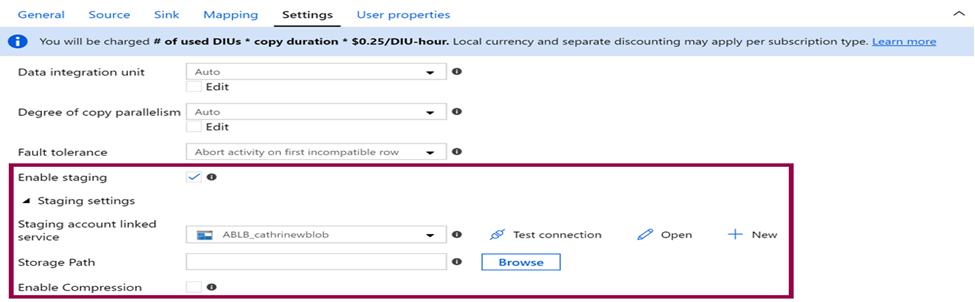
Now following setting change in copy activity can improve performance:
Enable Staging:
Compression and decompression can be explained as zipping and unzipping files during copying. You don’t need to first copy the file and then zip or unzip it. You just specify that the source is zipped and the destination is unzipped, or vice versa. Definitely it will improve copy performance.
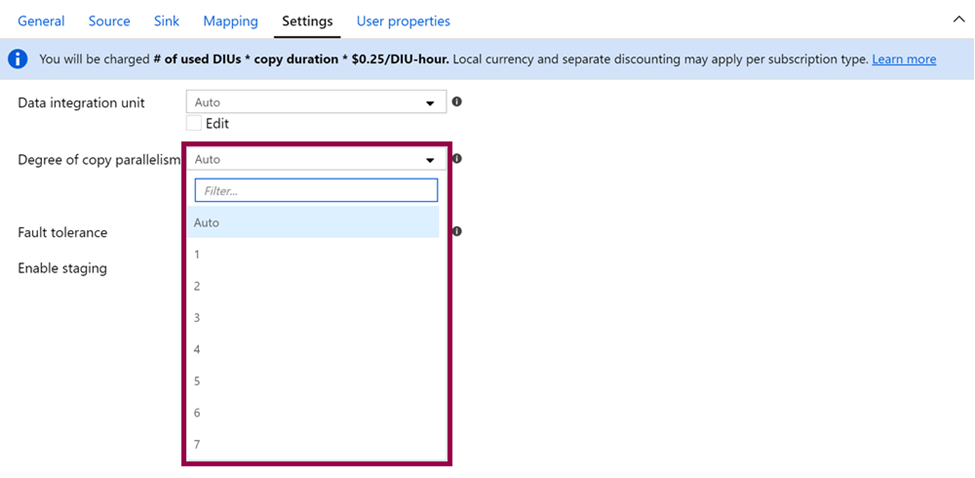
Degree of Copy Parallelism:
The degree of copy parallelism value specifies the maximum number of connections that can read from your source or write to your sink in parallel. It will increase the copy activity of the throughput.
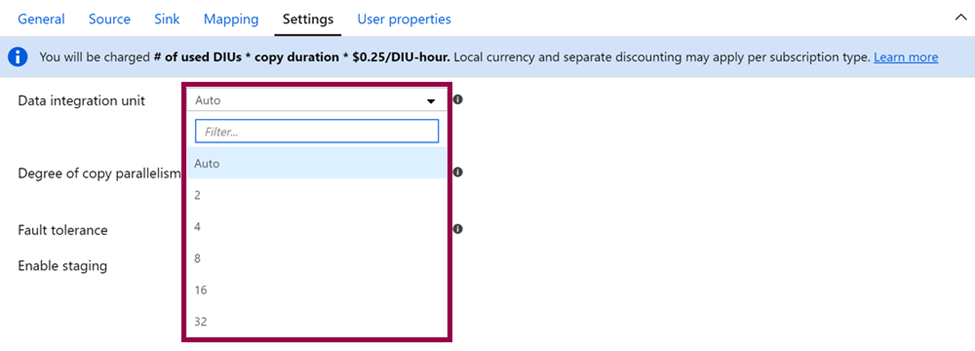
Data Integration Units (DIUs):
The more DIUs you specify, the more power you throw at the copy data activity. And the more power you throw at the copy data activity, the more you pay for it.
9. What are the different activities you have used in data factory?
Here are a few of the most used activities:
- Copy Data Activity to copy the data between datasets.
- ForEach Activity for looping.
- Get Metadata Activity that can provide metadata about any data source.
- Set Variable Activity to define and initiate variables within pipelines.
- Lookup Activity to do a lookup to get some values from a table/file.
- Wait Activity to wait for a specified amount of time before/in between the pipeline run.
- Validation Activity will validate the presence of files within the dataset.
- Web Activity to call a custom REST endpoint from an ADF pipeline.
10. Can you execute For-each inside another for-each activity?
No, inside for-each we cannot use another for each activity.
11. What are the different Metadata options that you get in Get Metadata activity?
You can specify the following metadata types in the Get Metadata activity field list to retrieve the corresponding information:
| Metadata type | Description |
| itemName | Name of the file or folder. |
| itemType | Type of the file or folder. Returned value is File or Folder. |
| size | Size of the file, in bytes. Applicable only to files. |
| created | Created datetime of the file or folder. |
| lastModified | Last modified datetime of the file or folder. |
| childItems | List of subfolders and files in the given folder. Applicable only to folders. Returned value is a list of the name and type of each child item. |
| contentMD5 | MD5 of the file. Applicable only to files. |
| structure | Data structure of the file or relational database table. Returned value is a list of column names and column types. |
| columnCount | Number of columns in the file or relational table. |
| exists | Whether a file, folder, or table exists. If exists is specified in the Get Metadata field list, the activity won’t fail even if the file, folder, or table doesn’t exist. Instead, exists: false is returned in the output. |
To demonstrate Get Metadata activity at work, I will create a data flow with the following logic:
- Read the list of the files available in the source folder, using Get Metadata activity and pass this data to ForEach activity
- Within the ForEach activity, read the properties of each file, using another Get Metadata activity and pass it to conditional activity, to determine if the file has been modified within the last 7 days
- Copy each recently changed file into the destination database.
Here are the steps to create this data flow:

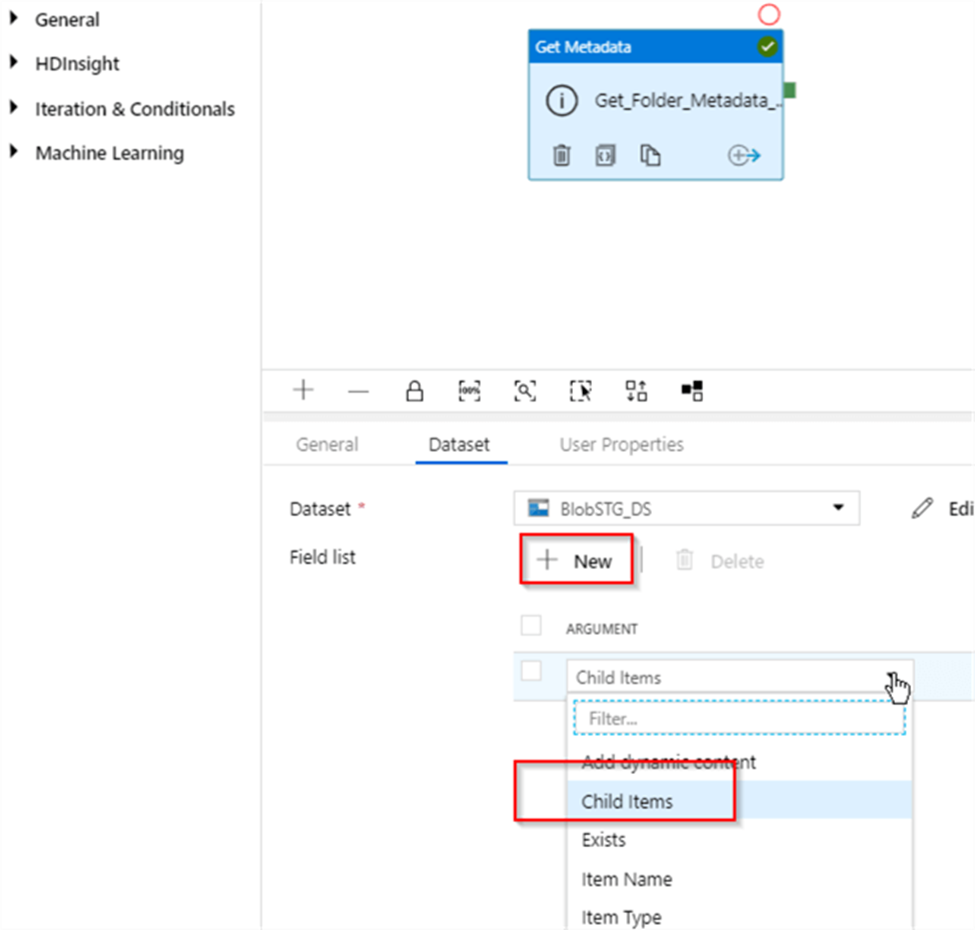
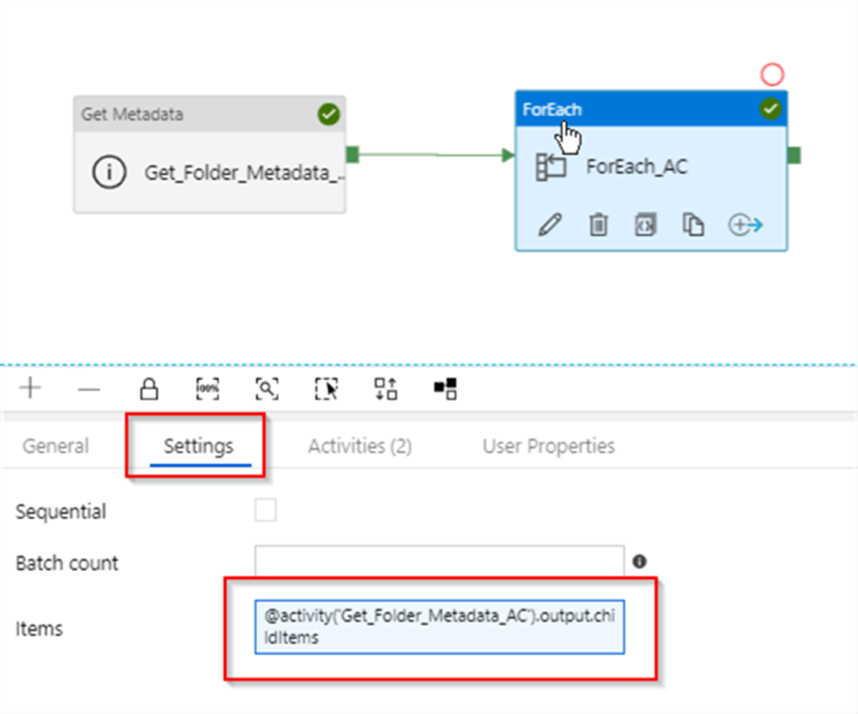
Next, click the ‘+New‘ button to add metadata field and select Child Items from the dropdown list-this field will produce names of the files in the csvfiles container:
Next, let’s add ForEach activity to our pipeline (I’ve named it as ForEach_AC), link it to the Success end of the Get_Folder_Metadata_ACactivity and add the following expression to its Items text box: @activity(‘Get_Folder_Metadata_AC’).output.childItems. This expression will extract childItems values from the output of the Get_Folder_Metadata_AC activity:
Next, let us switch to Activities tab and click the Add activity button to start adding child tasks to the ForEach activity:
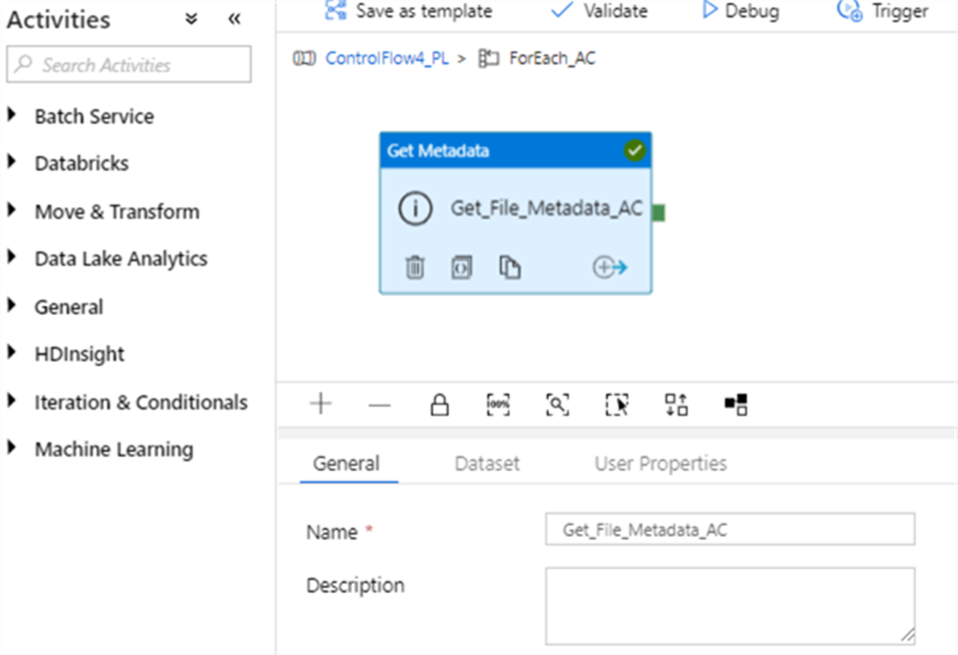
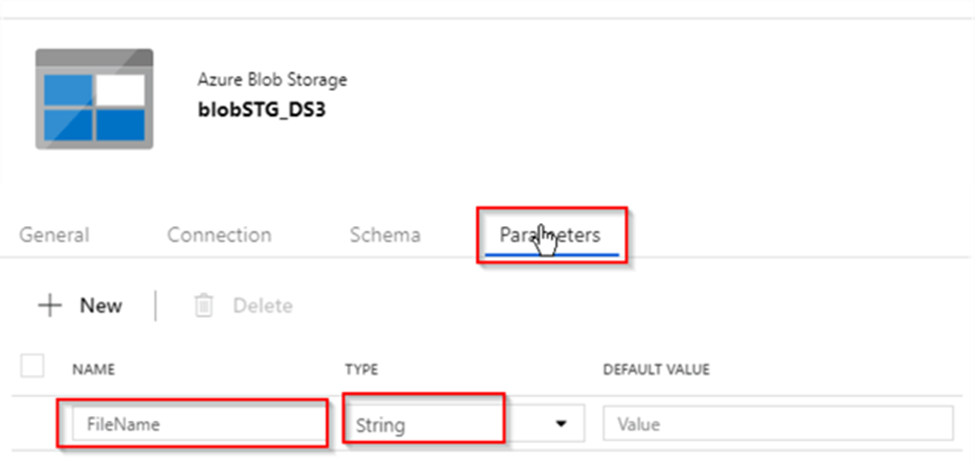
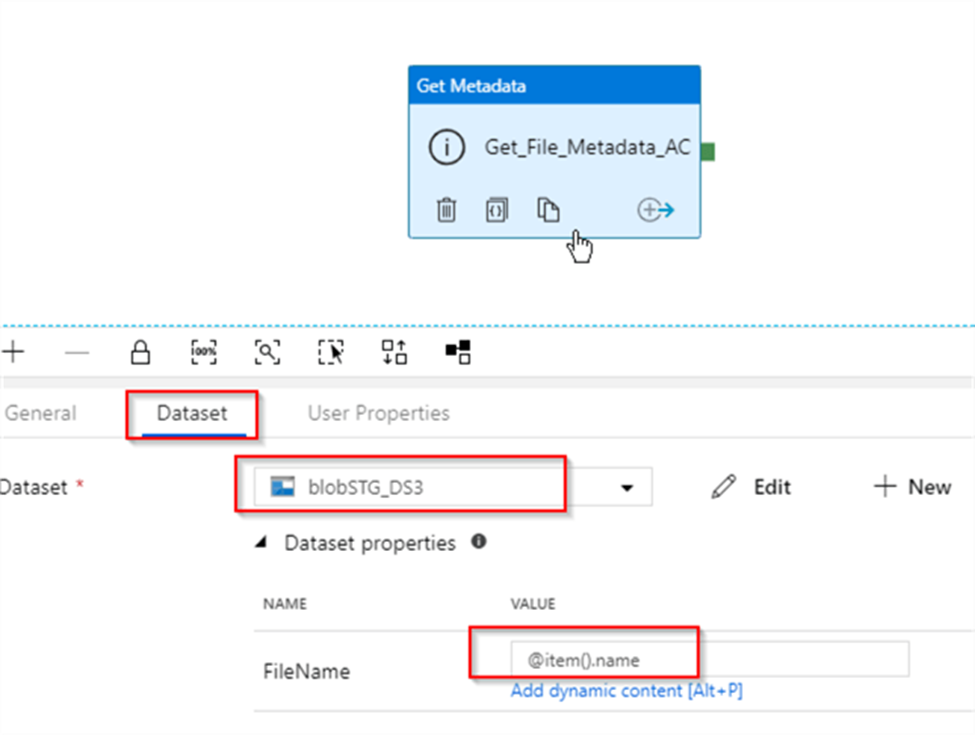
Let us switch to the Dataset tab to specify dataset details. Because this activity is going to receive its file name from the parent activity, its source needs to be a parameterized dataset. I have created a parameterized blob storage dataset (I have named it as blobSTG_DS3) with the FileName parameter.
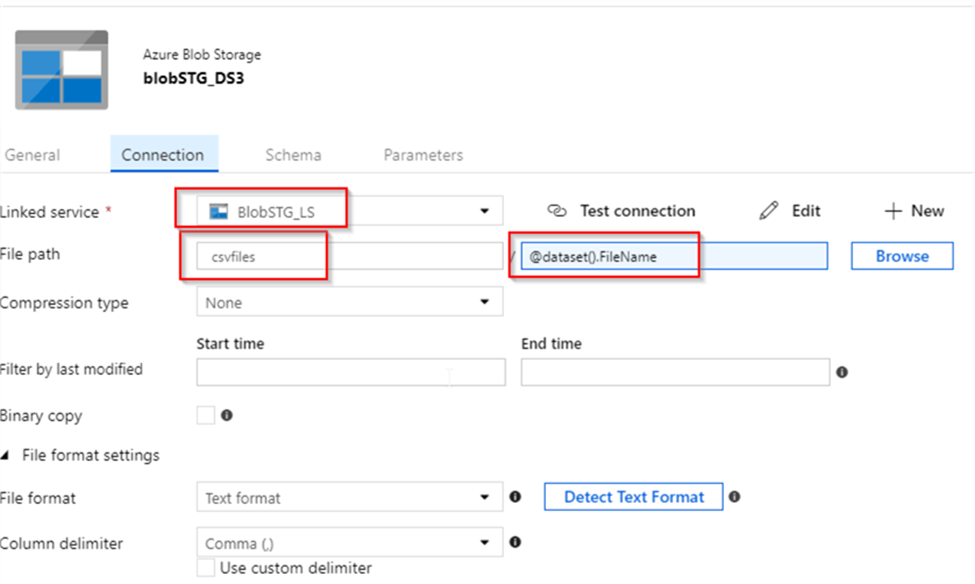
Next, let’s return to Get_File_Metadata_AC activity, select dataset BlobSTG_DS3 dataset we just created and enter an expression @item().name into its FileName parameter text box. This expression is going to pass the next file name value from ForEach activity’s item collection to the BlobSTG_DS3 dataset:
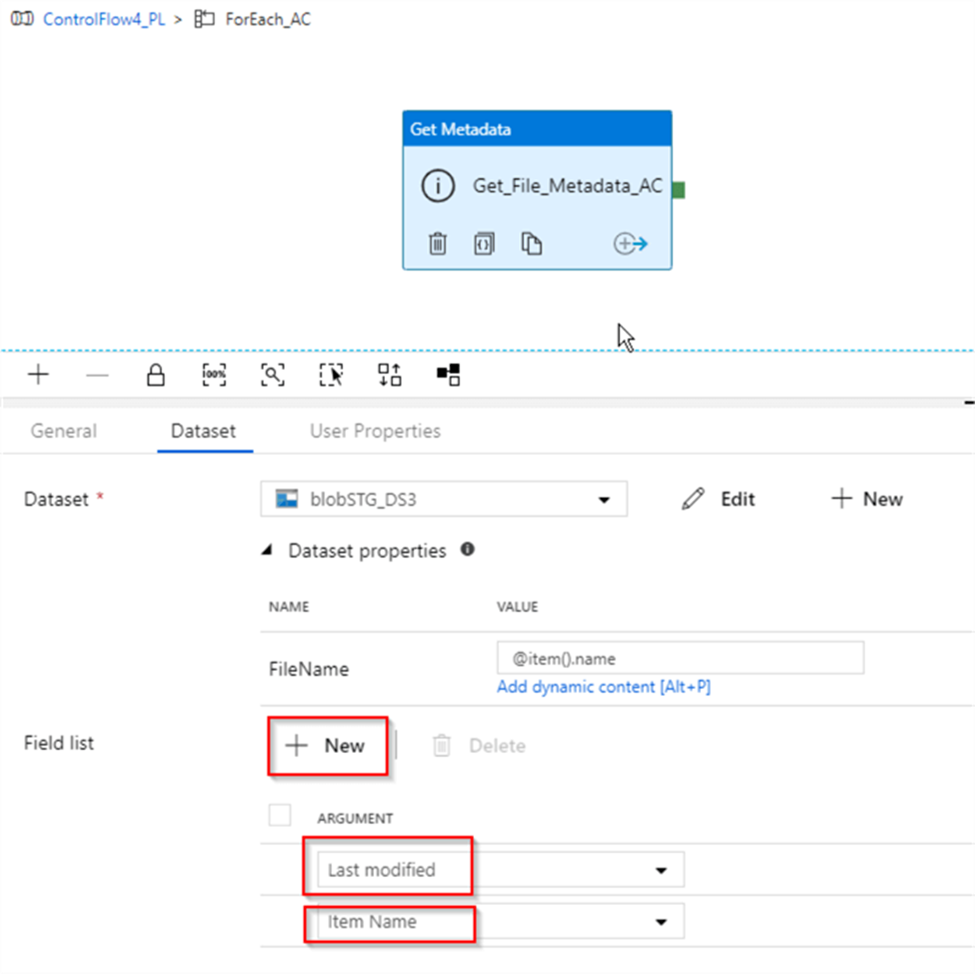
Next, let’s add the fields Last modified and Item Name fields, using the New button- these fields will be required for the subsequent activities:
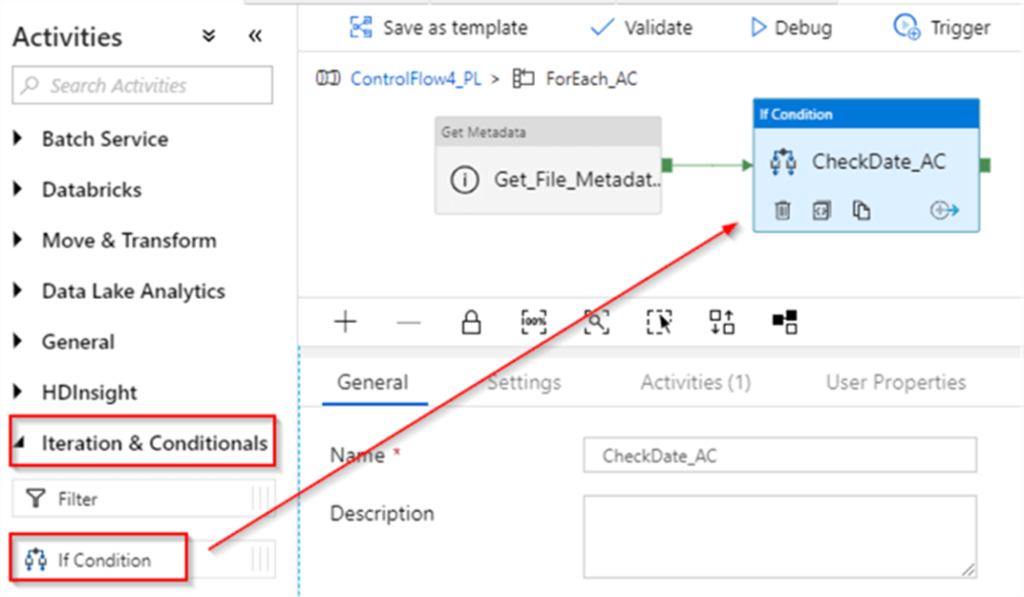
Next, let’s add If Condition activity (I’ve named it as CheckDate_AC) and link it to the Success end of the Get_File_Metadata_AC activity:
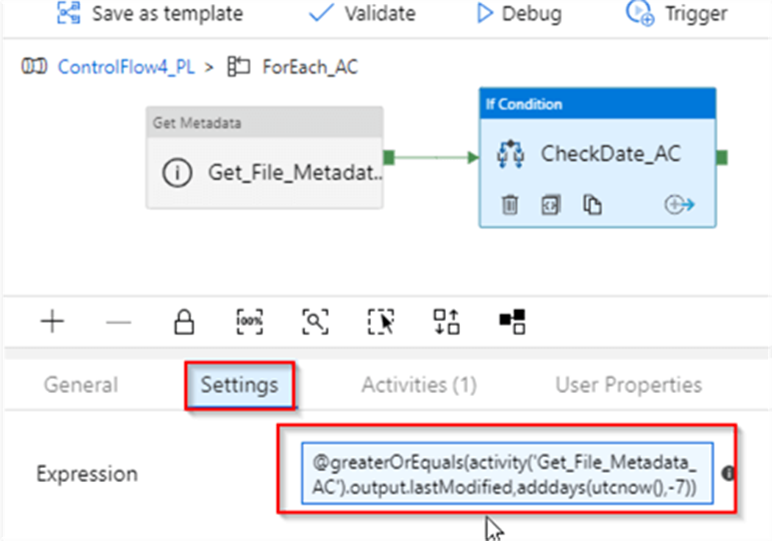
Let’s switch to the Settings tab and enter the following expression: @greaterOrEquals(activity(‘Get_File_Metadata_AC’).output.lastModified,adddays(utcnow(),-7)). This expression will check whether or not the Last modified field obtained from the previous activity falls within last 7 days period:
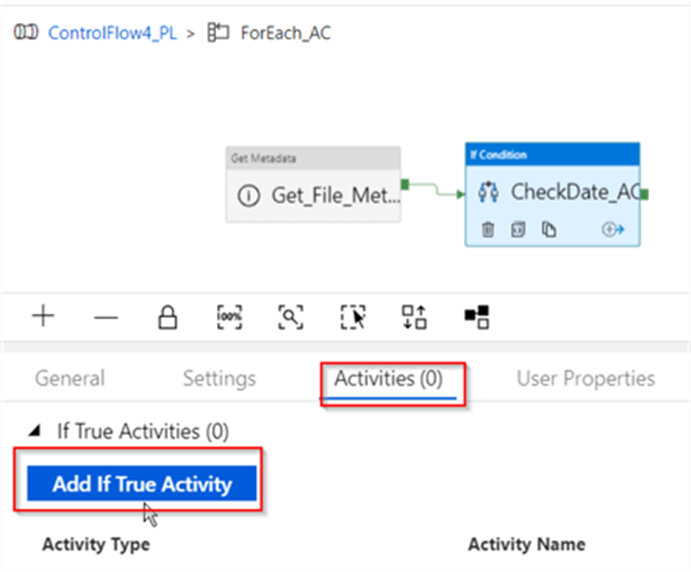
Next, switch to Activities tab and click Add If True Activity button, to start building tasks which will be executed when the condition evaluates to true:
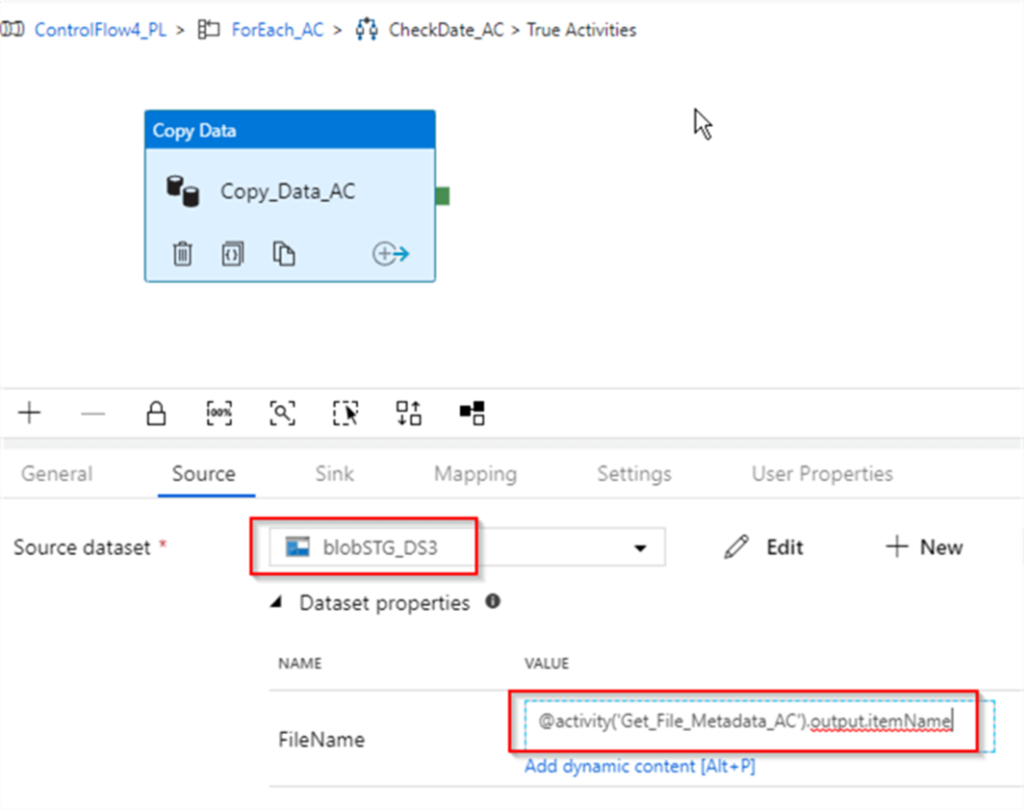
Within child activities window, add a Copy activity (I’ve named it as Copy_Data_AC), select BlobSTG_DS3 dataset as its source and assign an expression @activity(‘Get_File_Metadata_AC’).output.itemName to its FileName parameter. This expression will ensure that next file name, extracted by Get_File_Metadata_AC activity is passed as the input file name for copy activity. Here’s the screenshot:
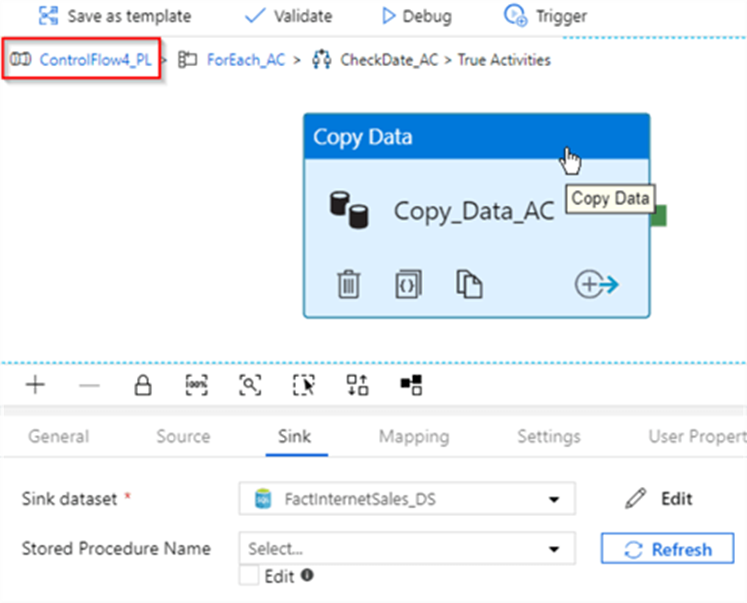
Next, switch to the Sink tab, select FactInternetSales_DS dataset we created earlier and enter following purge query for destination table – Delete from FactInternetSales. This will ensure that this activity doesn’t fail with duplicate key errors, in case the rows we’re transferring already exist in the destination table:

Finally, let’s click the navigation link at the top of the screen and return to the parent pipeline’s design screen:
Now that we have completed building data flow, we can test it. I will execute this pipeline twice to test the following scenarios:
- The first execution will be done with older files in the source container
- The second execution will be done with a newly modified file added to the source folder.
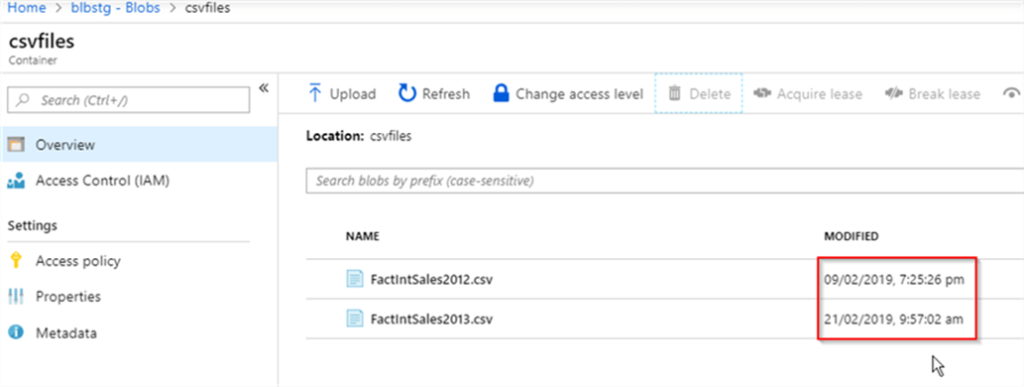
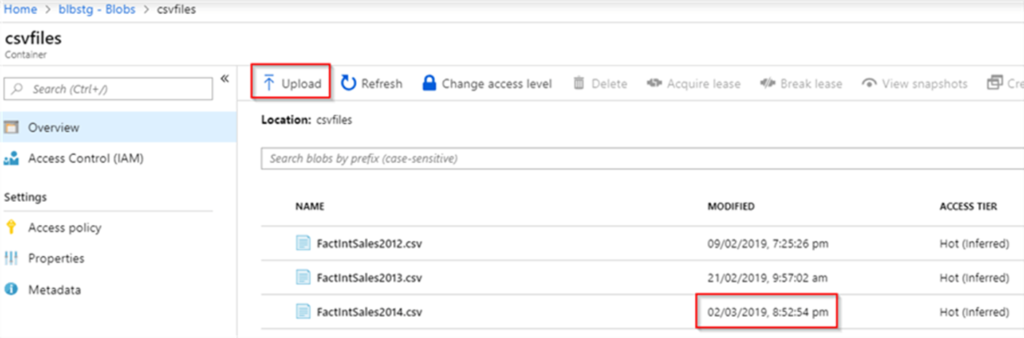
Let us open the blob storage page and ensure that all the files existing in its csvfiles container are dated more than 7 days from the execution date:
Let us start the pipeline in the debug mode and examine execution logs in the Output window:
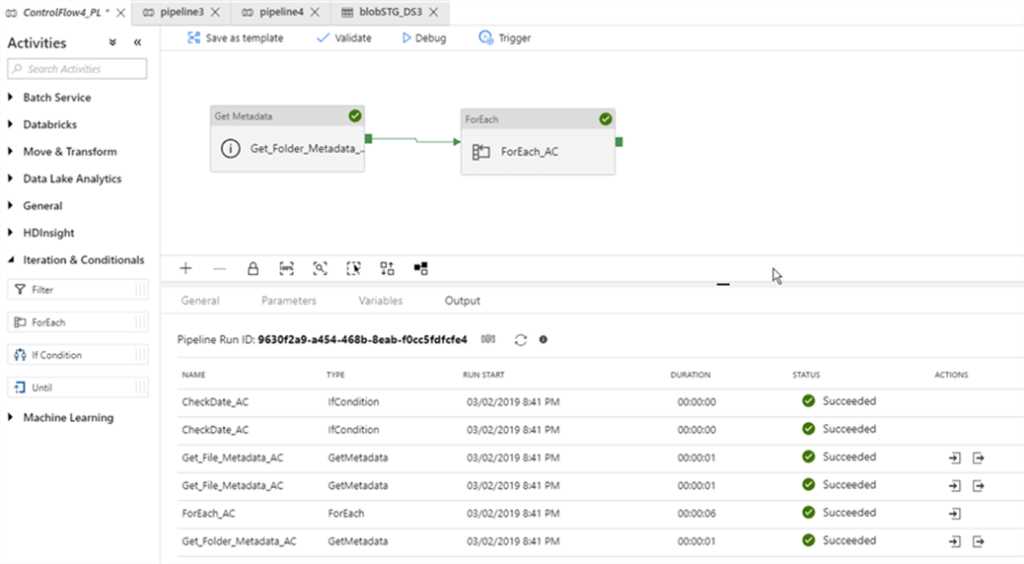
As you can see from the logs, all the activities, except the copy activity has executed successfully. The copy activity did not run, because the files in the source container are older than 7 days.
Next, I will upload a new file, using Upload button from Azure portal’s blob storage page:
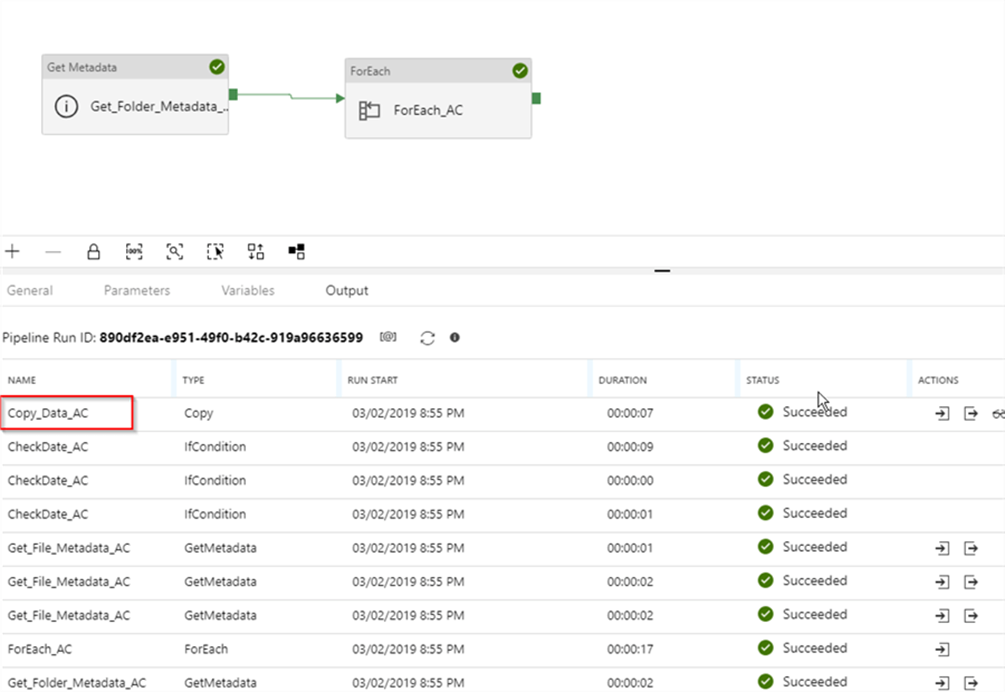
Let us execute the pipeline in a debug mode again and examine execution logs. As you can see from the logs, this execution included the copy activity as well, which is what we expected:
As usual, we will need to publish the changes, to ensure that they are permanent.
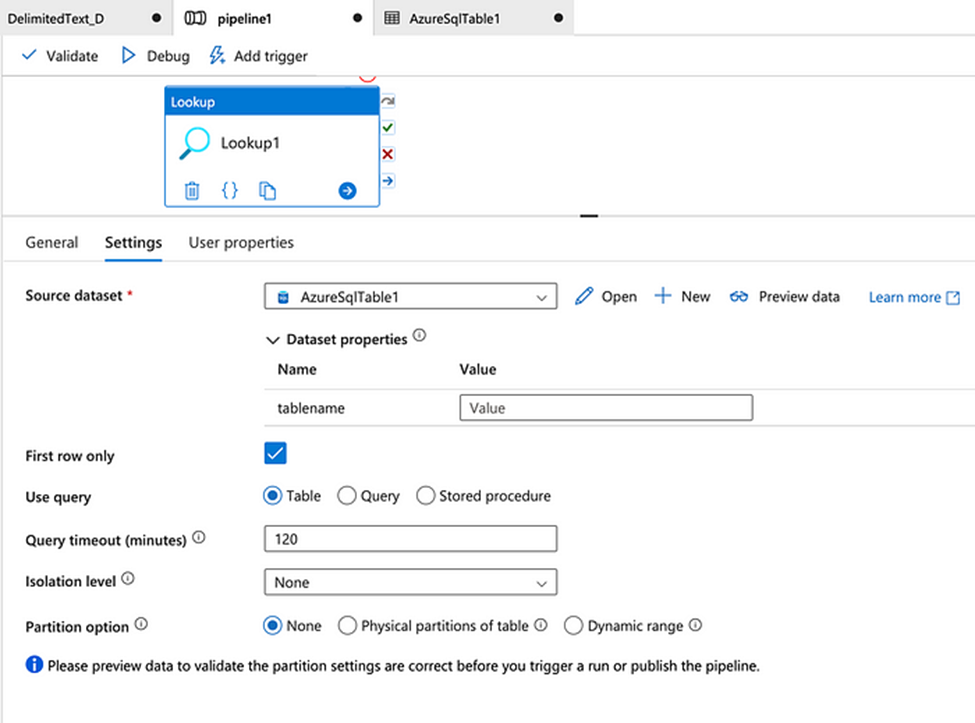
12. If you want to use the output by executing a query which activity shall you use?
- Lookup activity helps in retrieving lookup datasets from any Azure data factory-supported resources.
- From the database, we can get dataset using Table, Query, and Stored Procedure.
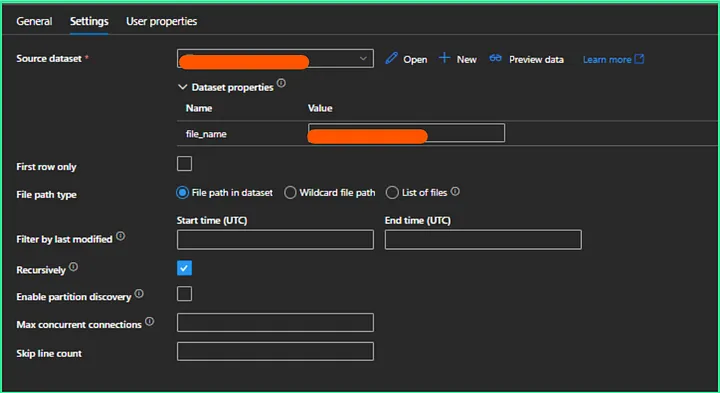
In the case of files stored in Azure storage:
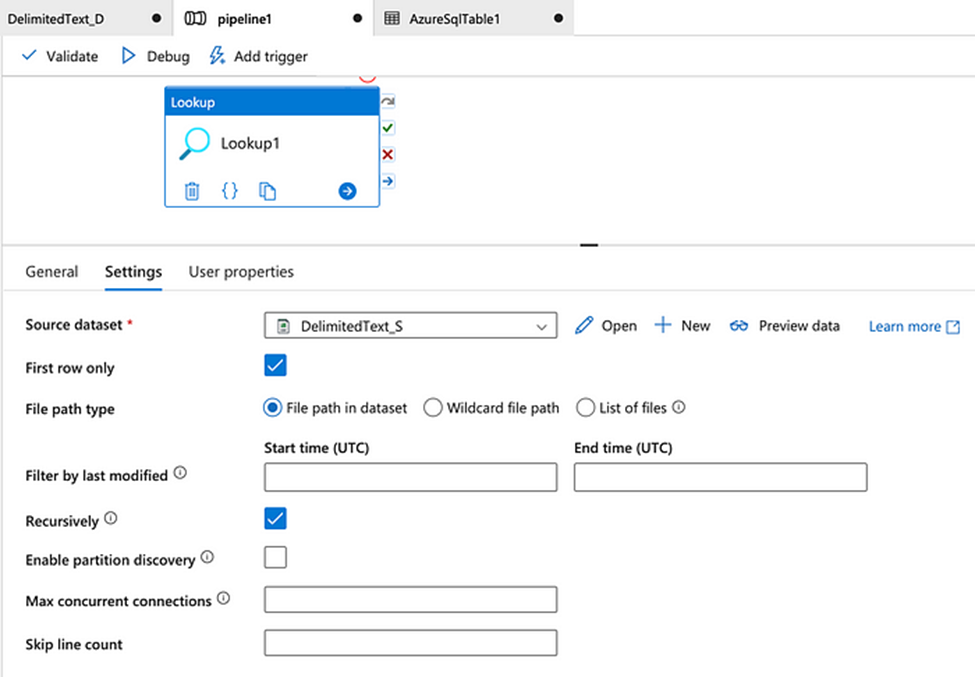
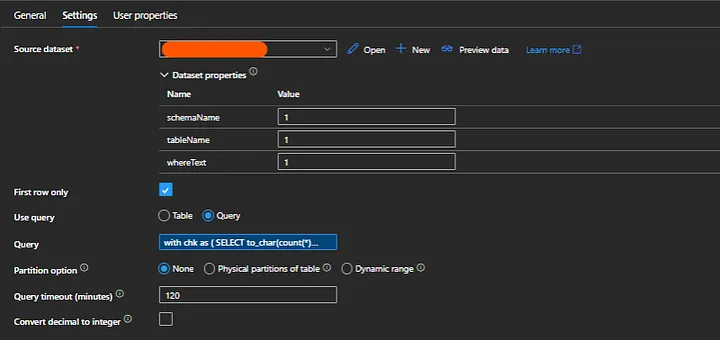
In the case of data stored in the database:
13. How you can verify the presence of a file in storage?
Validation activity can be used to check the existence of a file.
Step-1:
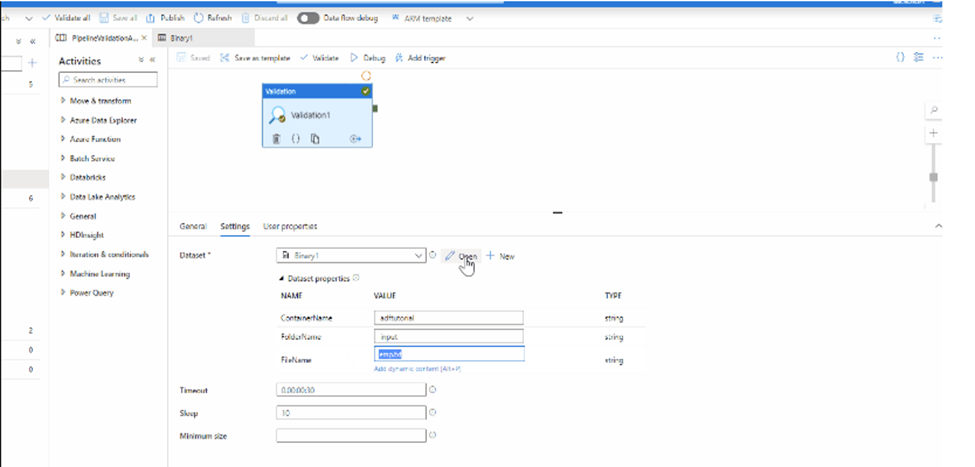
Step – 2:
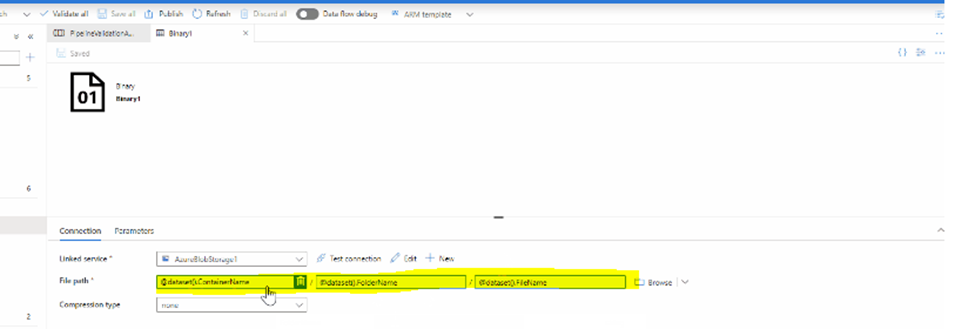
Step – 3:

You please make sure that you are passing the correct filename to @dataset().FileName parameter. Passing incorrect filename may be causing your validation activity to wait till timeout happens.
14. Have you used Execute Notebook Activity? How you pass parameters to your notebooks in execute notebook activity?
Using Base Parameter property we can pass parameters to notebook, incase parameters are not satisfied in activity, default values from the notebook will be executed.
15. How do you handle incremental Data in Data factory?
There are couple of ways to handle incremental data:
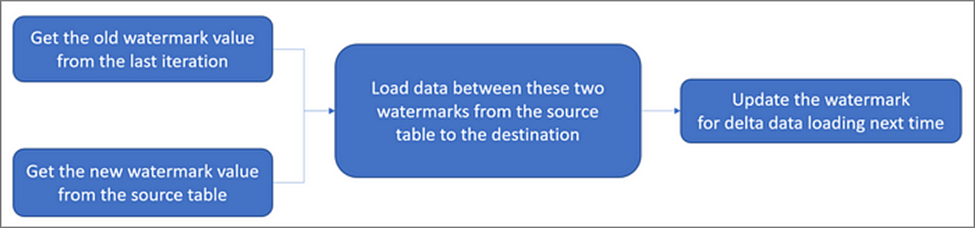
Delta data loading from database by using a watermark:
- Define a watermark in your source database. A watermark is a column that has the last updated time stamp or an incrementing key.
- The delta loading solution loads the changed data between an old watermark and a new watermark.
The workflow for this approach is depicted in the following diagram:
Example –
https://learn.microsoft.com/en-us/azure/data-factory/solution-template-delta-copy-with-control-table
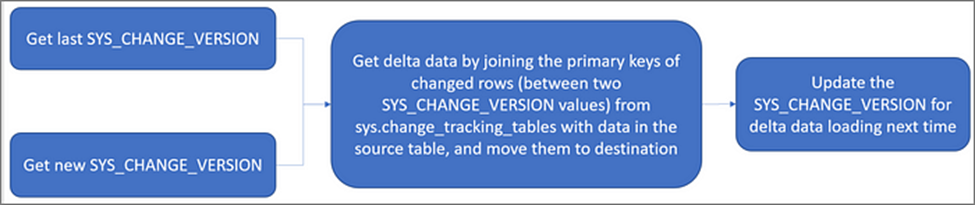
Delta data loading from SQL DB by using the Change Tracking technology:
Change Tracking: A lightweight solution in SQL Server and Azure SQL Database, providing an efficient change tracking mechanism for applications.
It enables an application to easily identify data that was inserted, updated, or deleted.
The workflow for this approach is depicted in the following diagram:
Example –
Loading new and changed files only by using LastModifiedDate:
One can copy new and changed files only by using LastModifiedDate to the destination store.
- ADF will scan all the files from the source store,
- Apply the file filter by their LastModifiedDate,
- Only copy the new and updated file since last time to the destination store.
Please be aware that if you let ADF scan huge amounts of files but you only copy a few files to the destination, this will still take a long time because of the file scanning process.
Example –
Using qlik replicate Tool:
Qlik Replicate empowers organizations to accelerate data replication, ingestion and streaming across a wide variety of heterogeneous databases, data warehouses, and big data platforms.
To know more just explore this tool.
16. How you send email notifications on your pipeline failure?
There are couple of ways to email notification:
- Using Logic Apps with Web/Web hook activity
- Alert and Metrics
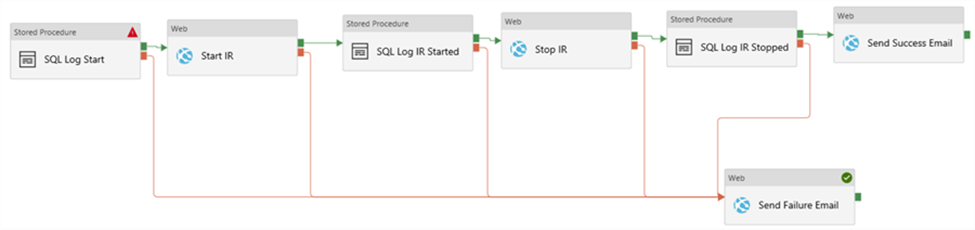
Triggering the Logic App from ADF:
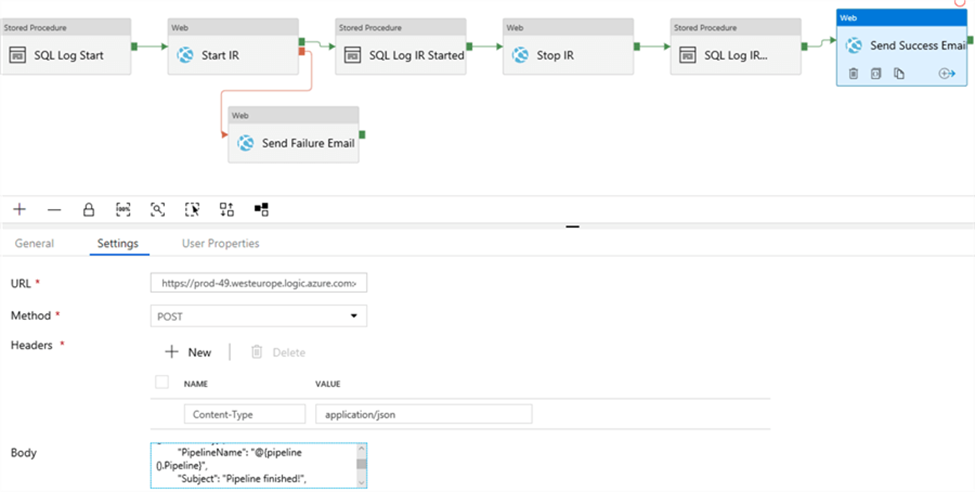
Suppose you have already created a pipeline with some activities in ADF.

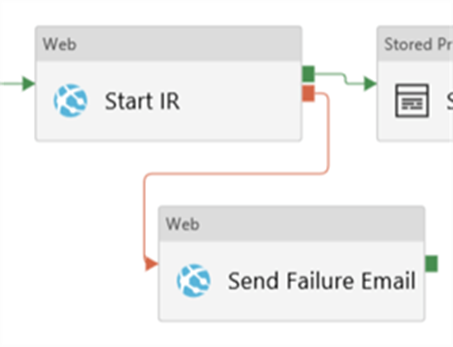
Now we want to send an email if an error occurs within an activity. Add a web activity to the canvas and connect another activity to this new activity using the arrow. When the connection has been made, right-click on the connection to change it to a Failure precedence constraint.

This will change the color of the connector to red.
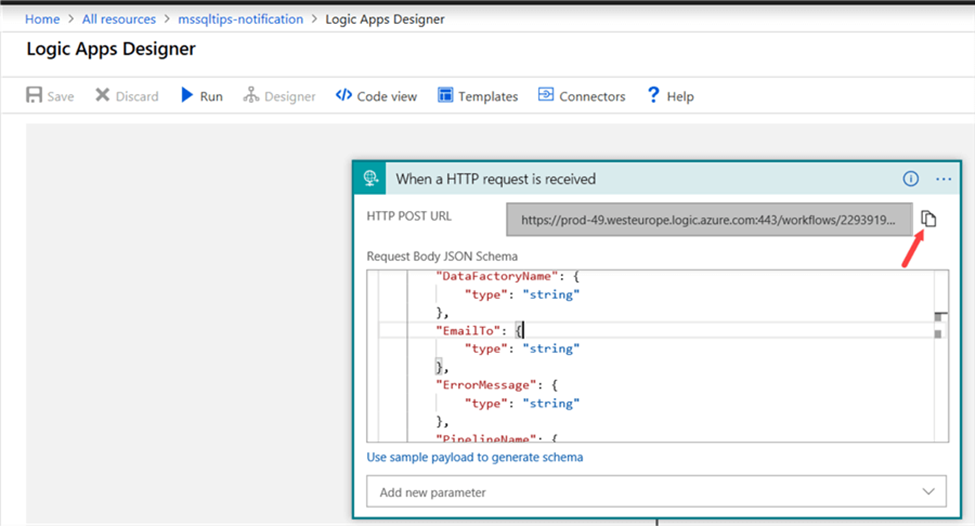
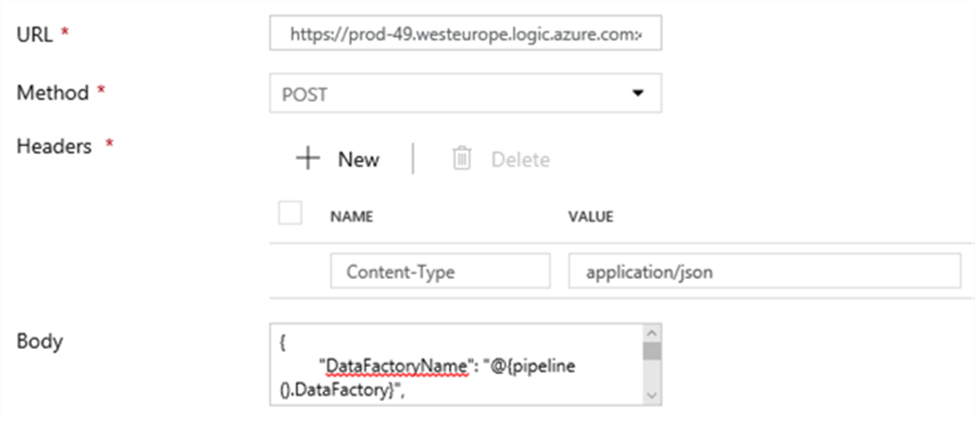
Now we need to go the Azure Logic App and copy the HTTP POST URL:
Paste this URL into the URL field in the settings pane of the Web activity. The method needs to be set to POST.
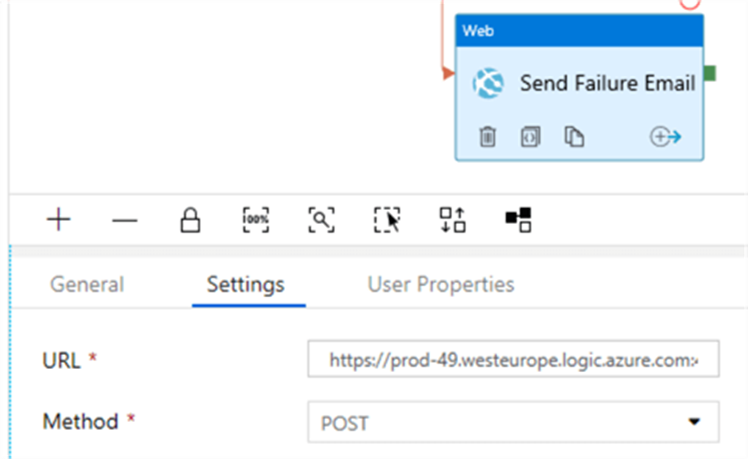
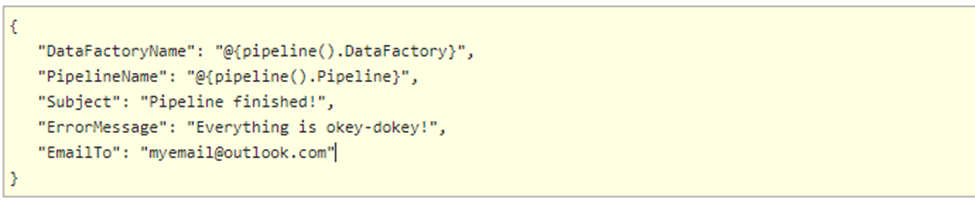
We also need to add a header, where we will set the Content-Type to application/json. In the body, we enter the following JSON (following the structure mentioned before):

We’re using system parameters to retrieve the name of the data factory and the name of the pipeline. All the other fields in the settings pane can be left as-is.
At the end of the pipeline, we can add a similar Web activity to send an email notifying users that the pipeline has finished successfully. This time we use the following body:
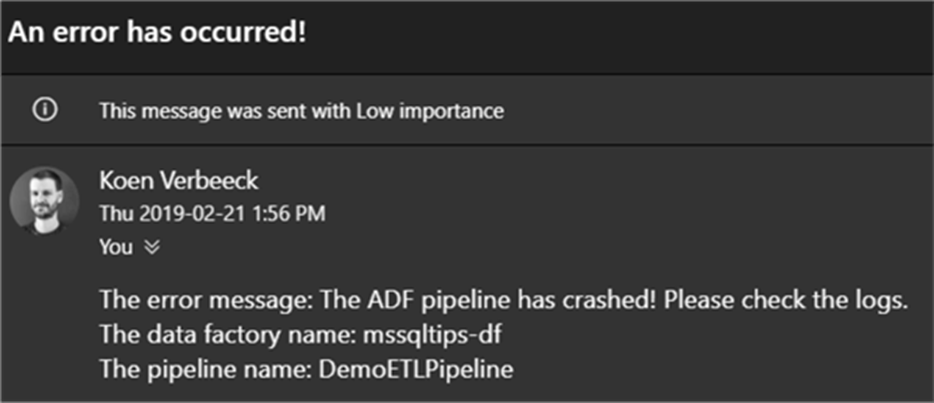
Now we can run the pipeline and wait to see if any emails come in:
Configuring Multiple Notifications
Suppose we have more than one single activity for which we want to send a notification if something goes wrong. The following won’t work in ADF:
Alert and Metrics:
Azure Data Factory pipeline run history can be accessed in the Studio of the respective Factory. The runs, inputs, outputs, and failure details will be available for each run.
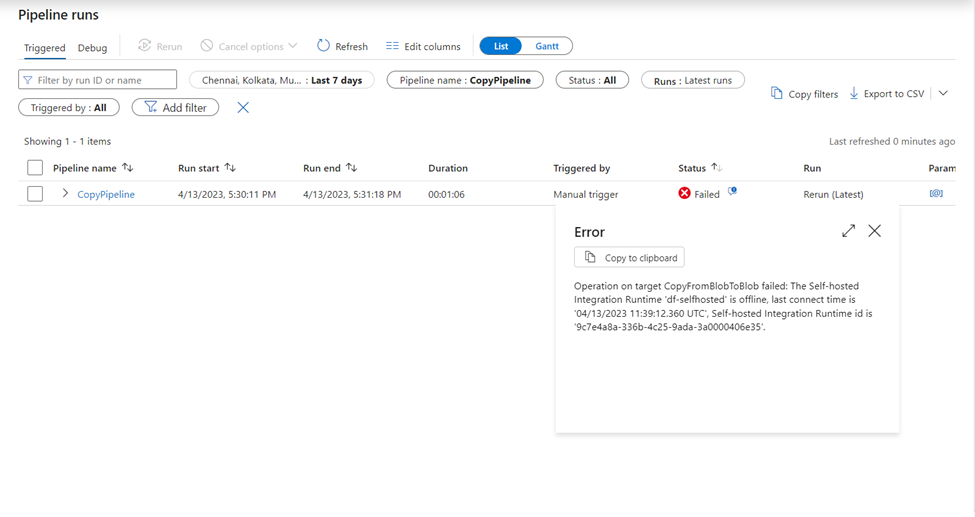
Failed runs in a Data Factory Pipeline can be monitored by navigating to Monitor -> Alerts & metrics. You will need to identify the monitoring criteria to define the alert logic and evaluation period.
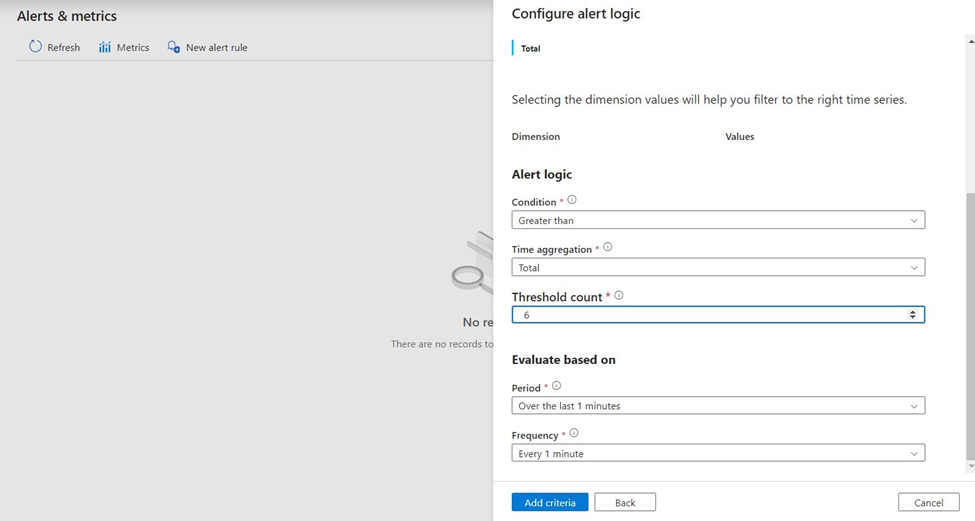
You can set up notification channels to get alerts and stay informed on violations. Azure Action groups enable you to group several notification channels and instantly notify failure alerts to multiple channels.
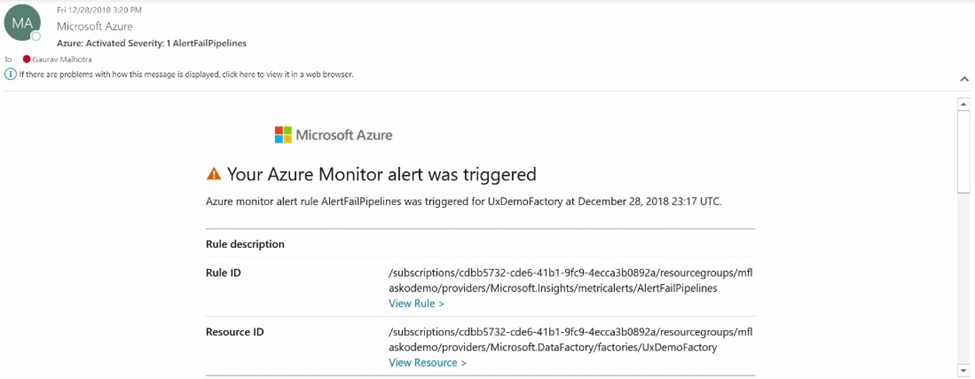
The image shown below displays a sample alert triggered using the alert rule configured in the Data Factory:
17. Describe the use of ADF in your project?
There are couple of things you can mention to your interviewer>
- How you copy data from source
- How you do data transformation (either using ADF or you call the Databrics notebook)
- If you mentioned ADF, just let them know are the different activity you have used for the same.
- How you store the final data.
- What you have done for performance improvement (Refer to Question -08)
Note – Remember several data transformation and cleaning ADF is not suitable that much, instead of that in organization people prefer those transformation work on Databrics Notebook.
So in short, Describe how many data source you have like csv, sql and other, how amny pipeline you have used in that project, what are the different transforma activity you have used in the same.
18. How do you test your pipeline when you have created code in feature branch?
Use Debug Mode – Whenever you are using any feature branch you have to use debug option.
Monitor Section –> Pipeline Runs –> Debug
19. Have you used Get metadata Activity? Can you give one use case for ‘child items’ property in get metadata activity?
Get the list of the files or folders from a specific location in Azure blob storage:
- Go to the data factory and create one pipeline.
- Create a linked service which will point to the Azure blob storage location.
- Create a dataset for Azure blob storage using the linked service created in above steps.
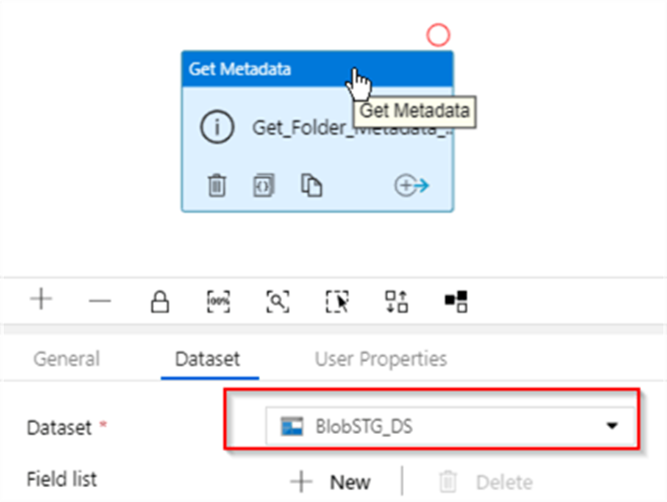
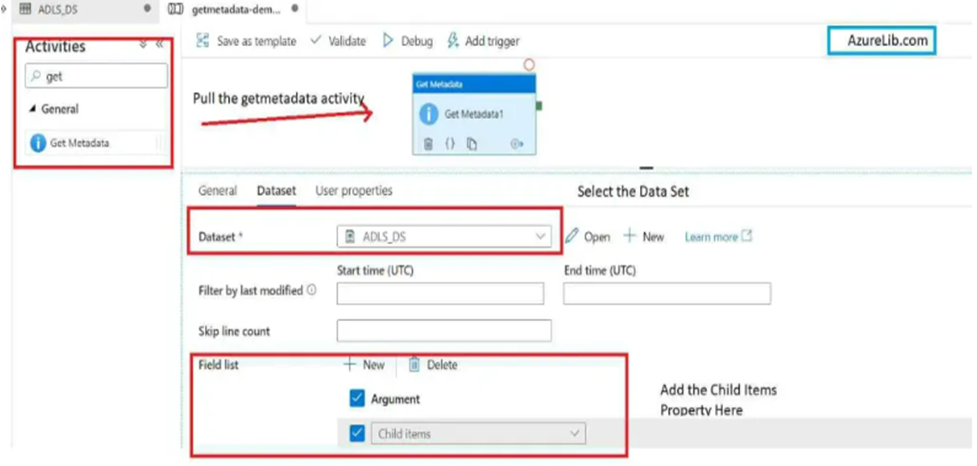
- Select Getmetadata activity and go to the dataset tab. Under the dataset tab you will see the field dataset there select the dataset which we have created in above step to connect to the Azure blob storage.
- Scroll down and there you will see the attribute field list. In front of it you will see a plus sign click on it. Drop down box will appear, in this drop down box you will see multiple properties. Here for now just select the child items as we wanted to select all the list of file names and folder names available inside the folder location. Hence just select the child items. This will return the list of all the folders and files available inside our pointed location along with their type.
- Our pipeline is now ready to run. Just go to the debug tab and click on the debug. This will execute the pipeline. It will take a few seconds based on the size of your folder and after that at the bottom pane you will see that your activity has been completed successfully.
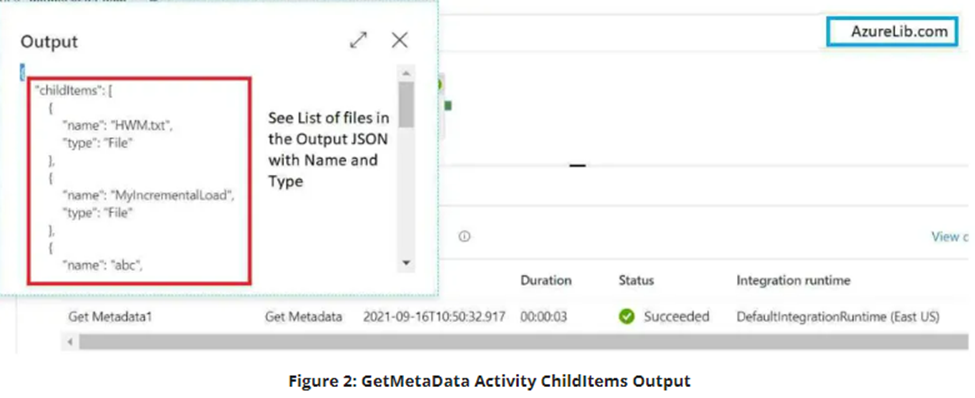
Click on the output of the getmetadata activity. There you will see the output JSON with the property child items and in this child items you will see an array of file and folder names along with their type. For files you will see the type is file and for the folder you will see the type as folder.
Iterate over list of files available inside folder in Azure storage location:
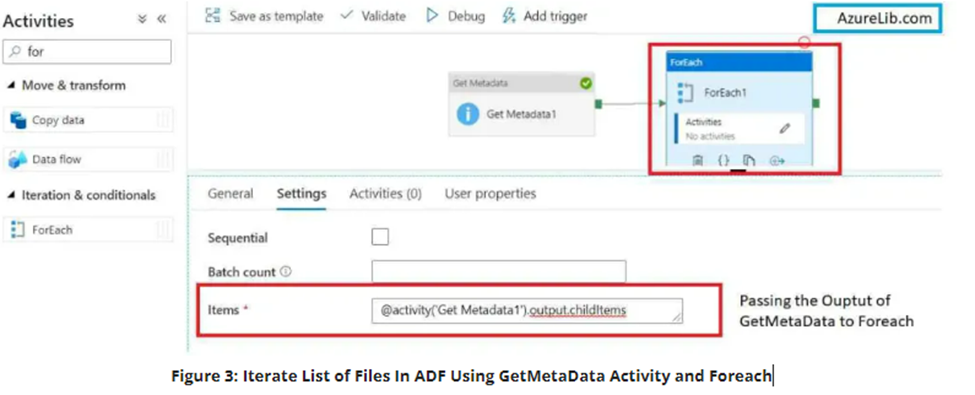
- For iterating over the file names you have to use the foreach activity. So let’s connect the output of getmetadata activity to the input of foreach activity. There you can iterate over the getmetadata output which contains array of files names.
- Under the foreach activity setting tab you will see items field. In the items field provide the output of the getmetadata activity. This will be the array of filenames over which you want to iterate.
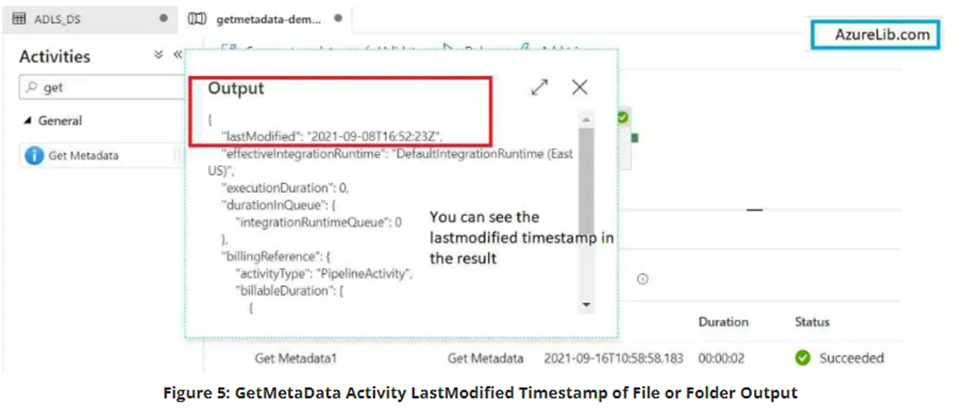
Let’s see how you can get the last modified date of a file using getmetadata activity with an example.
- Under the dataset tab you will see another property with name field list. In front of this property you will see a plus sign click on thispPlus sign and add the property.
- Select the last modified date property from the dropdown.
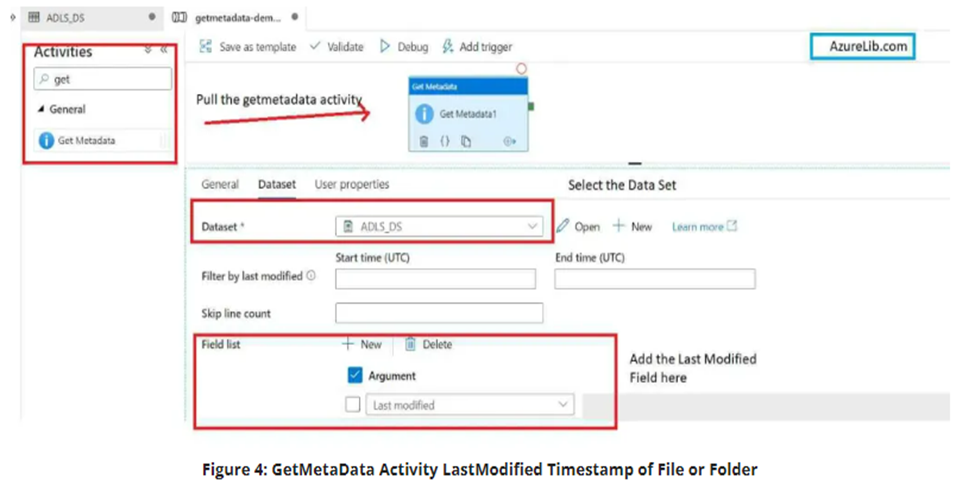
- As in this case we want to get the last modified date of a file or folder that’s why we have selected the property last modified date which will pull out the last updated timestamp for a file or a folder.
- Our pipeline is almost ready to run. Just go to the debug tab and click on the debug. It will execute the pipeline for our demo purpose, we have just added one activity. This will show get-metadata activity output under the output tab.
Go to the output tab and open the output for getmetadata activity. You will see the JSON and here you can see that the last modified date property is giving you the last modified timestamp for your files or folder which you have selected in the dataset.
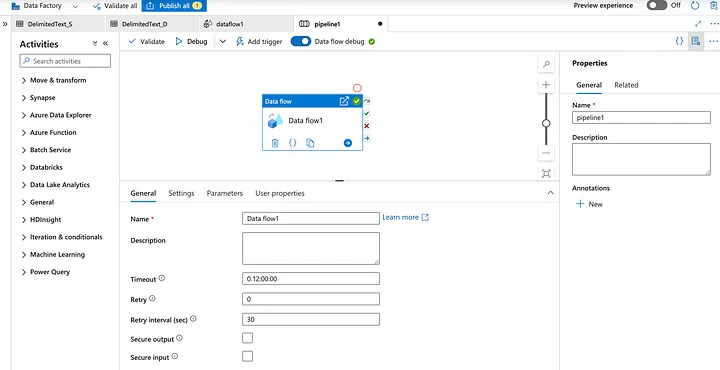
20. What are mapping and Wrangling data flow in Data Factory?
Mapping Data Flow –
- Mapping data flows are visually designed data transformations in Azure Data Factory.
- When there is a situation like you need to perform transformations using two or more datasets then you use a Mapping data flow.
- You can perform several transformations such as Filter, JOIN, Aggregate, Union, Lookup, Sort, etc using mapping data flows.
- Mapping data flows can be executed within ADF pipelines using data flow activities.
- Azure Data Factory handles the code transformation and execution of Mapping Data Flow behind the scenes.
- Mapping Data Flows activity can be created individually or within an Azure Data Factory pipeline.
Steps to create a Mapping Data Flow:
- Open the Azure Data Factory using the Azure portal, then click on Author & Monitor
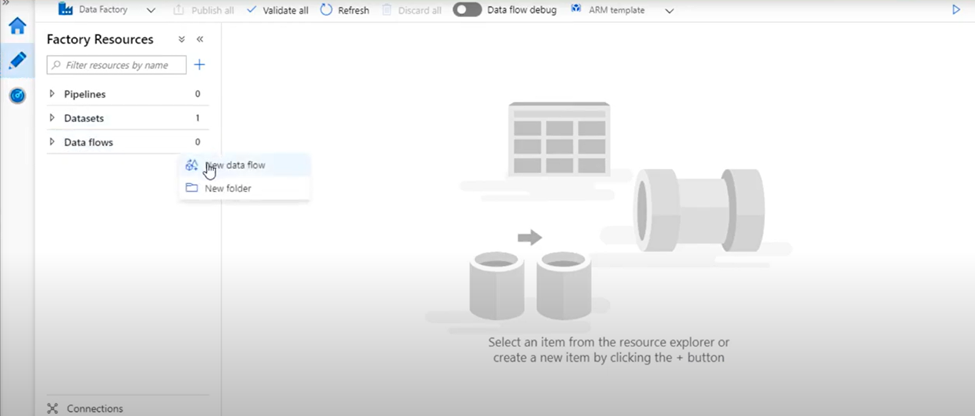
Click on the Author button then click on Data flows option. By clicking on three dots select New data flow option.
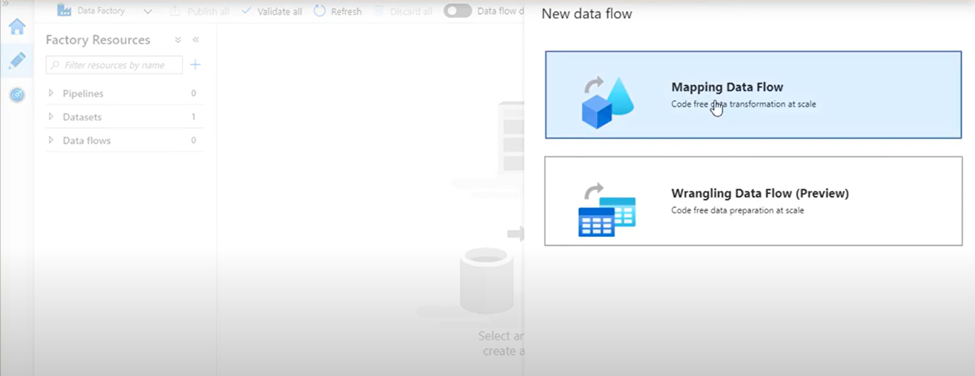
2. Select Mapping Data Flow. Click
Steps to build transformation logic in the data flow canvas:
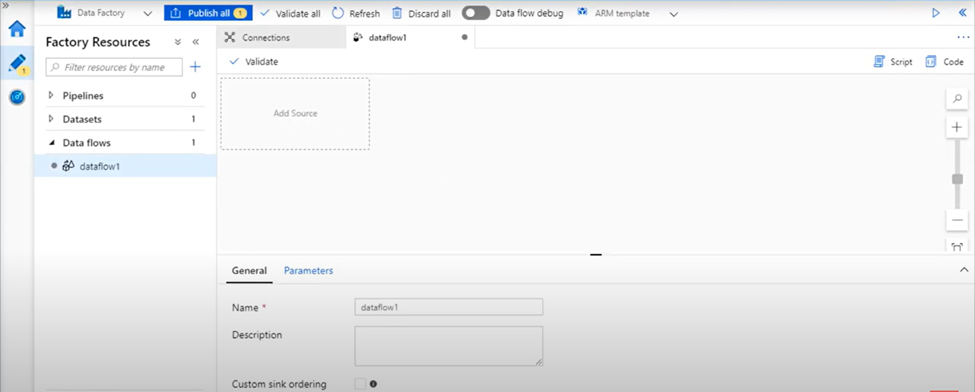
Once you create your Data Flow, you’ll be automatically sent to the data flow canvas.
Note: The assumption is that you are already aware of the basic building blocks of a data factory- like creating linked services, Pipelines, etc.
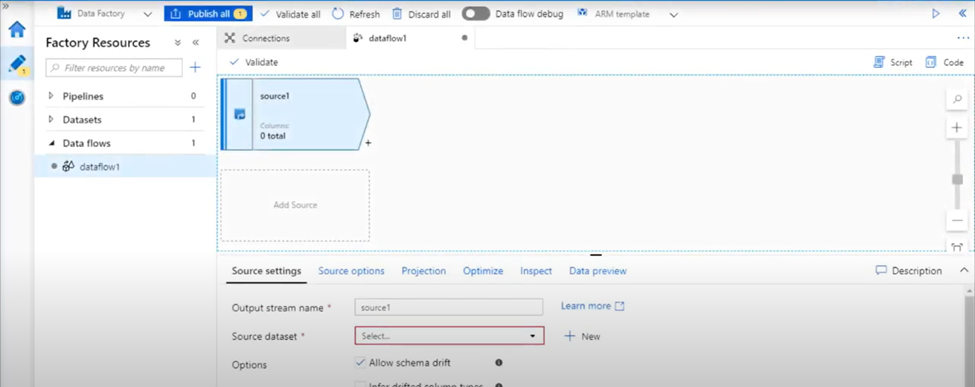
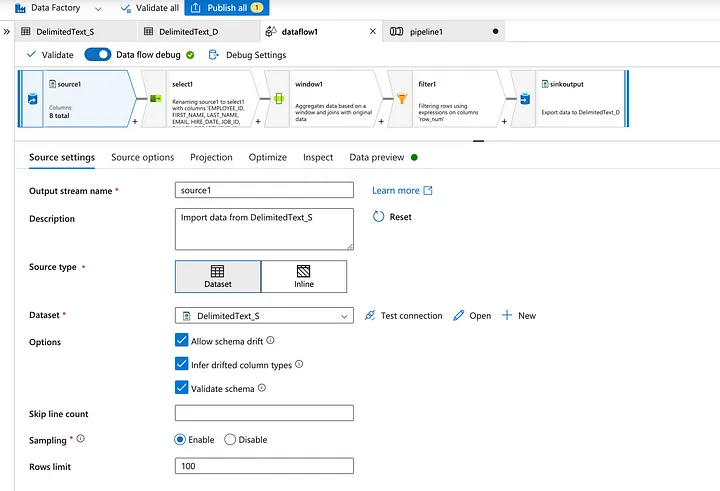
- In the data flow canvas, add a source by clicking on the Add Source
2. Name your source. Click on New to create a new source dataset.
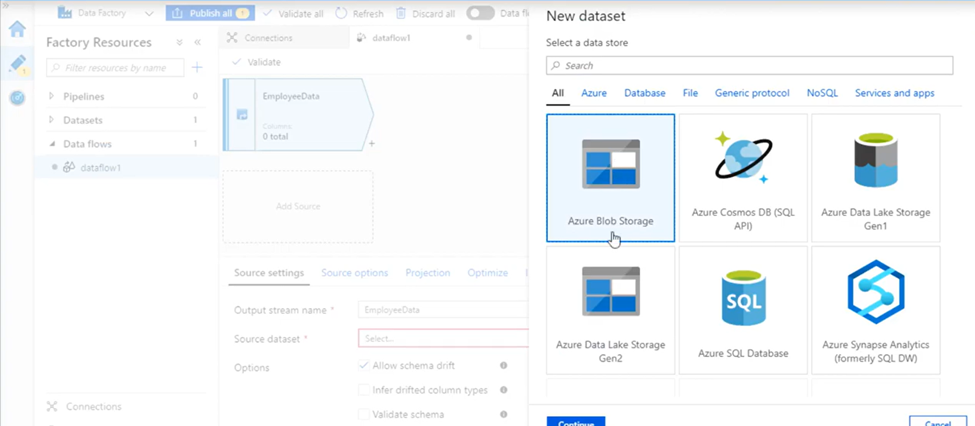
3. Choose Azure Blob Storage. Click
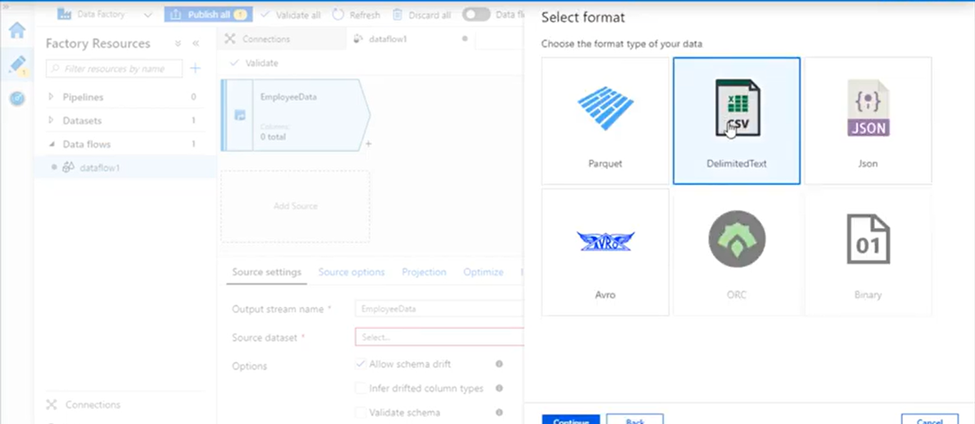
4. Choose DelimitedText. Click Continue.
5. Name your dataset. Let’s say empDataDataset. In the linked service dropdown choose Linked service if you have created before or you can click +New button to create new linked service.
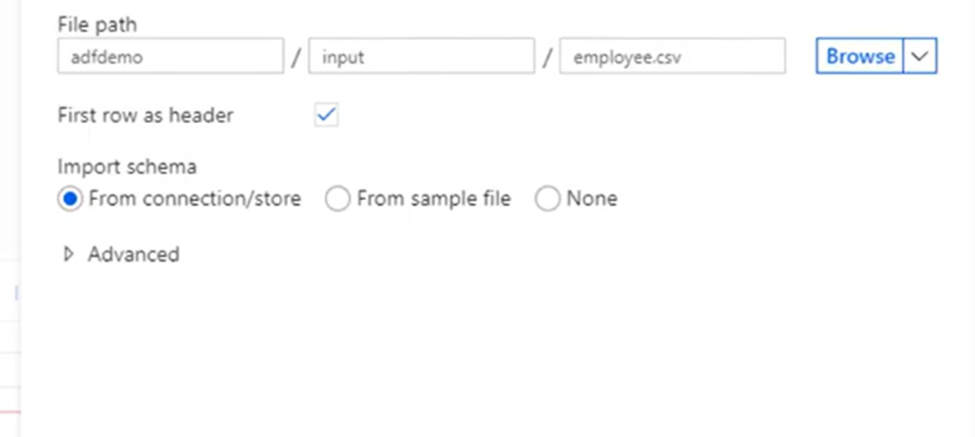
6. Once you’re back at the dataset creation window choose your File path. As the CSV file has headers, check First row as header. Select From connection/store to import the header schema directly from the file in storage. Click OK when done.
7. To add a transformation, click on the + icon on the data source which is next to your source node on the data flow canvas as specified in the screenshot below.

Transformation settings
The first tab in each transformation’s configuration pane contains the settings specific to that transformation. For more information, see that transformation’s documentation page.
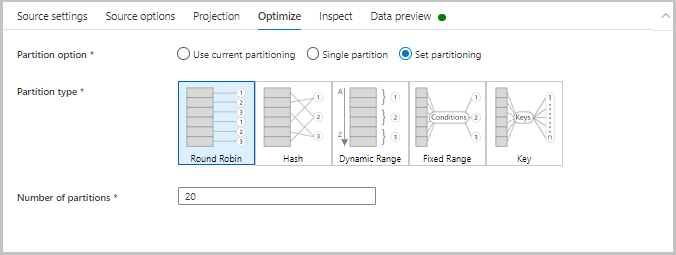
Optimize
The Optimize tab contains settings to configure partitioning schemes.
21. Consider you have load data from 100 tables into another target, how would you design pipeline for the same?
So inorder to achive that, from system information schema get a list of tables and use foreach loop to copy the data from each table to target.
Now here is the important steps you need to keep in mind inorder to achive this process.
Understanding your data source.
i. Check the source data tables that have been asked to be copied.
ii. Determine the number of rows and columns (yes, columns matter) in each table to assess their size.
iii. Understand how the source tables change, their delta load logic.
iv. Know regular loading times for these source tables.
In this example, let source database = Oracle DB 1.
i. In this source, a daily truncate insert operation is performed on 47 tables. 42 of these tables have a size that is under 40 MB, making them relatively tiny. In contrast, 5 tables totaling more than 100 MB in size are considerably bigger.
ii. Each day, 8 large tables are loaded incrementally from the source.
iii. They all get updated somewhere between 1:50 to 2:20 AM.
Deciding how many pipelines to create.
When developing new pipelines, it is crucial to prioritize their long-term sustainability, especially when considering the possibility of having a large number of pipelines in production, potentially reaching thousands.
To maintain this, we will design pipelines such that each pipeline serves a single purpose. This does not imply that you should build a new pipeline for each table (avoid this) since there may be hundreds of them and you would not be able to maintain it. So what is a single purpose for a pipeline?
In this example, I will create 3 pipelines.
i. A pipeline that loads the 42 small daily full load tables.
ii. A pipeline that loads the 5 large daily full load tables.
iii. A pipeline that loads the 8 large incremental load tables.
Based on the size of the tables and the logic employed to edit them, this isolation is carried out.
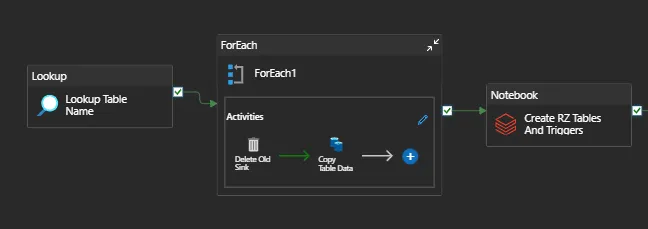
How to create a good lookup source file.
The lookup activity that reads a lookup file from your storage explorer to obtain the list of tables it needs to load is the first task for each pipeline. Make your lookup files as detailed as necessary because they are what dynamically drives the remainder of your actions.
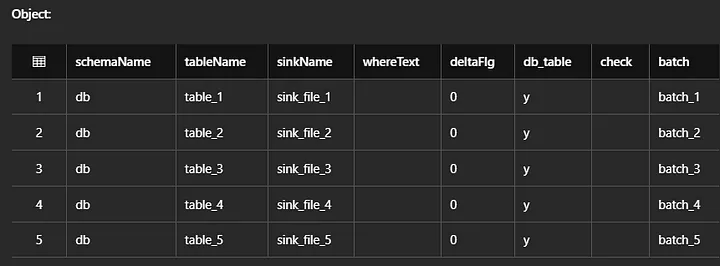
At least for me, the following fields must be filled out in the file.
i. source table name : the source table name that you are copying
ii. sink file name — the sink filename to be stored in your landing zone.
iii. delta load condition : The sql where condition to copy only modified data from source. For truncate and load tables, it could be where 1=1 or just blank. For delta tables, it could be anything, example where updated_at >= current_date() -1
iv. source job name : the source job name in charge of bringing up the source table.
v. target table name : Name of the target table in databricks
Three lookup files, one for each pipeline will be made in this pipeline. Here is an example of the lookup file created for 5 large full laod tables
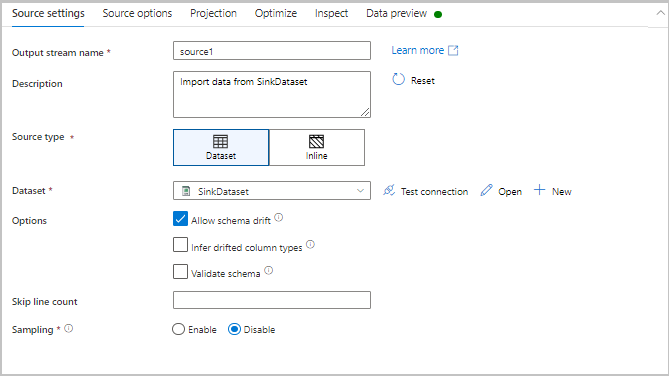
Creating good data sets.
Like pipelines, you need to create datasets that are sustainable too.
In this example, we will create 3 datasets. Assume the linked services are already created.
i. One to read lookup files in storage account.
ii. One to define landing zone sink for copy activity.
iii. One to define source database for copy activity.
Do not create a unique dataset for each lookup file. It is better to have all of your lookup files in one folder inside a container and create a dataset where you can pass the filename dynamically from a pipeline. I am keeping all of my lookup files in a directory /meta/
Example, creating dataset:
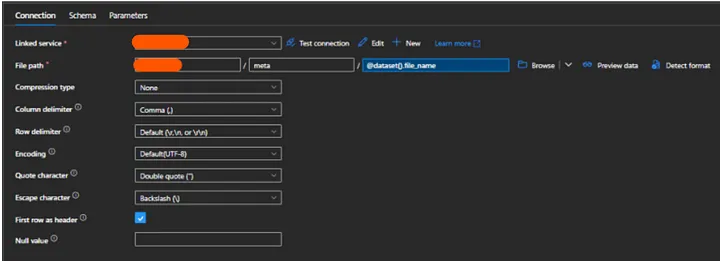
Example, using dataset in pipeline:
How to set dependency the right way.
It becomes a challenge to set dependency in a pipeline that loads multiple tables at once because we cannot use event based triggers. So, how can you ensure that the data you are copying has been updated using time based triggers? Let me explain using this example:
As you can see from the preceding text, the source tables are changed between 1:50 and 2:20 AM. For 2:00 AM, I’ll construct a time-based trigger.
The data source owners will build a batch status table in which they will log a status each day after each table is updated. In our scenario, a vendor completes this.
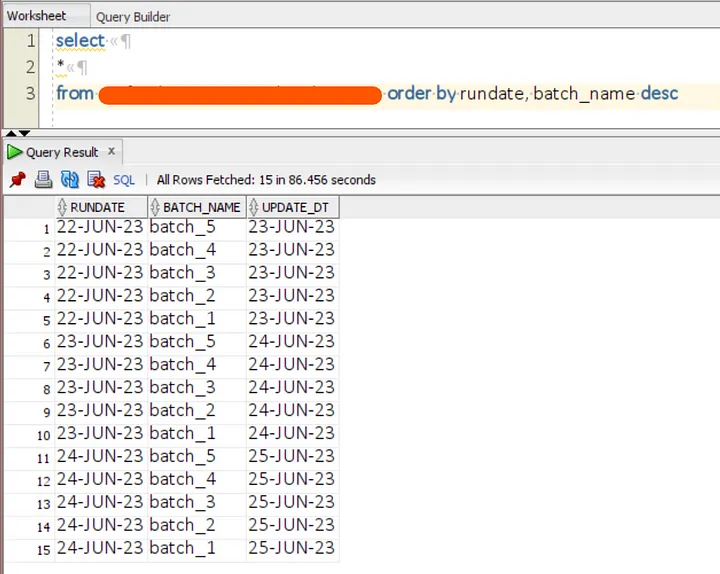
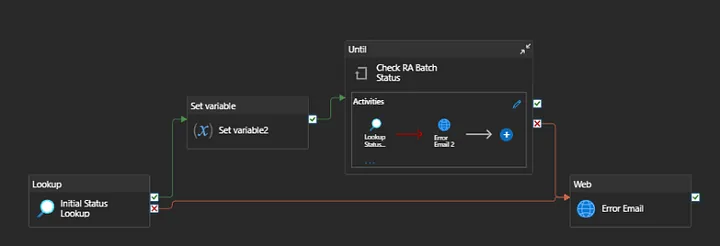
I’ll construct a dynamic pipeline that determines whether a table status has been updated for today in this configuration table and waits until it hasn’t been changed.
By entering the tablename and batch name from my lookup activity for today, I will use this pipeline inside my foreach loop activity to determine if the source table has already been refreshed and wait if it has not.
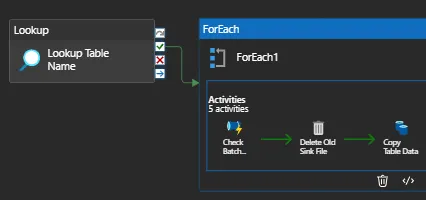
Batch Check pipeline:
Usage :
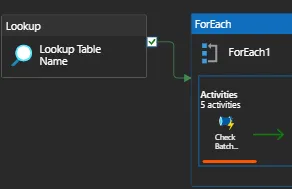
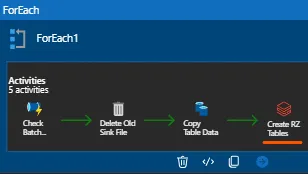
[Optimization] Copying data the right way.
Although copying data is one of the easiest tasks in ADF, a lot can go wrong in this situation. Make sure that you are efficiently querying the source table and that you are just copying the necessary data.
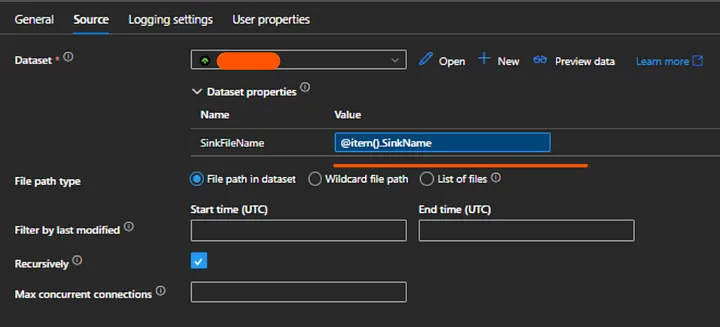
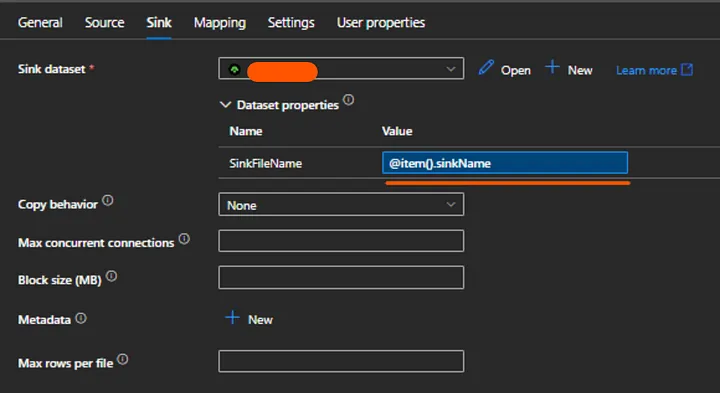
After the batch check pipeline in this example, I’ll add a delete activity and a copy activity inside the foreach activity. If the sink file already exists, the delete activity will remove it, and the copy activity will copy the source file when I pass a dynamic delta load condition from my lookup file.
Two things to keep in mind:
Here, I’m turning off the for loop’s sequential options. This will guarantee that the copying processes take place concurrently. Avoid checking this. Consider that it takes 30 minutes for each of your five tables to be replicated to the landing zone. The total running time, if done sequentially, is 5 * 30 minutes.

Do not maintain old sink files, rather overwrite them. You don’t want to be logging into your storage account after a year and see 365*55 old sink files that have no use.
[Optimization] Working with Databricks notebook activity.
I used to believe that I would add a databricks notebook step within the for loop when a copy activity was complete to read the files from the landing zone and load my databricks table. My pipeline would be completed rapidly because these tasks would likewise be carried out concurrently.
NOTE – However this was not the case. Doing this could end badly for you and make your pipeline run longer. so You have to do this in optimise manner.
For small tables I will create a notebook that reads the lookup files and creates a dataframe, then iterates through the rows in the dataframe and loads each table from landing zone to databricks table. (this does not take as long as copy activity).
Let’s say you ran 40 notebooks in parallel, and each time only 4 notebooks would be able to make a successful request. Your retry interval is set to 3 minutes, So this would add N retries * 3 minutes to your pipeline runtime.
Can you do the same for large tables? Probably not. Because iterating through a dataframe and loading them one by one can take very long, so a single notebook will run longer. In this case, you might be better off running notebook calls in parallel inside the foreach activity. What you can do is batch large tables in different pipelines and then run a single notebook to load the tables in this batch at once.
Reference – https://medium.com/@ishanpradhan/constructing-and-improving-adf-pipelines-to-effectively-copy-multiple-tables-823a06caae14
22. How you can handle Full And Incremental Data Loading Concept From Source To Destination Using Azure Data Factory?
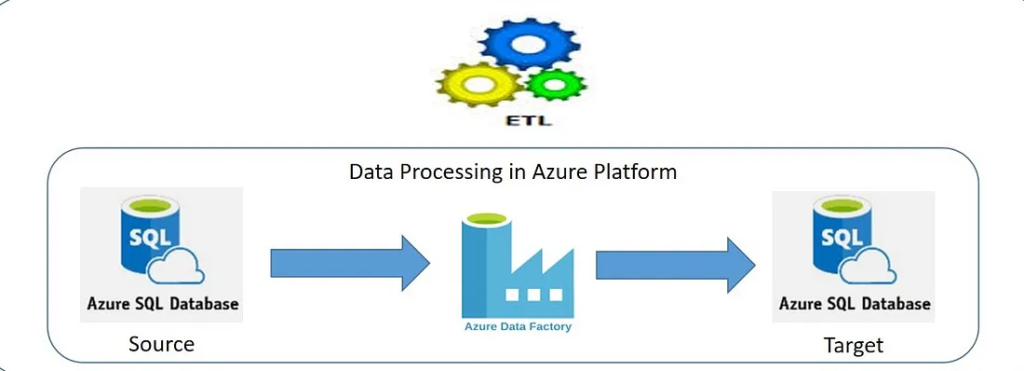
Objective: Our objective is to load data incrementally or fully from a source table to a destination table using Azure Data Factory Pipeline. First, we will go through the concept and design, and later the implementation steps using Azure Data Factory.
During the first run, the load activity is the full load of tables. Then, insert few records and perform the load activity once again which should be the incremental load. The configuration table data will updated automatically after the first run(full load), so that in second run it will automatically go for incremental load.

Development Process using Azure Data Factory:
1. First, create two Azure SQL DB resources: a. Source DB and b: Target DB
2. Create the Azure Data Factory resource.
3. Create the configuration Table.
4. Create two tables in the source DB e.g. customer table and transaction table.
5. Load data into the configuration table for customer table and transaction table. Load also an extra row for promotion table. After loading data it should be look like.

6. Load few data into the customer table and transaction table.
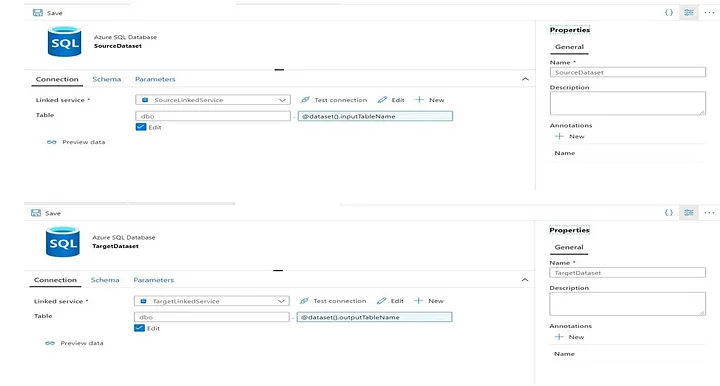
7. Go to the Azure Data Factory > Manage > Linked services > New and create two new linked services one for source and another for target.
8. Then, create two parameterized data set (Azure Data Factory > Author > Datasets > New dataset), one for source and another for target so that we can pass the table names on runtime from configuration table and this will help to handle multiple table using a single pipeline.
9. Go to the Azure Data Factory > Author > Pipeline > New Pipeline
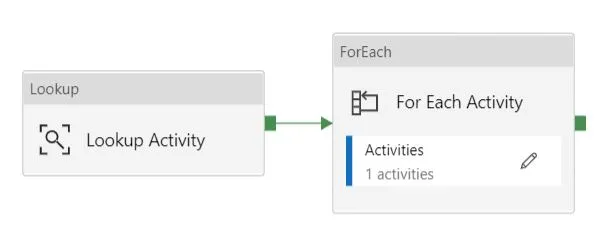
10. First, create a lookup activity with query:
select * from [schema].[configuration table name] where Active_Indicator=1;
11. Create a For Each activity to iterate each table and perform activity(full or incremental load) for each table.
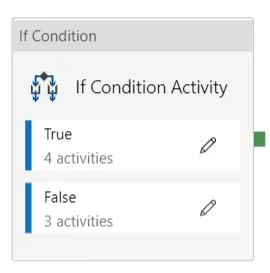
12. Then, create a If Condition activity, if ‘Incremental_Full_Load’ is 1, go for the ‘Incremental Load Activity’(associated with True value of if condition) else ‘Full Load Activity’(associated with False value of if condition).
13. Within the Incremental Load Activity,
a. first create a lookup to get the ‘Max_Last_Updated_Date’ from the configuration table for each desire table.
b. Then, using Copy Data activity, move data from source to target.
c. After that, using lookup activity, get the max value of the ‘added_date’ from the target table and update that value in the configuration table for the particular row for the particular ‘Table_Name’ value.

14. Within Full Load Activity, we will do step ‘b’ and step ‘c’. Only a small addition that we also update the ‘Max_Last_Updated_Date’ value to 1 in step ‘c’. So that, the fully loaded tables will automatically perform incremental load from second time.

Reference – https://apu-nandi88.medium.com/full-and-incremental-data-loading-concept-from-source-to-destination-using-azure-data-factory-dd39627d6f21
23. How do you handle duplicate rows in Data flows?
One of the most frequently asked questions in a data engineering interview. In this article let’s see how we can remove duplicate records.
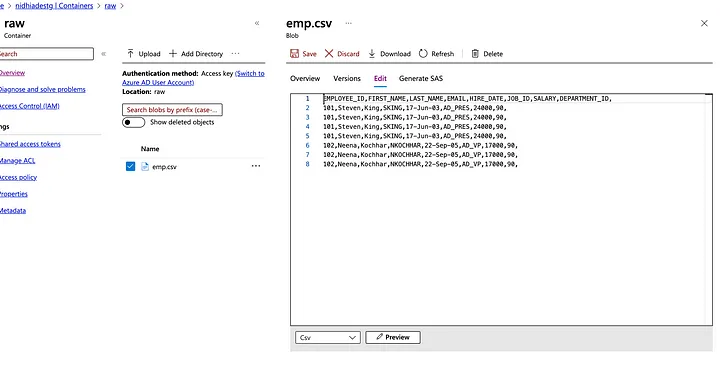
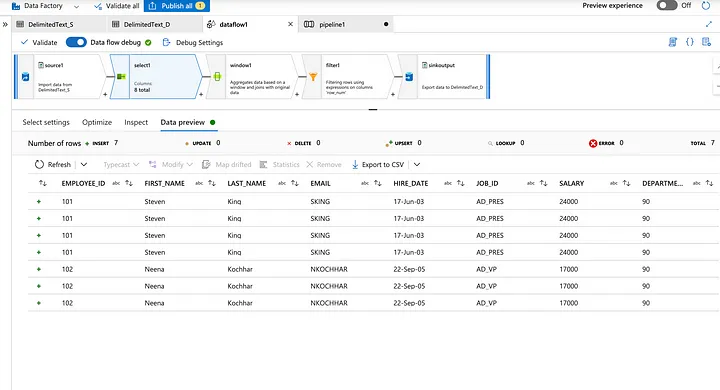
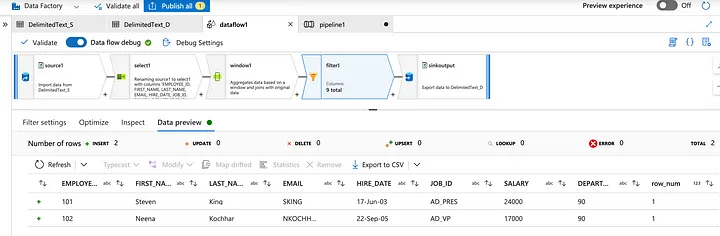
Consider an employee table with duplicate records of an employee.
Select a Data flow activity to remove duplicate records.
Select a Dataset from the storage where data is placed in an Azure.
Preview all the records from the dataset.
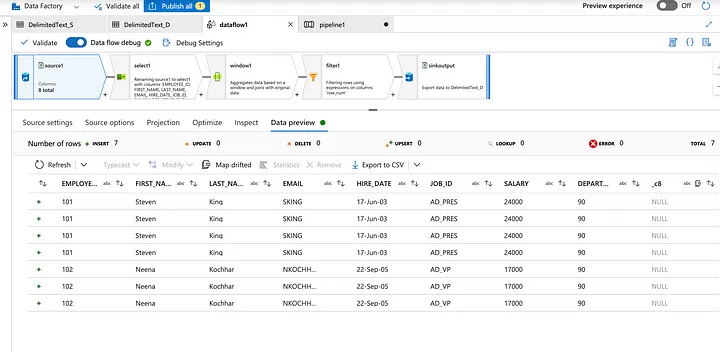
Select the specific records and check the dataset columns.
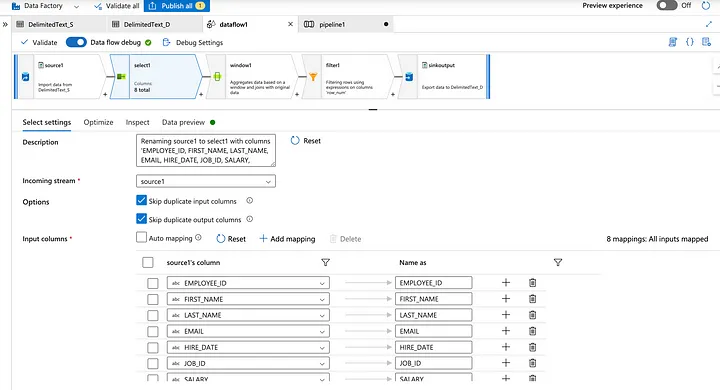
Check the selected specific records.
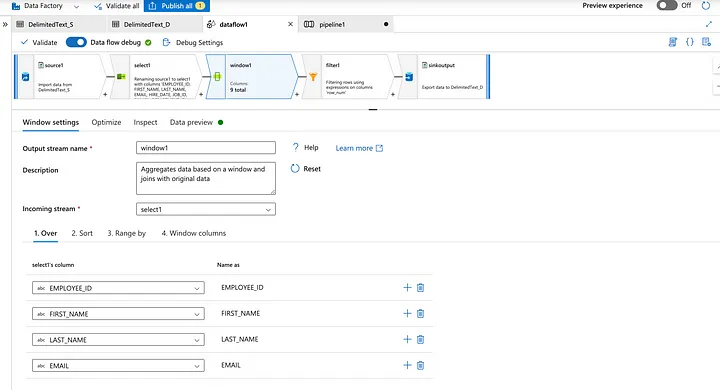
Select the Windows function to segregate the duplicate records.
Preview the mapped data from the dataset.
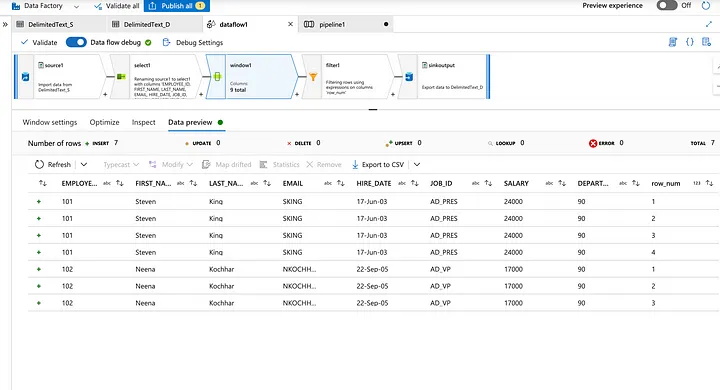
Now filter the records where rownum ==1 as duplicate records are sorted with the latest entry first.
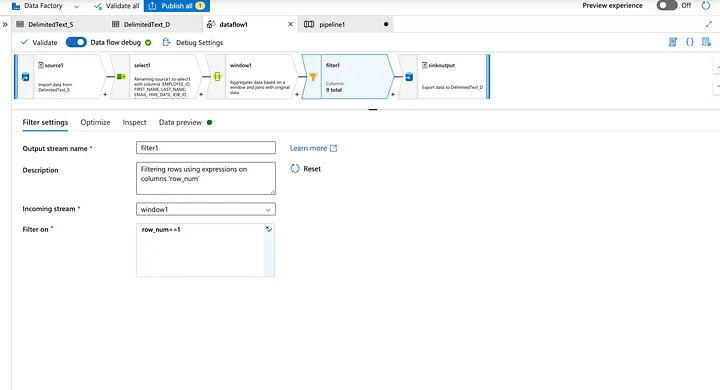
Preview the records where rownum=1.
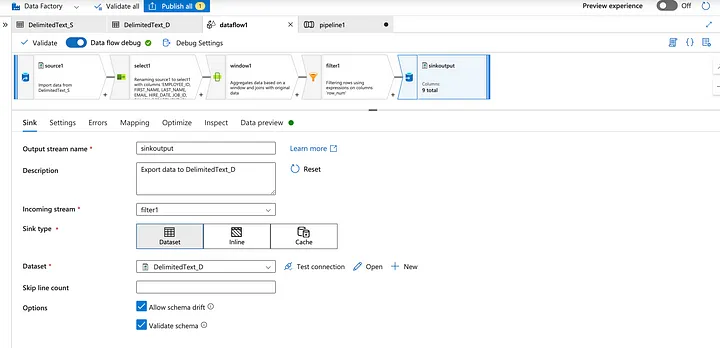
Now add the nonduplicate records to the sink.
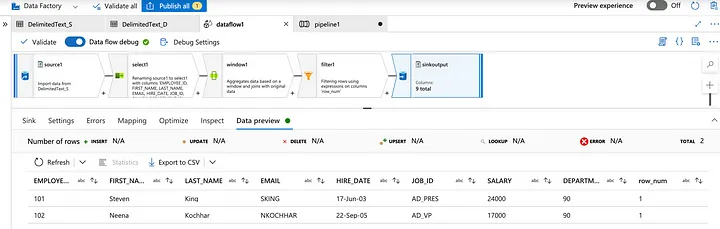
Preview the non-duplicate/unique records.
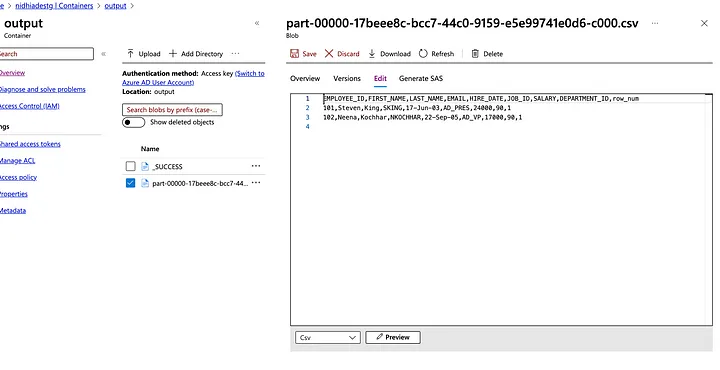
Now check the destination folder in the storage account.
Reference – https://nidhig631.medium.com/removal-of-duplicate-records-in-adf-azure-data-factory-e7da613d1c1c
24. If your input has column ‘Title’ and you get bad records in that column, how do you handle it?
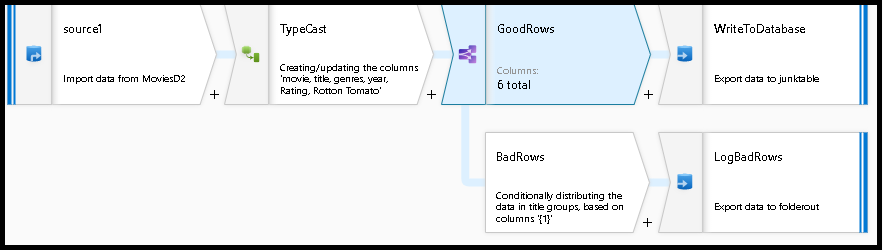
Conditional split transformation defines the maximum length of “title” to be five. Any row that is less than or equal to five will go into the GoodRows stream. Any row that is larger than five will go into the BadRows stream.
Now we need to log the rows that failed. Add a sink transformation to the BadRows stream for logging. Here, we’ll “auto-map” all of the fields so that we have logging of the complete transaction record. This is a text-delimited CSV file output to a single file in Blob Storage. We’ll call the log file “badrows.csv”.
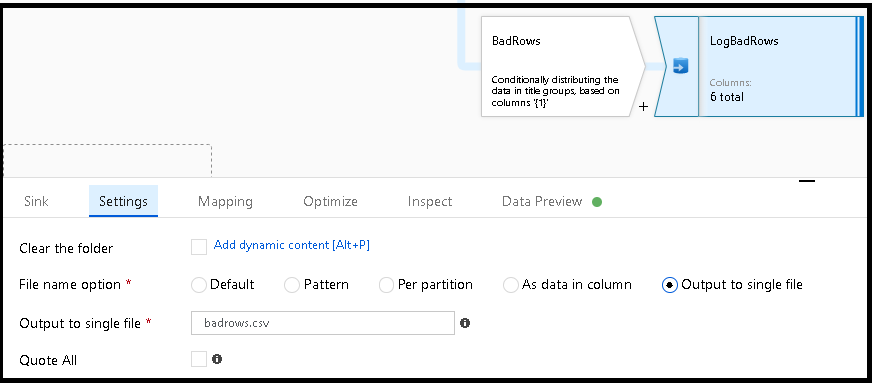
The completed data flow is shown below. We are now able to split off error rows to avoid the SQL truncation errors and put those entries into a log file. Meanwhile, successful rows can continue to write to our target database.
If you choose the error row handling option in the sink transformation and set “Output error rows”, ADF will automatically generate a CSV file output of your row data along with the driver-reported error messages. You do not need to add that logic manually to your data flow with that alternative option. There will be a small performance penalty incurred with this option so that ADF can implement a 2-phase methodology to trap errors and log them.

25. What is the difference between pipeline and Dataflow?
A pipeline is an orchestrator and does not tranform data. It manages a series of one or more activities, such as copy data or executive stored procedure. Data flow is one of these activity types and very different from a pipeline.
26. How you can open and read contents of a file in ADF?
We can use web activity and provide url of file that we want to read from the storage accoount. Output of the web activity contaains the response. Then we can use set variable activity to get the contents of the file in an output response.

27. If you want to Delete files in Blob storage how can you do that?
We can use delete activity in the pipeline and provide configurations for the files thet we want to delete. Alsso we can apply triggers if regular or event deletion is needed.
Leave a Reply