Why Python for data Analysis?

Python is very easy to learn and implement. For many people including myself python language is easy to fall in love with. Since his first appearance in 1991, python popularity is increasing day by day. Among interpreted languages Python is distinguished by its large and active scientific computing community. Adoption of Python for scientific computing in both industry applications and academic research has increased significantly since the early 2000s.

For data analysis and exploratory analysis and data visualization, Python has upper hand as compare with the many other domain-specific open source and commercial programming languages and tools, such as R, MATLAB, SAS, Stata, and others. In recent years, Python’s improved library support (primarily pandas) has made it a strong alternative for data manipulation tasks. Combined with python’s strength in general purpose programming, it is an excellent choice as a single language for building data-centric applications.

So in short we can say due to following reason we should choose python for data analysis.

  • It’s very simple language to understand.
  • It’s an open source.
  • Strong data science inbuilt library.
  • Apart from the long existing  demand in the web development projects, the use of Python is only growing to grow as AI/ML projects become more main stream and popular with global businesses.

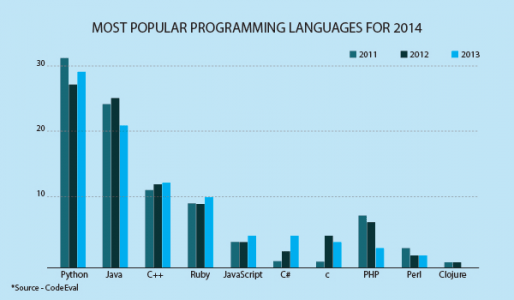
As you can see below chart, python is the most shouting language in the industry.

Over the year popularity

Trend in one year

IEEE Spectrum 2017 Survey

Python-Environment Setup

To successfully create and run the code we will required environment set up which will have both general-purpose python as well as the special packages required for Data science.

In this tutorial we will discuss about python 3, because Python 2 won’t be supported after 2020 and Python 3 has been around since 2008. So if you are new to Python, it is definitely worth much more to learn the new Python 3 and not the old Python 2.

Anaconda Installation:

Anaconda is a package manager, an environment manager, a Python/R data science distribution, and a collection of over 1,500+ open source packages. Anaconda is free and easy to install, and it offers free community support too.

To Download Anaconda click on https://www.anaconda.com/distribution/

Over 250+ packages are automatically installed with Anaconda. You can also download other packages using the pip install command.

If you need installation guide you can check the same on anaconda website https://docs.anaconda.com/anaconda/install/

Open Navigator for Window:

From the Start menu, click the Anaconda Navigator desktop app.

Anaconda Navigation

Run Python in a Jupyter Notebook:

  • On Navigator’s Home tab, in the Applications panel on the right, scroll to the Jupyter Notebook tile and click the Install button to install Jupyter Notebook.
  • Launch Jupyter Notebook by clicking Jupyter Notebook’s Launch button.This will launch a new browser window (or a new tab) showing the.
  • On the top of the right hand side, there is a drop down menu labeled “New”. Create a new Notebook with the Python version you installed.
  • Rename your Notebook. Either click on the current name and edit it or find rename  under File in the top menu bar. You can name it to whatever you’d like, but for this  example we’ll use MyFirstAnacondaNotebook.
  • In the first line of the Notebook, type or copy/paste print(“Hello Anaconda”)
  • Save your Notebook by either clicking the save and checkpoint icon or select File – Save and Checkpoint in the top menu.
  • Select cell and press CTR+Enter or Shift+Enter

Python Variables

Variables are nothing but reserved memory locations to store values. This means that when you create a variable you reserve some space in memory. Variable also known as identifier and used to hold value.

In Python, we don’t need to specify the type of variable, because Python is language and smart enough to get variable type.

How to define Variable Names

A variable can have a short name (like x and y) or a more descriptive name (age, carname, total_volume). Rules for Python variables:

  • A variable name must start with a letter or the underscore character
  • A variable name cannot start with a number
  • A variable name can only contain alpha-numeric characters and underscores (A-z, 0-9, and _ )
  • Variable names are case-sensitive (age, Age and AGE are three different variables)

Declaring Variable and Assigning Values

Python allows us to create variable at required time. It does not bound us to declare variable before using in the application. We don’t need to declare explicitly variable in Python. When we assign any value to the variable that variable is declared automatically.

The equal (=) operator is used to assign value to a variable.

counter = 100 # An integer assignment
miles = 1000.0 # A floating point
name = “John” # A string

Here, 100, 1000.0 and “John” are the values assigned to countermiles, and name variables, respectively.

Multiple Assignments

Python allows us to assign a value to multiple variables in a single statement which is also known as multiple assignments. We can apply multiple assignments in two ways either by assigning a single value to multiple variables or assigning multiple values to multiple variables. Lets see given examples.

X = Y = Z = 50

Let’s explore above concept through jupyter notebook

Numbers and more in Python

In this lecture, we will learn about numbers in Python and how to use them.

We’ll learn about the following topics:

1.) Types of Numbers in Python

2.) Basic Arithmetic

3.) Differences between classic division and floor division

4.) Object Assignment in Python

Types of numbers:

There are three numeric types in Python

  • int
  • float
  • complex

Variables of numeric types are created when you assign a value to them:

x = 1    # int
y = 2.8  # float
z = 1j   # complex

Let’s explore about the numbers through jupyter notebook.

Python Statements

In this post we will be doing a quick overview of Python Statements. This post will emphasize differences between Python and other languages such as C++.

There are two reasons we take this approach for learning the context of Python Statements:

  • If you are coming from a different language this will rapidly accelerate your understanding of Python.
  • Learning about statements will allow you to be able to read other languages more easily in the future.

Python vs Other Languages

Let’s create a simple statement that says: “If a is greater than b, assign 2 to a and 4 to b”

Take a look at these two if statements (we will learn about building out if statements soon).

Version 1 (Other Languages)

if (a>b){
a = 2;
b = 4;
}

Version 2 (Python)

if a>b:
a = 2
b = 4

You’ll notice that Python is less cluttered and much more readable than the first version. How does Python manage this?

Let’s walk through the main differences:

Python gets rid of () and {} by incorporating two main factors: a colon and whitespace. The statement is ended with a colon, and whitespace is used (indentation) to describe what takes place in case of the statement.

Another major difference is the lack of semicolons in Python. Semicolons are used to denote statement endings in many other languages, but in Python, the end of a line is the same as the end of a statement.

Lastly, to end this brief overview of differences, let’s take a closer look at indentation syntax in Python vs other languages:

Indentation

Here is some pseudo-code to indicate the use of whitespace and indentation in Python:

Other Languages

if (x)
    if(y)
        code-statement;
else
    another-code-statement;

Python

if x:
    if y:
        code-statement
else:
    another-code-statement

Note how Python is so heavily driven by code indentation and whitespace. This means that code readability is a core part of the design of the Python language.

Now let’s start diving deeper by coding these sort of statements in Python!

Time to code!

if, elif, else Statements

if Statements in Python allows us to tell the computer to perform alternative actions based on a certain set of results.

Verbally, we can imagine we are telling the computer:

“Hey if this case happens, perform some action”

We can then expand the idea further with elif and else statements, which allow us to tell the computer:

“Hey if this case happens, perform some action. Else, if another case happens, perform some other action. Else, if none of the above cases happened, perform this action.”

Let’s go ahead and look at the syntax format for if statements to get a better idea of this:

if case1:
    perform action1
elif case2:
    perform action2
else: 
    perform action3

Let’s Explore more example in jupyter notebook.

Python for Loops

A for loop is used for iterating over a sequence (that is either a list, a tuple, a dictionary, a set, or a string).

This is less like the for keyword in other programming languages, and works more like an iterator method as found in other object-orientated programming languages.

With the for loop we can execute a set of statements, once for each item in a list, tuple, set etc.

Here’s the general format for a for loop in Python:

for item in object:
_____statements to do stuff

The variable name used for the item is completely up to the coder, so use your best judgment for choosing a name that makes sense and you will be able to understand when revisiting your code. This item name can then be referenced inside your loop, for example if you wanted to use if statements to perform checks.

Let’s go ahead and work through several example of for loops using a variety of data object types. We’ll start simple and build more complexity later on.

Python while Loops

The while statement in Python is one of most general ways to perform iteration. A while statement will repeatedly execute a single statement or group of statements as long as the condition is true. The reason it is called a ‘loop’ is because the code statements are looped through over and over again until the condition is no longer met.

The general format of a while loop is:

while test:
    code statements
else:
    final code statements

Let’s look at a few simple while loops in action.