Archive September 2023

Transform data using mapping data flows

In this post, we’ll use the Azure Data Factory user interface (UX) to create a pipeline that copies and transforms data from an Azure Data Lake Storage (ADLS) Gen2 source to an ADLS Gen2 sink using mapping data flow. The configuration pattern in this tutorial can be expanded upon when transforming data using mapping data flow.

In this post, will do the following steps:

  • Create a data factory.
  • Create a pipeline with a Data Flow activity.
  • Build a mapping data flow with four transformations.
  • Test run the pipeline.
  • Monitor a Data Flow activity

Prerequisites

  • Azure subscription. If you don’t have an Azure subscription, create a free Azure account before you begin.
  • Azure storage account. You use ADLS storage as a source and sink data stores.

Create a data factory

In this step, you create a data factory and open the Data Factory UX to create a pipeline in the data factory.

  1. Open Microsoft Edge or Google Chrome. Currently, Data Factory UI is supported only in the Microsoft Edge and Google Chrome web browsers.
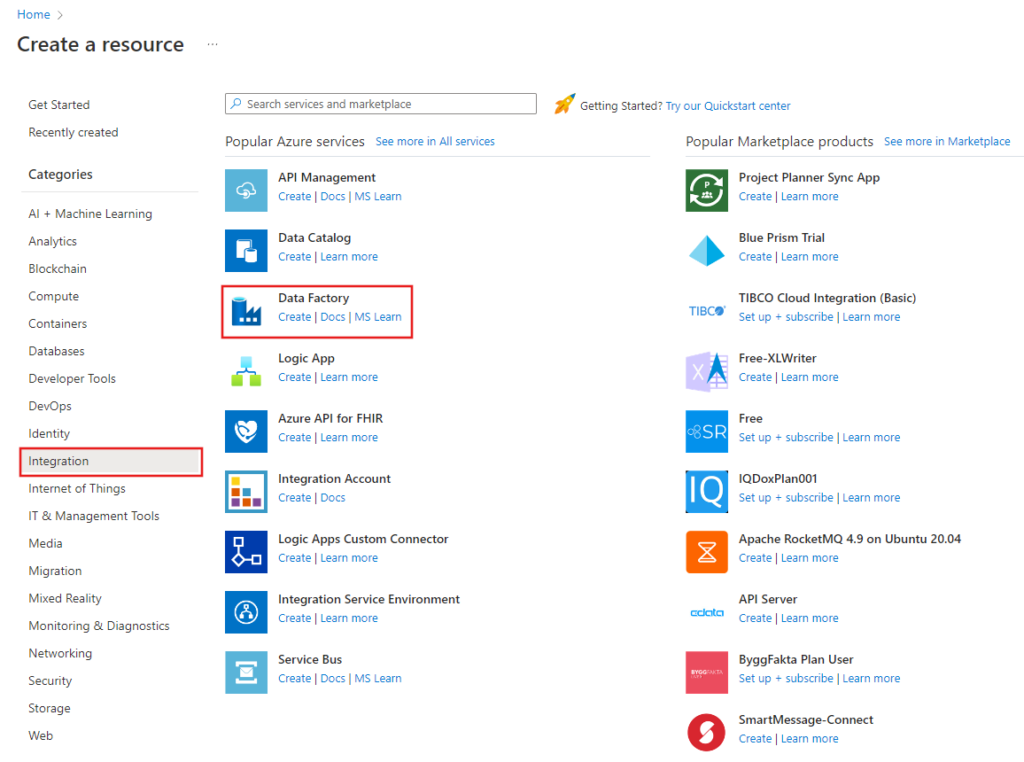
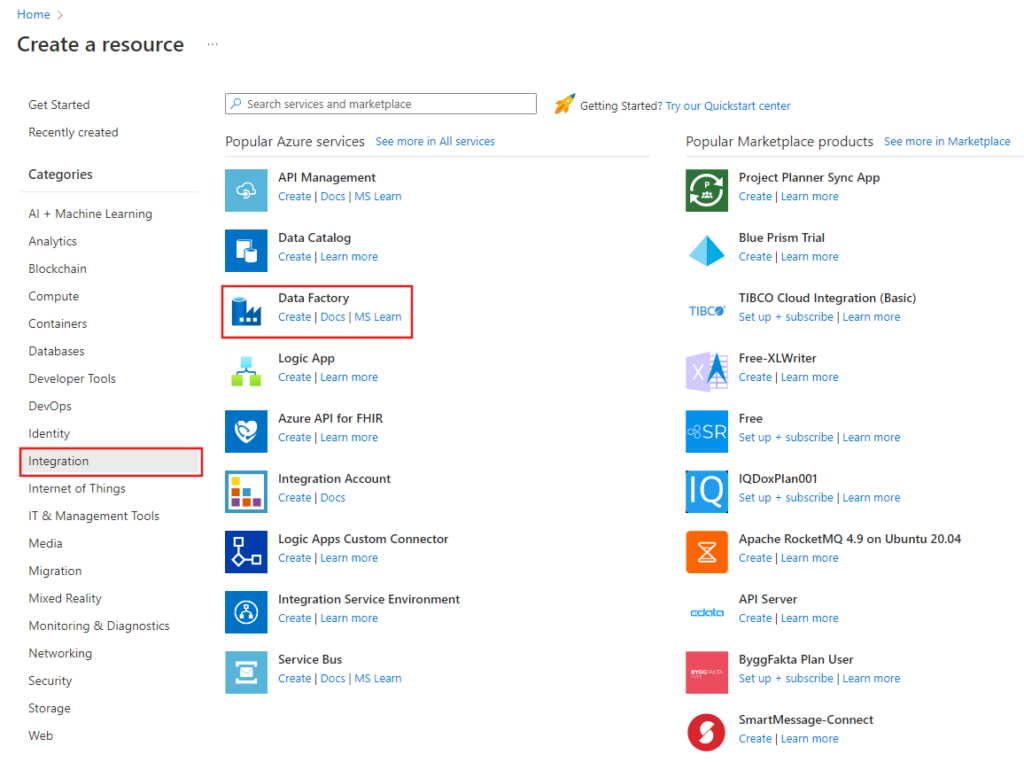
  2. On the left menu, select Create a resource > Integration > Data Factory:
3. On the New data factory page, under Name, enter ADFTutorialDataFactory.

The name of the Azure data factory must be globally unique. If you receive an error message about the name value, enter a different name for the data factory. (for example, yournameADFTutorialDataFactory). 

4. Select the Azure subscription in which you want to create the data factory.

5. For Resource Group, take one of the following steps:

a. Select Use existing, and select an existing resource group from the drop-down list.

b. Select Create new, and enter the name of a resource group.

6. Under Version, select V2.

7. Under Location, select a location for the data factory. Only locations that are supported are displayed in the drop-down list. Data stores (for example, Azure Storage and SQL Database) and computes (for example, Azure HDInsight) used by the data factory can be in other regions.

8. Select Create.

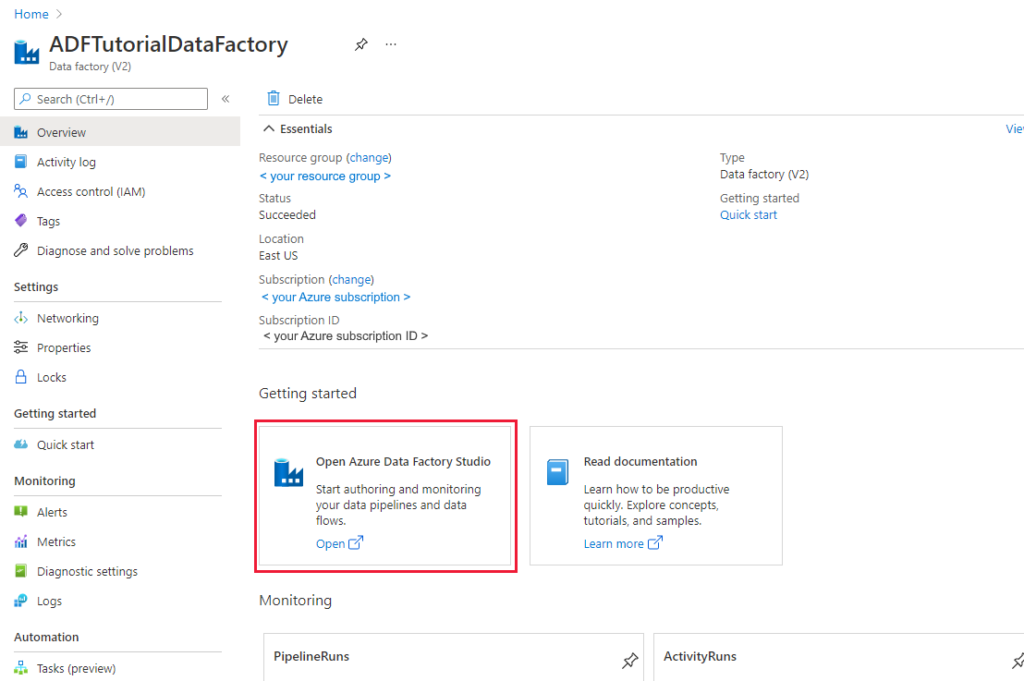
9. After the creation is finished, you see the notice in Notifications center. Select Go to resource to navigate to the Data factory page.

10. Select Author & Monitor to launch the Data Factory UI in a separate tab.

Create a pipeline with a Data Flow activity

In this step, you’ll create a pipeline that contains a Data Flow activity.

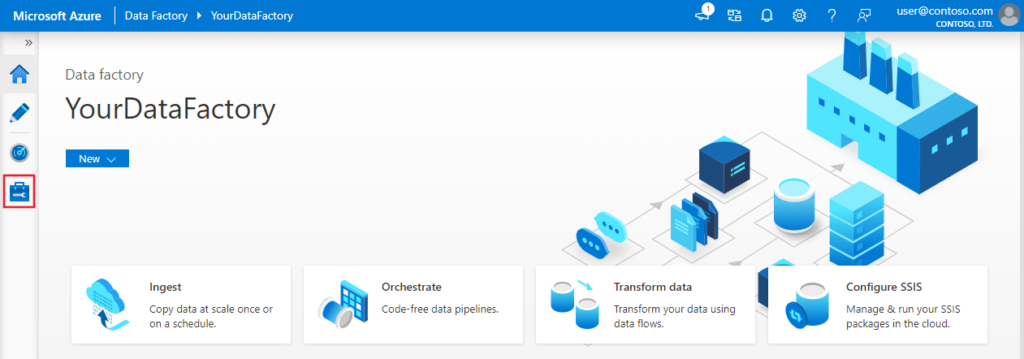
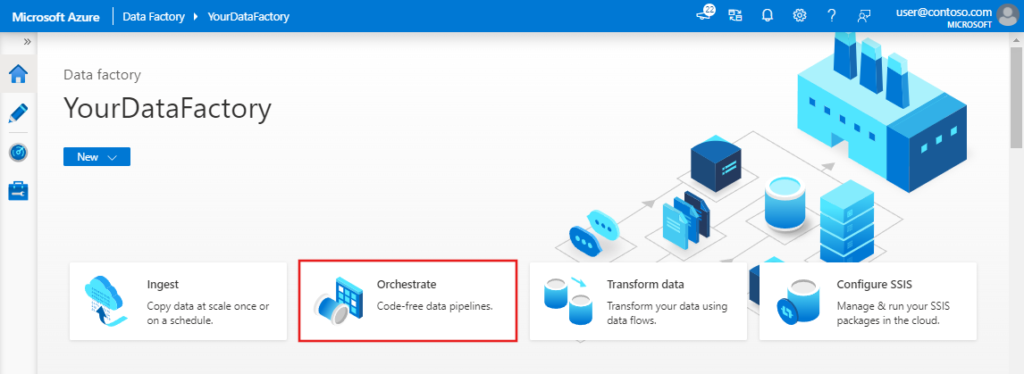
  1. On the home page of Azure Data Factory, select Orchestrate.
2. In the General tab for the pipeline, enter TransformMovies for Name of the pipeline.

3. In the Activities pane, expand the Move and Transform accordion. Drag and drop the Data Flow activity from the pane to the pipeline canvas.

4. In the Adding Data Flow pop-up, select Create new Data Flow and then name your data flow TransformMovies. Click Finish when done.

5. In the top bar of the pipeline canvas, slide the Data Flow debug slider on. Debug mode allows for interactive testing of transformation logic against a live Spark cluster. Data Flow clusters take 5-7 minutes to warm up and users are recommended to turn on debug first if they plan to do Data Flow development


Build transformation logic in the data flow canvas

Once you create your Data Flow, you’ll be automatically sent to the data flow canvas. In case you are not redirected to data flow canvas, in the panel below the canvas, go to Settings and select Open, located beside data flow field. This will open the dataflow canvas.

In this step, you’ll build a data flow that takes the moviesDB.csv in ADLS storage and aggregates the average rating of comedies from 1910 to 2000. You’ll then write this file back to the ADLS storage.

  1. In the data flow canvas, add a source by clicking on the Add Source box.

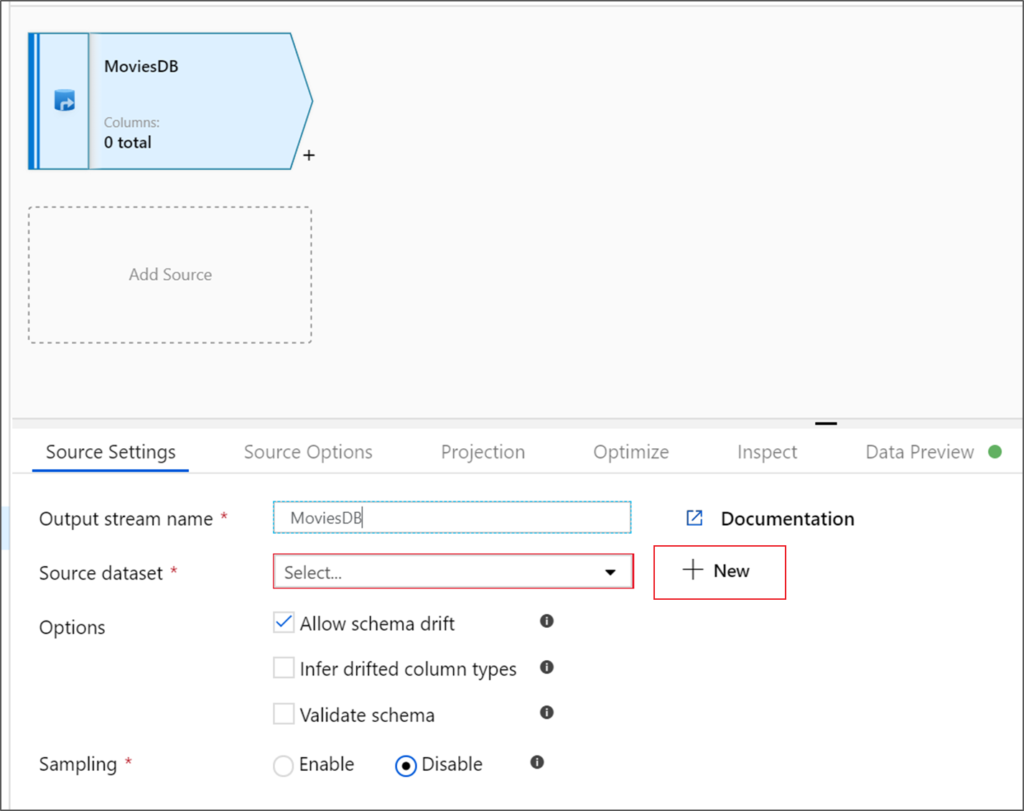
2. Name your source MoviesDB. Click on New to create a new source dataset.
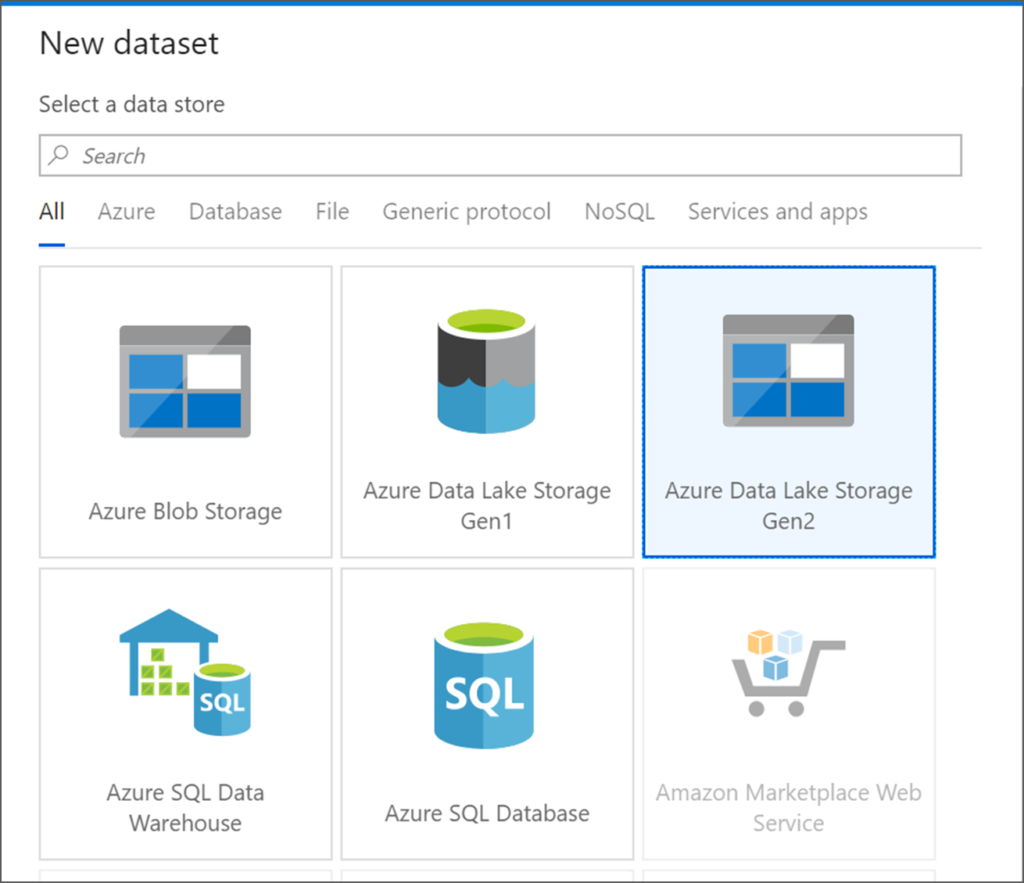
3. Choose Azure Data Lake Storage Gen2. Click Continue.
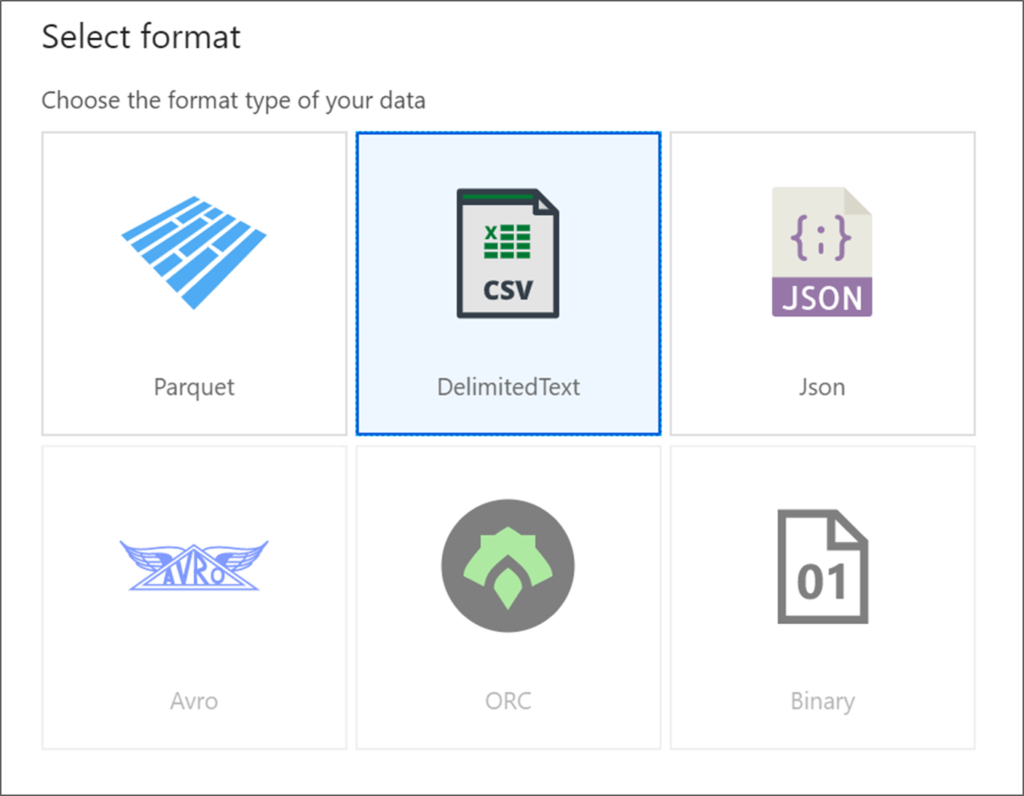
4. Choose DelimitedText. Click Continue.
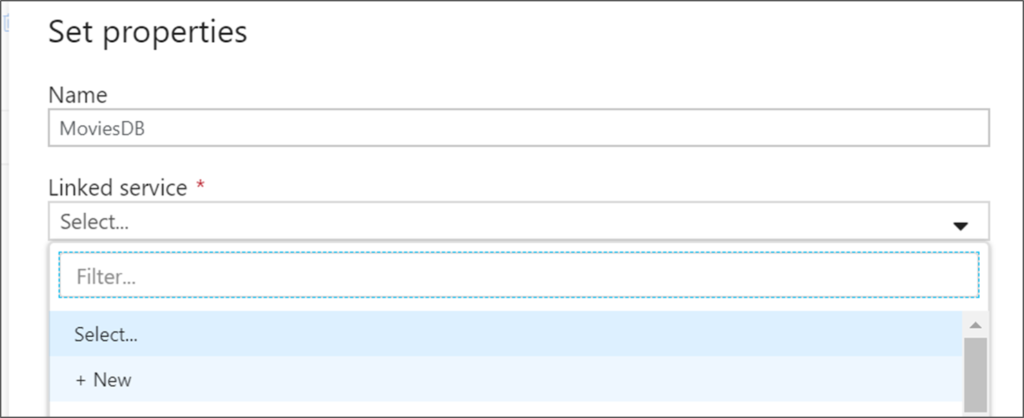
5. Name your dataset MoviesDB. In the linked service dropdown, choose New.
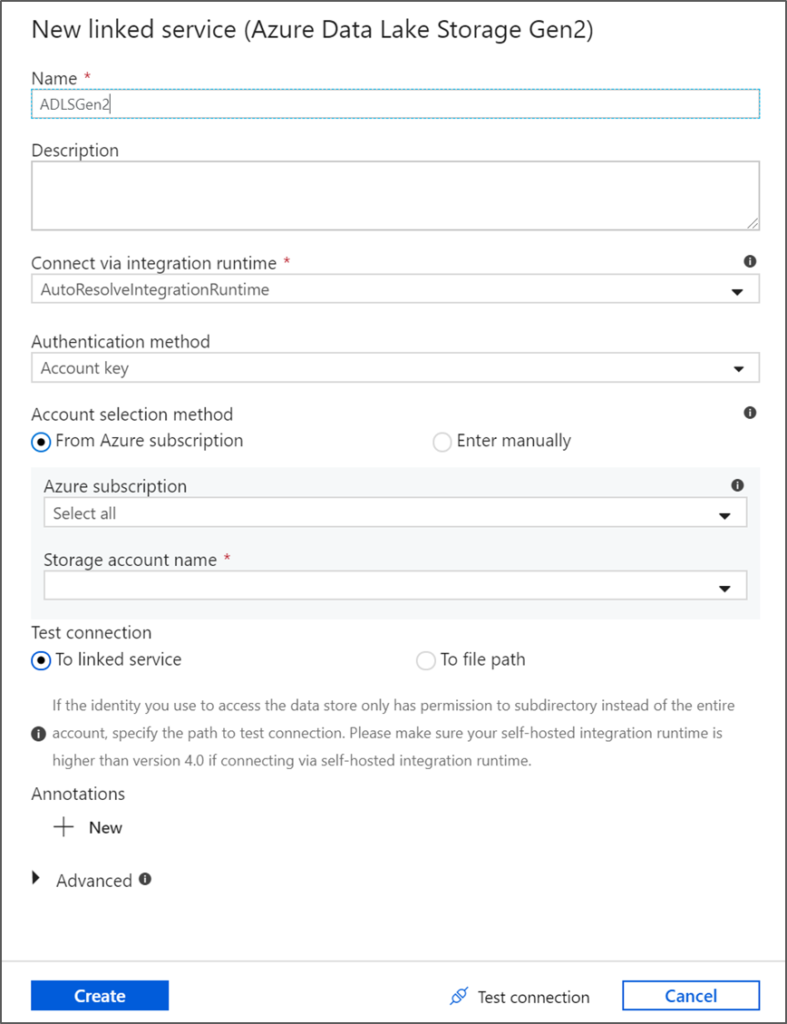
6. In the linked service creation screen, name your ADLS gen2 linked service ADLSGen2 and specify your authentication method. Then enter your connection credentials. In this tutorial, we’re using Account key to connect to our storage account. You can click Test connection to verify your credentials were entered correctly.
7. Once you’re back at the dataset creation screen, enter where your file is located under the File path field. In this tutorial, the file moviesDB.csv is located in container sample-data. As the file has headers, check First row as header. Select From connection/store to import the header schema directly from the file in storage. Click OK when done.

8. If your debug cluster has started, go to the Data Preview tab of the source transformation and click Refresh to get a snapshot of the data. You can use data preview to verify your transformation is configured correctly.

9. Next to your source node on the data flow canvas, click on the plus icon to add a new transformation. The first transformation you’re adding is a Filter.
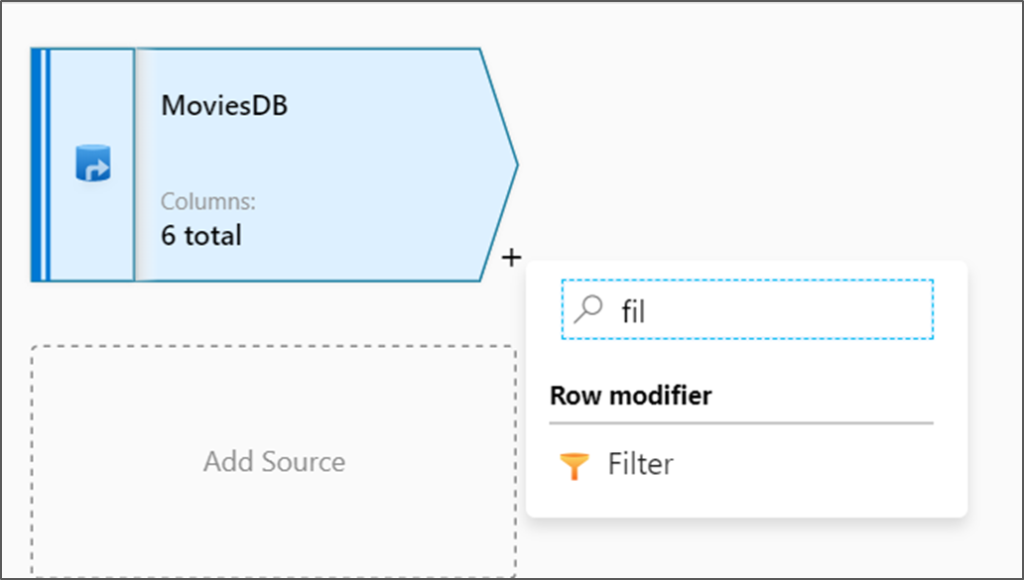
10. Name your filter transformation FilterYears. Click on the expression box next to Filter on to open the expression builder. Here you’ll specify your filtering condition.
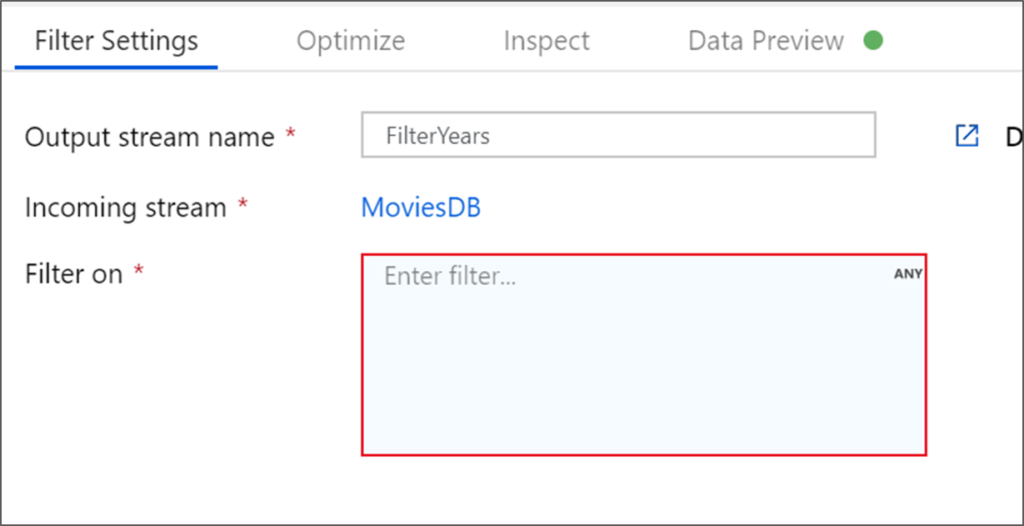
11. The data flow expression builder lets you interactively build expressions to use in various transformations. Expressions can include built-in functions, columns from the input schema, and user-defined parameters.

In this tutorial, you want to filter movies of genre comedy that came out between the years 1910 and 2000. As year is currently a string, you need to convert it to an integer using the toInteger() function. Use the greater than or equals to (>=) and less than or equals to (<=) operators to compare against literal year values 1910 and 2000. Union these expressions together with the and (&&) operator. The expression comes out as:

toInteger(year) >= 1910 && toInteger(year) <= 2000

To find which movies are comedies, you can use the rlike() function to find pattern ‘Comedy’ in the column genres. Union the rlike expression with the year comparison to get:

toInteger(year) >= 1910 && toInteger(year) <= 2000 && rlike(genres, 'Comedy')

If you’ve a debug cluster active, you can verify your logic by clicking Refresh to see expression output compared to the inputs used. There’s more than one right answer on how you can accomplish this logic using the data flow expression language.
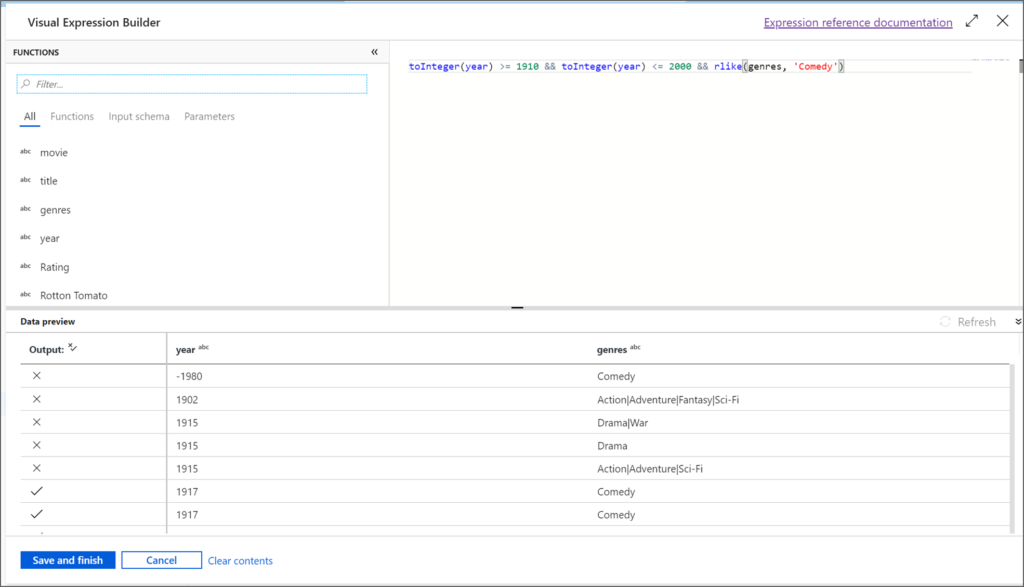
Click Save and Finish once you’re done with your expression.

12. Fetch a Data Preview to verify the filter is working correctly.

13. The next transformation you’ll add is an Aggregate transformation under Schema modifier.
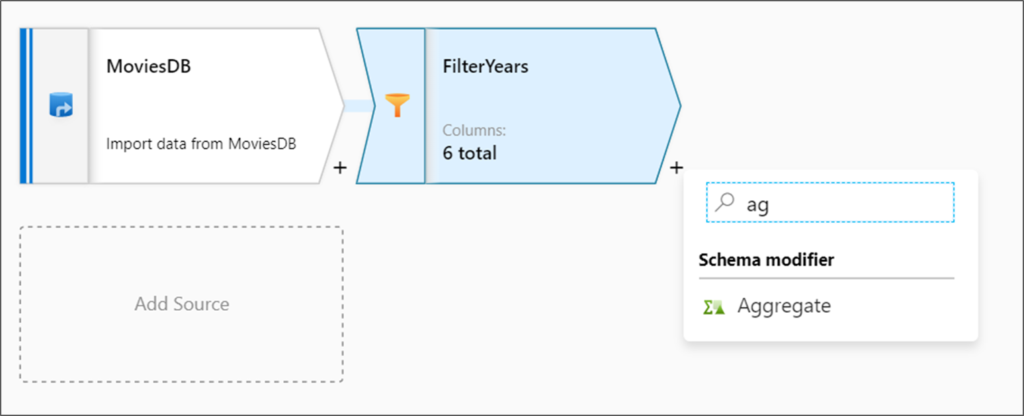
14. Name your aggregate transformation AggregateComedyRatings. In the Group by tab, select year from the dropdown to group the aggregations by the year the movie came out.
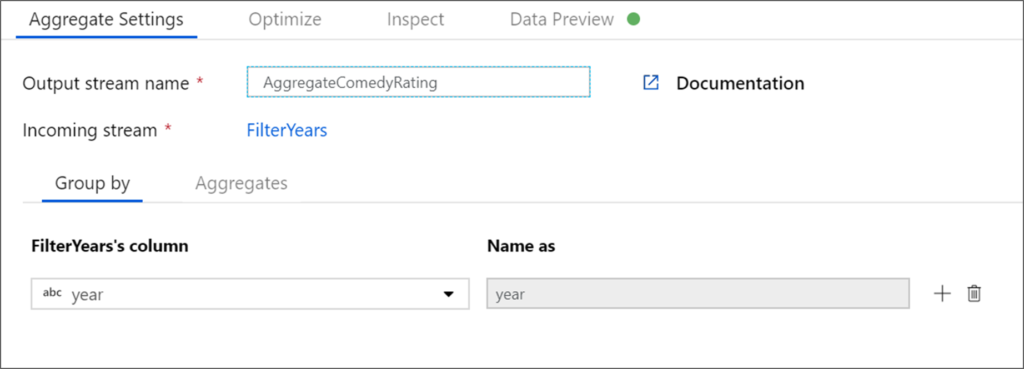
15. Go to the Aggregates tab. In the left text box, name the aggregate column AverageComedyRating. Click on the right expression box to enter the aggregate expression via the expression builder.

16. To get the average of column Rating, use the avg() aggregate function. As Rating is a string and avg() takes in a numerical input, we must convert the value to a number via the toInteger() function. This is expression looks like:

avg(toInteger(Rating))

Click Save and Finish when done.

17. Go to the Data Preview tab to view the transformation output. Notice only two columns are there, year and AverageComedyRating.

18. Next, you want to add a Sink transformation under Destination.

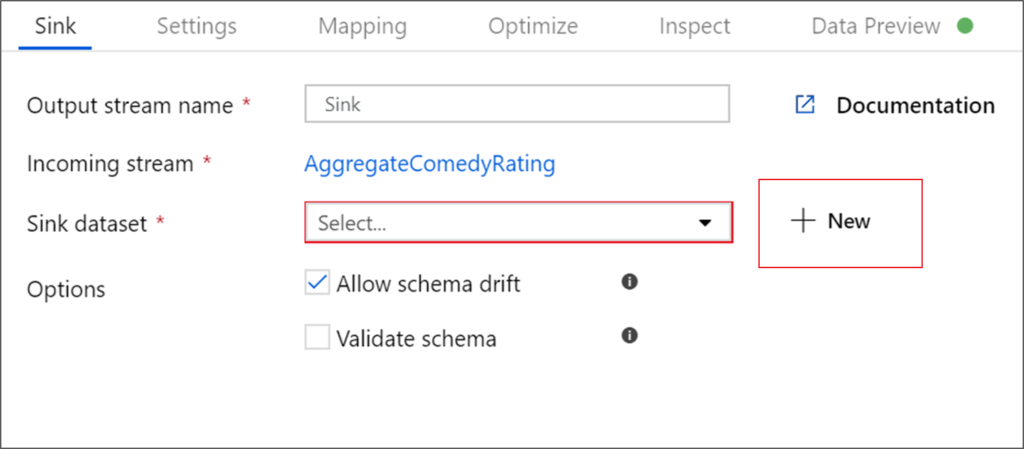
19. Name your sink Sink. Click New to create your sink dataset.
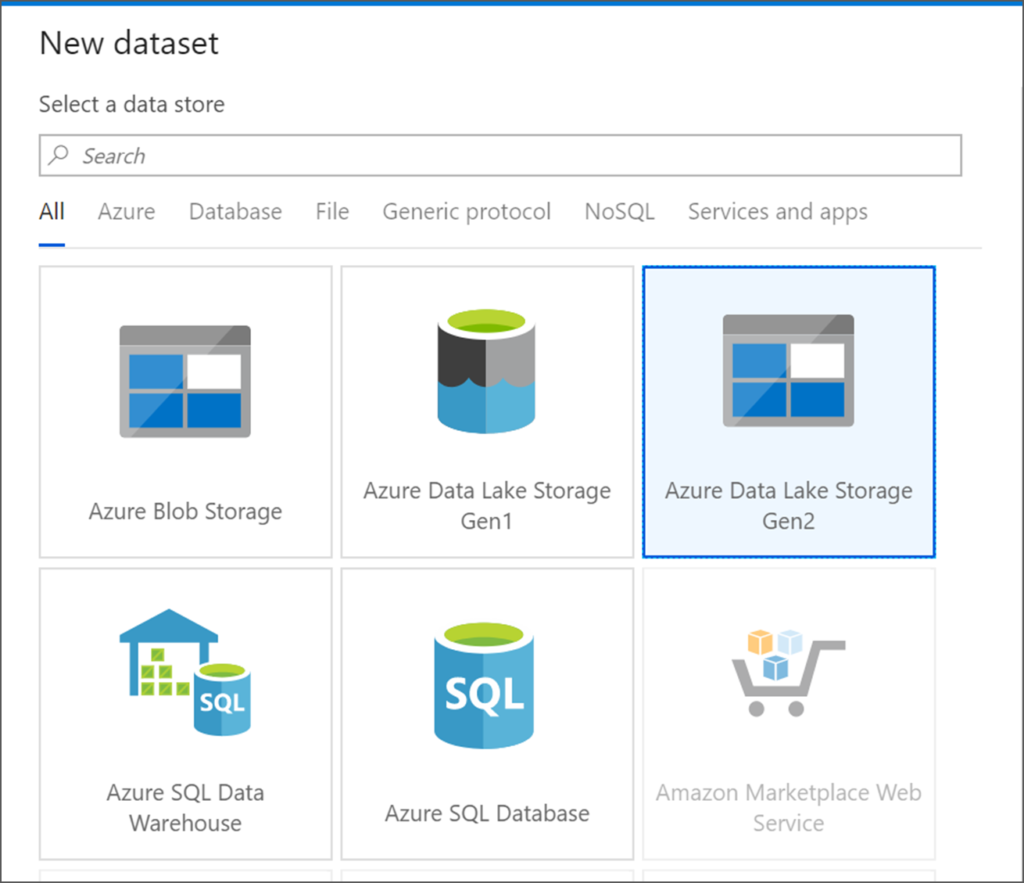
20. Choose Azure Data Lake Storage Gen2. Click Continue.
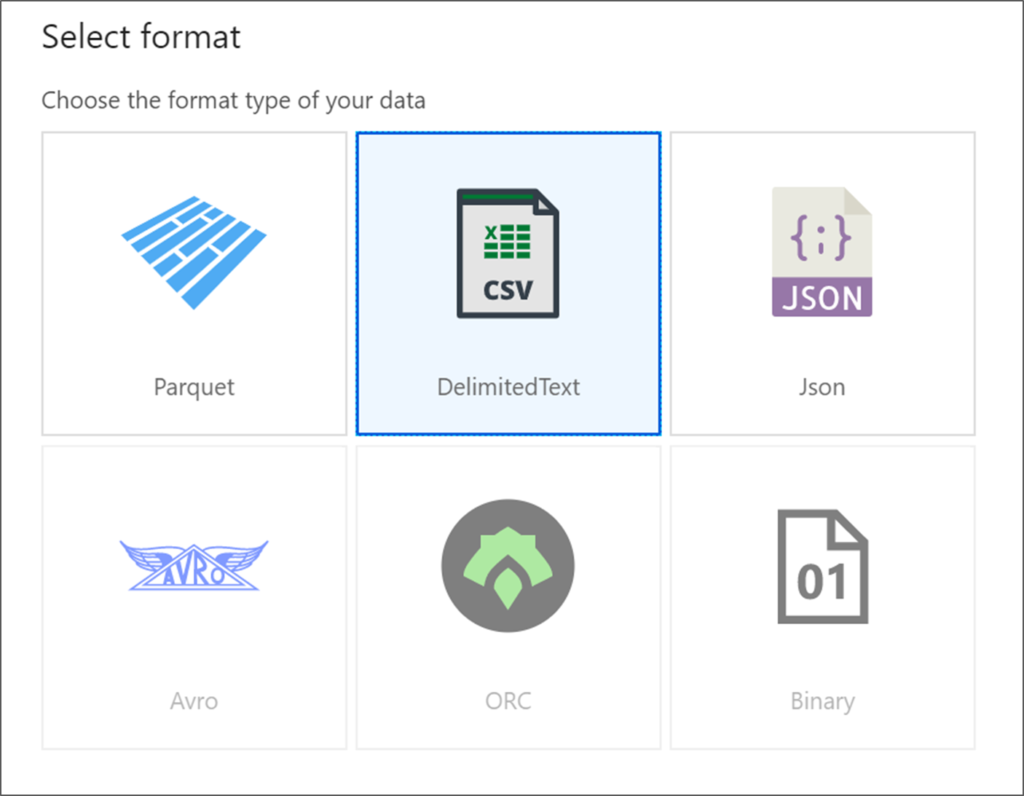
21. Choose DelimitedText. Click Continue.
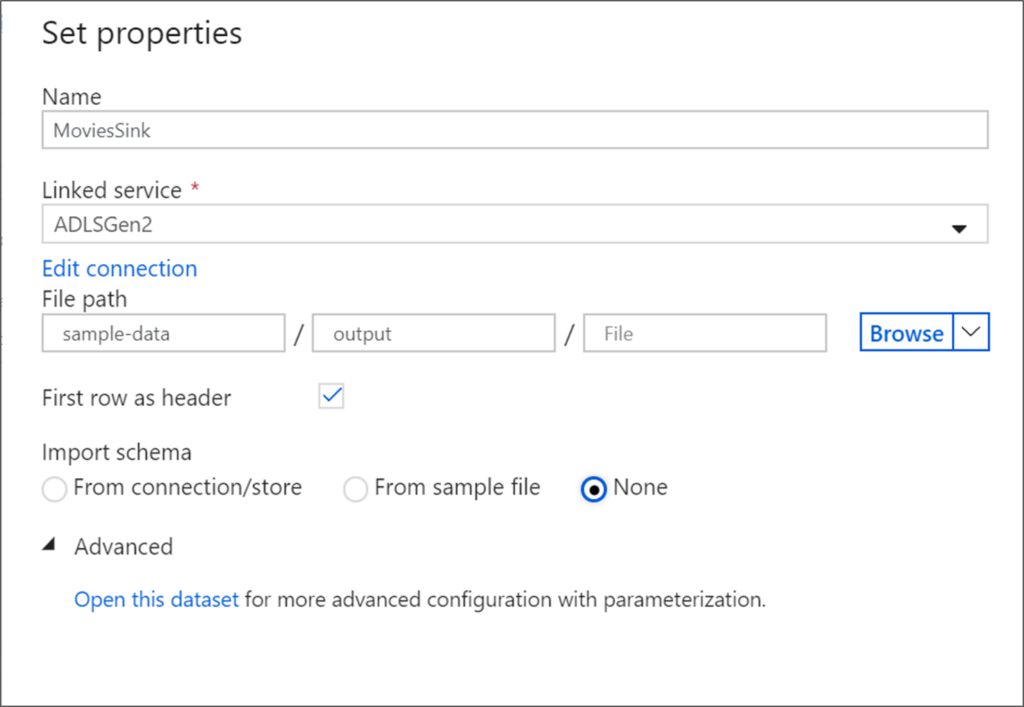
22. Name your sink dataset MoviesSink. For linked service, choose the ADLS gen2 linked service you created in step 6. Enter an output folder to write your data to. In this tutorial, we’re writing to folder ‘output’ in container ‘sample-data’. The folder doesn’t need to exist beforehand and can be dynamically created. Set First row as header as true and select None for Import schema. Click Finish.
Now you’ve finished building your data flow. You’re ready to run it in your pipeline.

Running and monitoring the Data Flow

You can debug a pipeline before you publish it. In this step, you’re going to trigger a debug run of the data flow pipeline. While data preview doesn’t write data, a debug run will write data to your sink destination.

  1. Go to the pipeline canvas. Click Debug to trigger a debug run.

2. Pipeline debug of Data Flow activities uses the active debug cluster but still take at least a minute to initialize. You can track the progress via the Output tab. Once the run is successful, click on the eyeglasses icon to open the monitoring pane.

3. In the monitoring pane, you can see the number of rows and time spent in each transformation step.
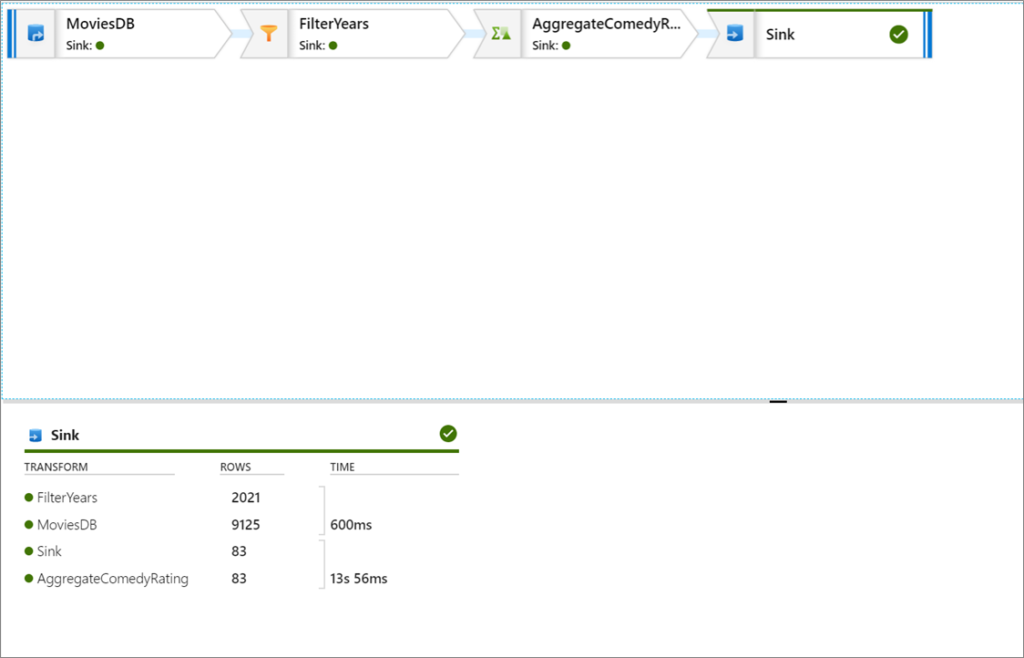
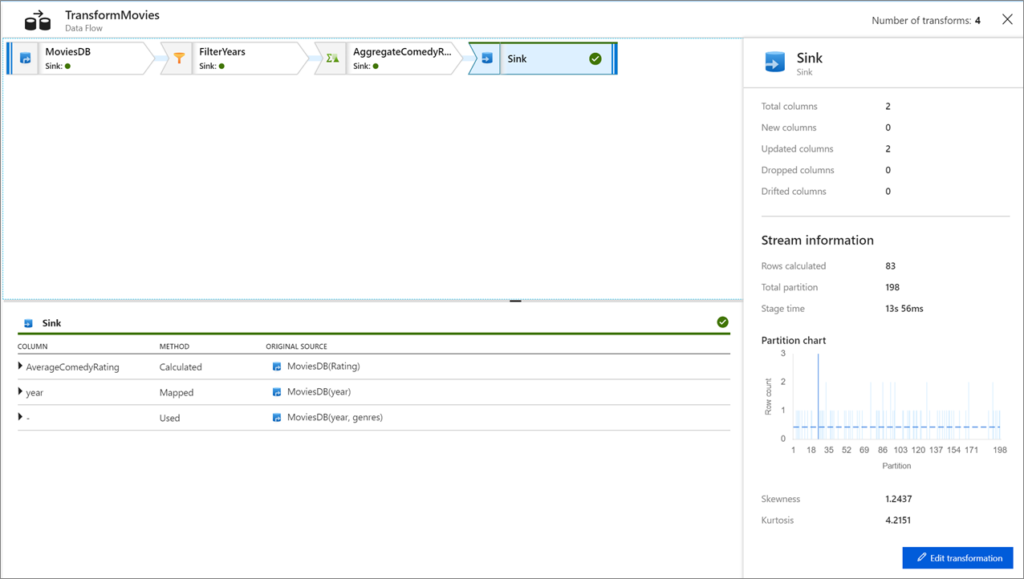
4. Click on a transformation to get detailed information about the columns and partitioning of the data.
Reference – https://learn.microsoft.com/

Mapping data flows in Azure Data Factory

What are mapping data flows?

Mapping data flows are visually designed data transformations in Azure Data Factory. Data flows allow data engineers to develop data transformation logic without writing code. The resulting data flows are executed as activities within Azure Data Factory pipelines that use scaled-out Apache Spark clusters. Data flow activities can be operationalized using existing Azure Data Factory scheduling, control, flow, and monitoring capabilities.

Mapping data flows provide an entirely visual experience with no coding required. Your data flows run on ADF-managed execution clusters for scaled-out data processing. Azure Data Factory handles all the code translation, path optimization, and execution of your data flow jobs.

Getting started:

Data flows are created from the factory resources pane like pipelines and datasets. To create a data flow, select the plus sign next to Factory Resources, and then select Data Flow.

This action takes you to the data flow canvas, where you can create your transformation logic. Select Add source to start configuring your source transformation.

Authoring data flows

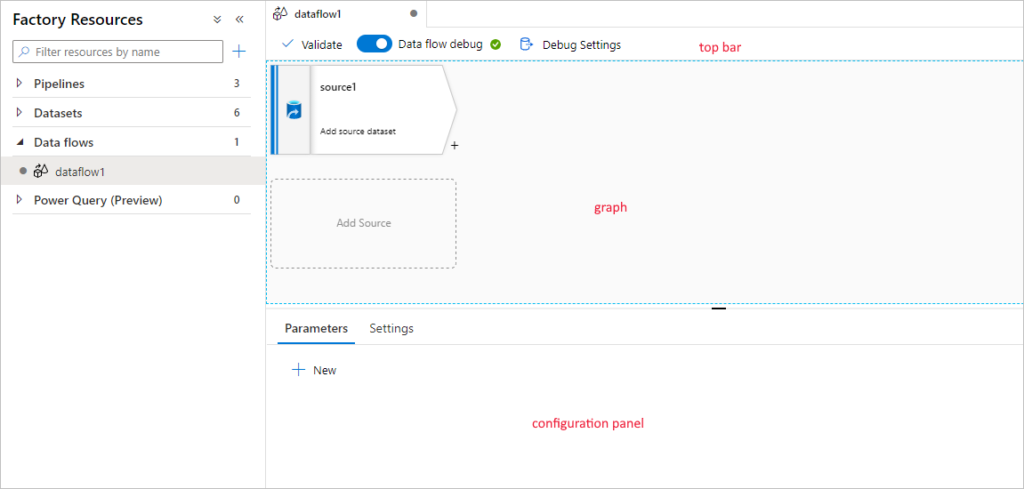
Mapping data flow has a unique authoring canvas designed to make building transformation logic easy. The data flow canvas is separated into three parts: the top bar, the graph, and the configuration panel.

Graph

The graph displays the transformation stream. It shows the lineage of source data as it flows into one or more sinks. To add a new source, select Add source. To add a new transformation, select the plus sign on the lower right of an existing transformation.

Configuration panel

The configuration panel shows the settings specific to the currently selected transformation. If no transformation is selected, it shows the data flow. In the overall data flow configuration, you can add parameters via the Parameters tab.

Each transformation contains at least four configuration tabs.

Transformation settings

The first tab in each transformation’s configuration pane contains the settings specific to that transformation. For more information, see that transformation’s documentation page.

Optimize

The Optimize tab contains settings to configure partitioning schemes. To learn more about how to optimize your data flows.

Inspect

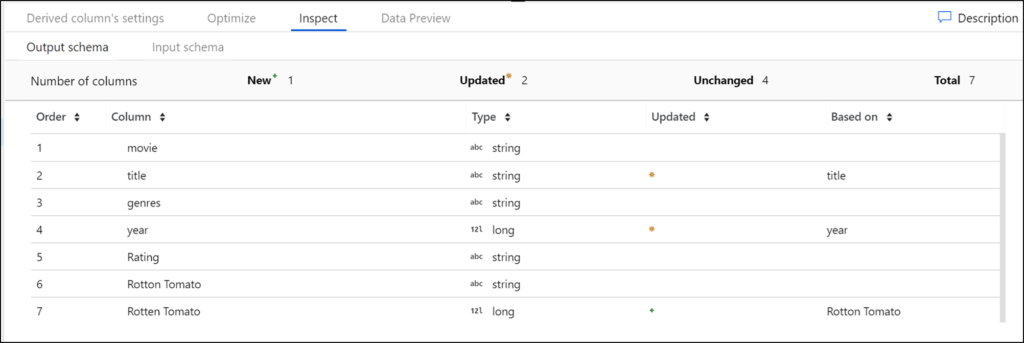
The Inspect tab provides a view into the metadata of the data stream that you’re transforming. You can see column counts, the columns changed, the columns added, data types, the column order, and column references. Inspect is a read-only view of your metadata. You don’t need to have debug mode enabled to see metadata in the Inspect pane.

As you change the shape of your data through transformations, you’ll see the metadata changes flow in the Inspect pane. If there isn’t a defined schema in your source transformation, then metadata won’t be visible in the Inspect pane. Lack of metadata is common in schema drift scenarios.

Data preview

If debug mode is on, the Data Preview tab gives you an interactive snapshot of the data at each transform. For more information.

Debug mode

Debug mode allows you to interactively see the results of each transformation step while you build and debug your data flows. The debug session can be used both in when building your data flow logic and running pipeline debug runs with data flow activities.

Data Factory – Move files to time folder structure

Scenario:

I have a folder full of CSV files. Each file name is a date for which this file contains data (i.e. 2021-10-01T00:00:00Z). I want to organize these files into folders, with a time hierarchy. Meaning, the top level folders will be years (2022, 2023…), the second level will be months in this year (1,2,3…12), and the next level will be folders for a day in a month (1,2…30/31/28). Each day folder will contain one or many files with data referencing that day.

This Structure is important because it will enable you to use partitions when reading that data with tools like SQL serverless pool or spark pool in Synapse. You can read only the data required for the current query and save time and resources.

In this post, I’ll use Azure data factory to copy the files to the new structure. I’m assuming the files are already on an Azure storage account, in one container, and we want to build the new folder structure on another container.

Let’s launch data factory and create a new pipeline.

First, we’ll add 2 parameters, to hold the containers names (source and destination)

We’ll use a metadata activity to get a list of files in our source folder, so drag this activity into the canvas.

In the new metadata activity, on the settings tab, under “field list” click on new and add “child items”.

Create a dataset to your source folder of type blob storage or data lake storage. Set your container to the parameter we added. Leave the directory and file name blank. The file type can be binary since we are only copying the files, and not accessing their content in this pipeline.

Now add a foreach activity, and connect it with a success (green) link from the metadata activity.

On the items field, type in:

@activity('Get file names').output.childItems

This will make the foreach activity loop on each result (which is one for each file in the source folder)

Click on the + sign inside the foreach activity to add an activity that will run for each file, and then click “copy data”.

Click on the copy data activity you just added, to get It’s settings.

On the source tab, create a new dataset, with the same properties as the one we created for the metadata activity, except now we’ll add a parameter to the file name.

Use this dataset in the source tab. A new parameter appear under the dataset for the file name. Click on “dynamic content” and write @item().name . This expression will take the file name in each loop.

You can check “delete files after completion” if you want the source files to be removed after successful copy.

Now on the sink tab, we need to create a new dataset to our destination folder. I am using Azure data lake storage. This time we are creating a parameter on the container and folder parts, leaving the file name blank.

Back on the sink tab, you now can insert a value for the dataset parameters. For the folder value, Click on “dynamic content” and paste in this:

@concat(
  formatDateTime(item().name ,'yyyy'),
   '/',
   formatDateTime(item().name ,'MM'),
   '/',
  formatDateTime(item().name ,'dd')
)

Explaining the expression:

Item().name is the file on the current loop. Something like 2021-10-01T00:00:00Z.

formatDateTime extract part of the timestamp string,

and concat brings the all folder path together.

In our example, that will be 2021/10/1 (the / symbol show moving to a different folder level)

Our pipeline is ready, let click on debug to test it.

We’ll need to supply the parameters, which are the names of our source and destination containers.

Our pipeline works and copied the files to the right folders (while creating those folders)

Reference – https://www.madeiradata.com/

Using Data Factory activities making sure that the files smaller than 1KB will be deleted from the source storage account?

Following activity will take place:

  • ForEach activity for iteration
  • Get Metadata to get the size of all files in the source storage
  • If Condition to check the size of the files
  • Delete activity to delete all files smaller than 1KB

Demo Overview

In the demo that we will discuss in this article, we will create an Azure Data Factory pipeline, that will read data stored in CSV files located in an Azure Blob Storage container, making sure that the file extension is CSV and the size of the file larger than or equal to 1KB, and write the data to an Azure SQL Database table.

Prerequisites

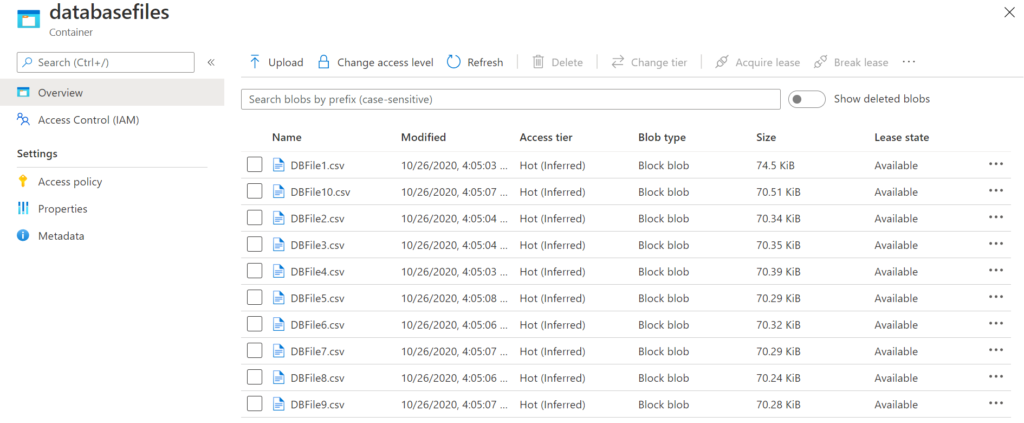
In order to create that pipeline, make sure that you have an Azure Data Factory, an Azure Storage account where the CSV files are stored, as shown below:

And an Azure SQL Database where the data will be written, where we need to add the current client IP address to the Azure SQL Database firewall settings, in order to be able to connect using SSMS from my machine, and enable Allow Azure Services and Resources to access this Server firewall setting to allow the Azure Data Factory to access it, as shown below:

Linked Services and DataSets

The first step in creating the Azure Data Factory pipeline is creating the source and sink linked services and datasets. To achieve that, open the Azure Data Factory, click on Author & Monitor to launch the Data Factory UI.

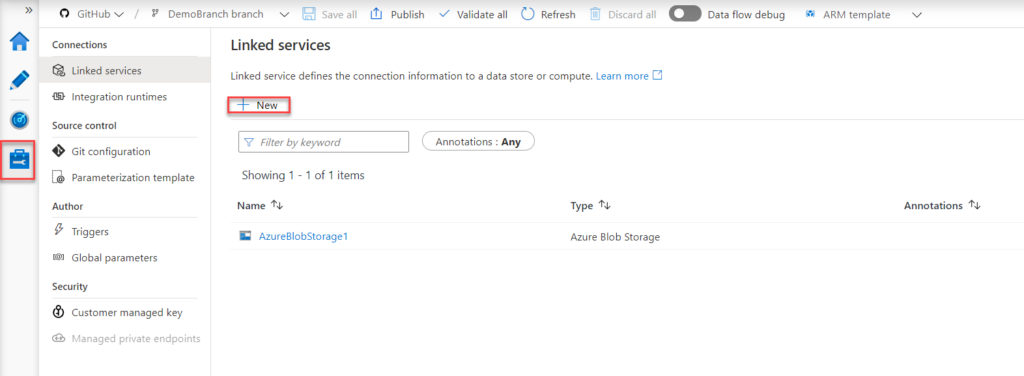
From the opened Azure Data Factory UI in the Azure Portal, click on the Manage button to create the Linked Services, as shown below:

Now, we need to create the linked service that points to the Azure Blob Storage container where the CSV files are stored. To create the linked service, click on the Linked Services option under the Connections list, then click on the New button, as below:

From the New Linked Service window, choose the Azure Blob Storage data store, then click Continue to proceed:

In the new Azure Blob Storage Linked service window, provide a meaningful name for the linked service, the Integration Runtime that will be used to connect to the Azure Blob Storage, which is Azure IR in our case, the authentication method that will be used to connect to that storage account, the Azure Subscription where this storage account is created and the name of that storage account.

After providing all required information, click on Test Connection to verify whether we are able to connect to that storage account using the provided information or not then click Create if the connection is tested successfully, as shown below:

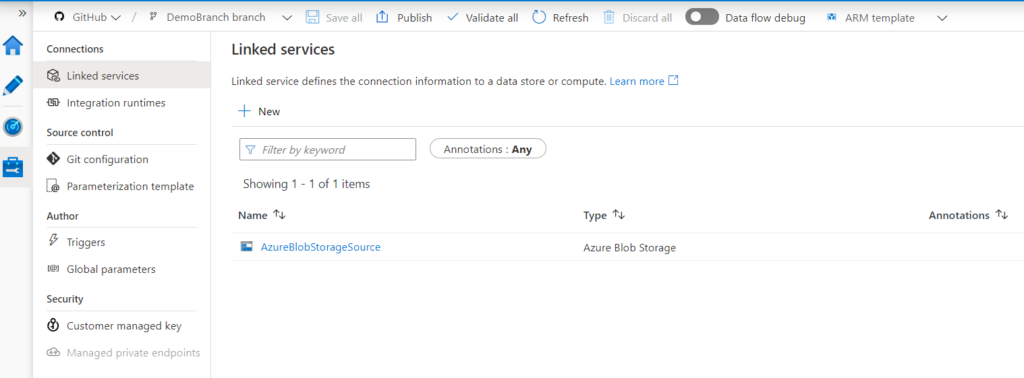
And the created Azure Blob Storage linked service that will act as the data source in our pipeline will be shown in the linked services list, as below:

With the source linked service created, we need to create the source dataset, which points to the container, folder or file under the source storage account that contains the source data.

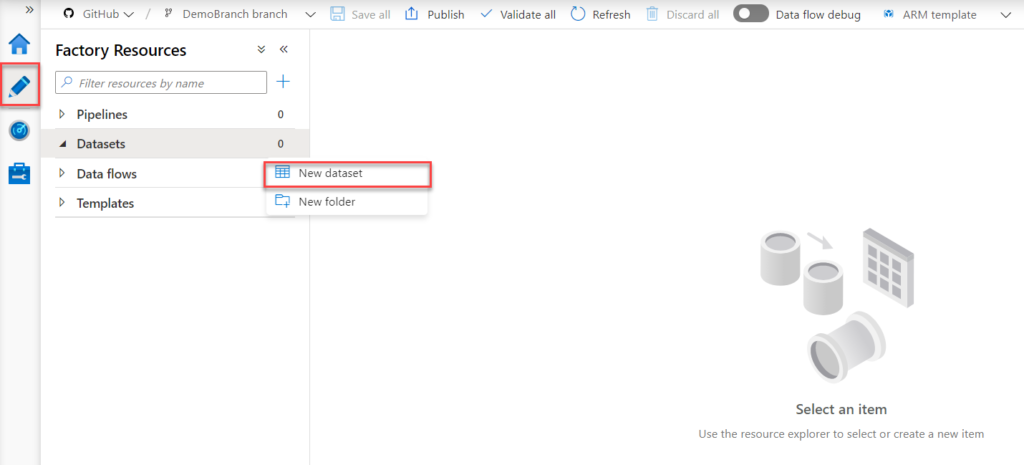
To create a new dataset, click on the Author button, choose Datasets under the Factory Resources list, choose to create a New dataset, as shown below:

In the New Dataset window, choose Azure Blob Storage data store, then click Continue to proceed:

In the Select Format window, choose DelimitedText format as we will read from CSV files, as shown below:

From the DataSet Set Properties window, provide a meaningful name for the source dataset, the linked service that contains the connection information for that dataset, browse to identify the container and the folder where the data source files are located and check the “First row as header” option if the CSV files contain the names of the columns in the first row, then click OK to proceed:

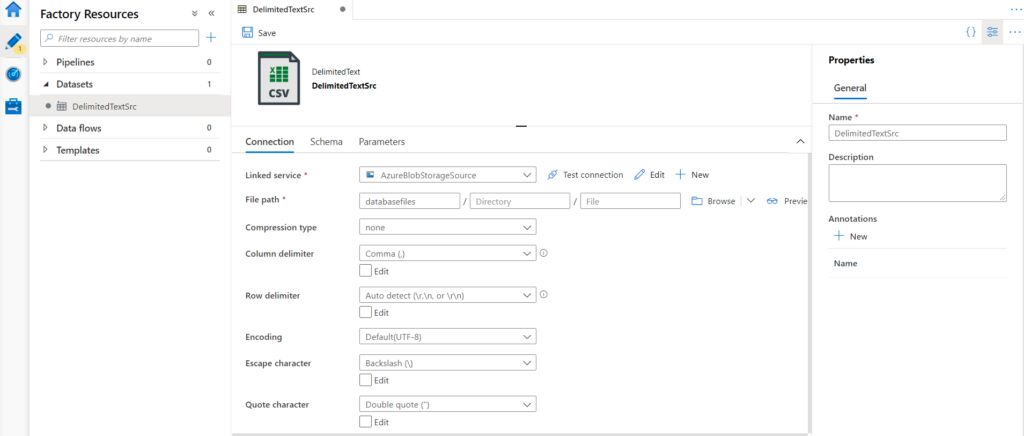
Before saving all dataset settings, review the delimiter and path settings then click Save to create the dataset, as below:

You can also click on the Preview option to review the shape of the source data, as shown below:

Let us move to the next step, in which we need to create the linked service and dataset for the sink data store, which is the Azure SQL Database in this demo.

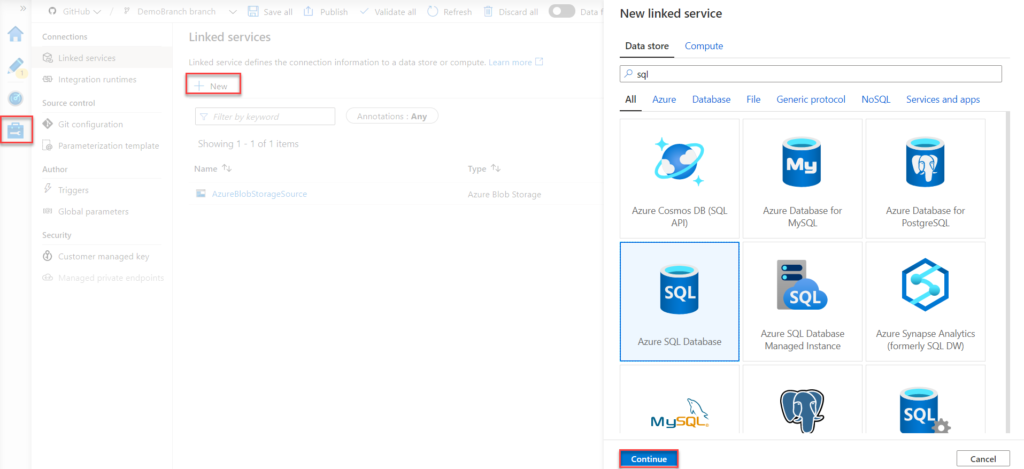
We will follow the same steps, but this time, from the New Linked Service data stores, we will choose the Azure SQL Database store then click Continue to proceed:

In the New Linked Service window, provide a meaningful name for the Azure SQL DB linked service, the Integration Runtime that will be used to connect to that database, which the Azure IR in this scenario, the subscription where this database is created, the name of the Azure SQL server and database and finally the credentials that will be used to connect to that Azure SQL Database.

After providing all required information, click on Test Connection to verify whether we are able to connect to that Azure SQL Database using the provided information or not then click Create if the connection is tested successfully, as shown below:

And the created Azure SQL Database linked service that will act as the data sink in our pipeline will be shown in the linked services list, as below:

With the sink linked service created successfully, we will create the dataset that points to the database table where the data will be written in the Azure Data Factory pipeline.

Following the same previous steps, clicking on the New Dataset option from the Author window, select the Azure SQL Database as the data store type for that dataset then click Continue, as shown below:

In the dataset properties window, provide a meaningful name for the dataset, the linked service that contains the connection information, the name of the table where the data will be written, then click OK to proceed:

Now, review the dataset information then click Save to create the dataset, as shown below:

Well done! The linked services and datasets that will be used to connect to the source and the sink of our pipeline are created and configured successfully. Let us move to the next step in which we will create the Azure Data Factory pipeline.

Create a New Pipeline

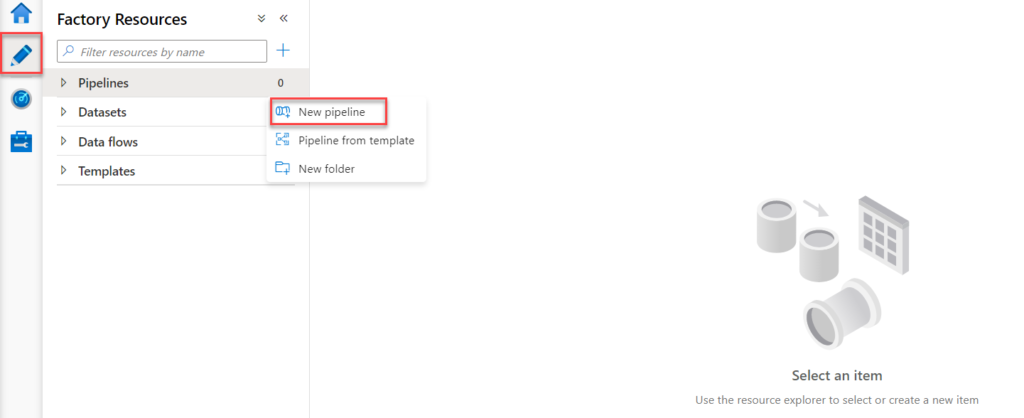
To create a new pipeline, click on the New pipeline option under the Factory Resources of the Author page, as shown below:

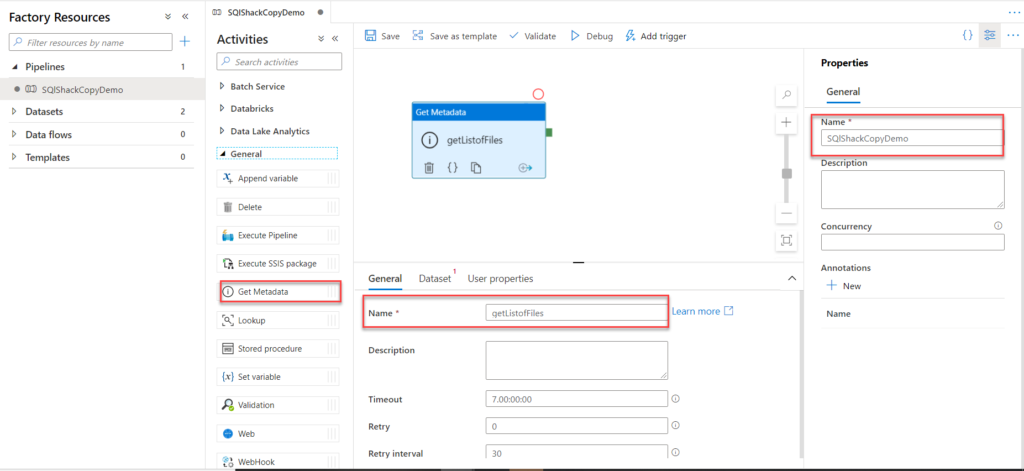
In the new pipeline page, expand the General Activities and drag then drop the Get Metadata activity to the design surface. We will use this Get Metadata activity to get the list of all source files and retrieve the name of these files, so that it will be easier for us to filter the types of these files.

In the General tab of the Get Metadata activity, provide a meaningful name of the activity that reflects the purpose of that activity, as shown below:

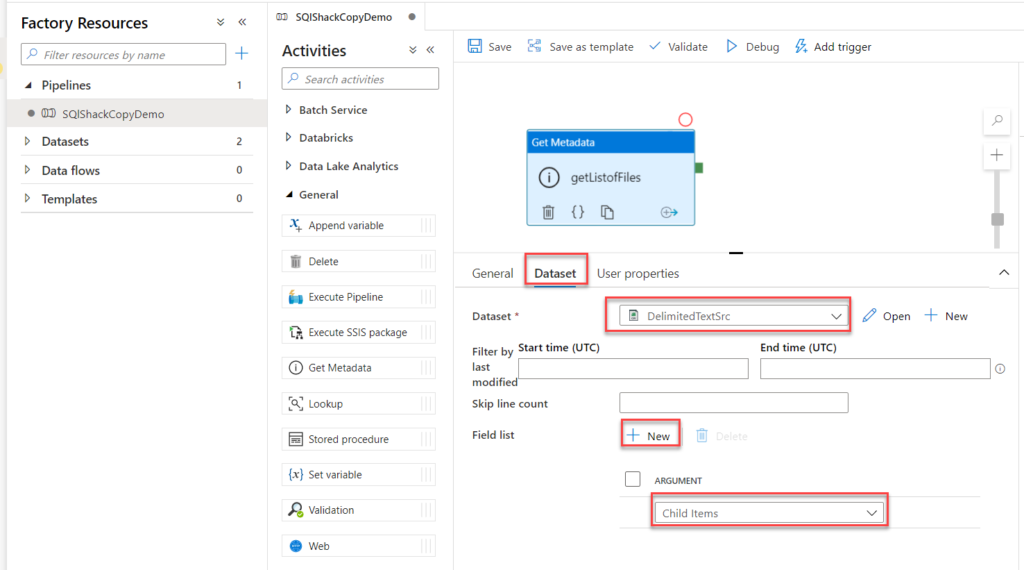
In the Dataset tab of the Get Metadata activity, provide the name of the source dataset, which points to the Azure Blob Storage container, where the source files are stored.

In the Field List, click New to add a new argument and choose the Child Item as an argument to get the names of the source files, as below:

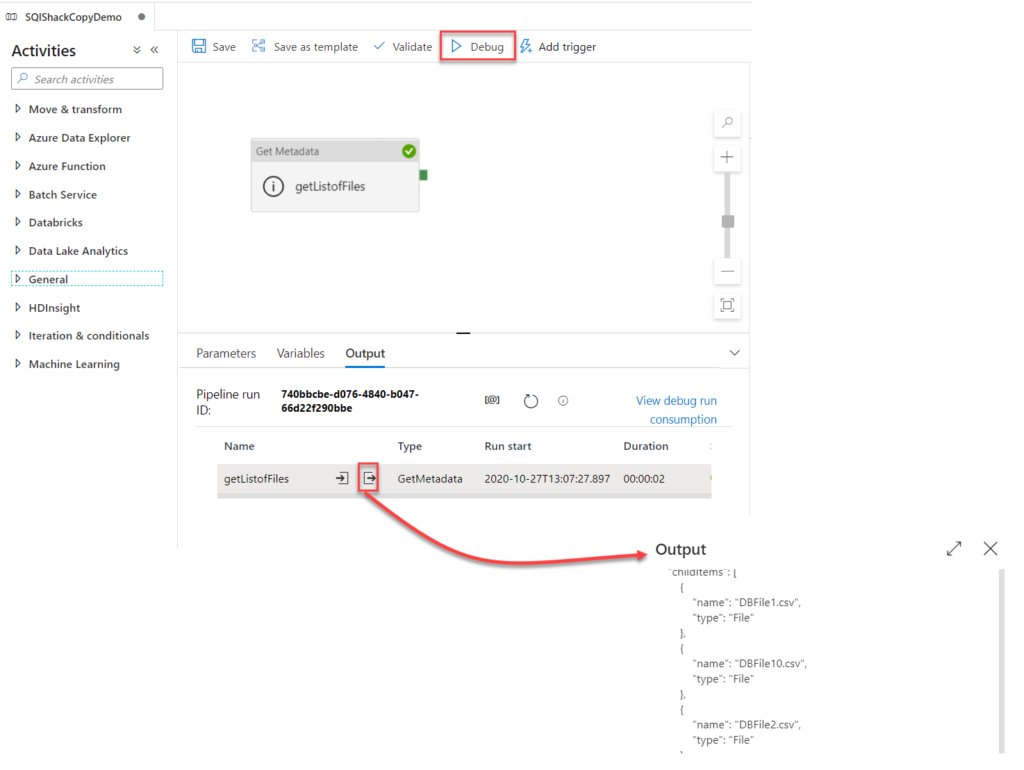
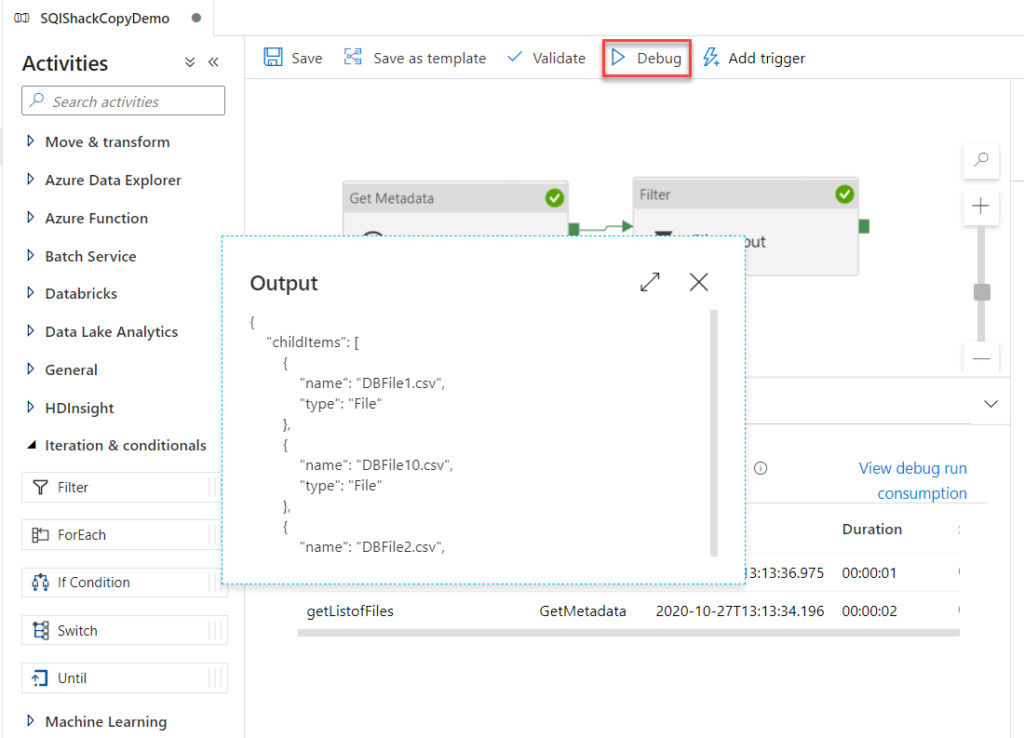
To test that activity, click on the Debug option, to execute that activity within the Azure Data Factory pipeline in the debug mode, then click to check the output of the activity execution, where it will return the list of files located in the source container and the names of these files, as shown below:

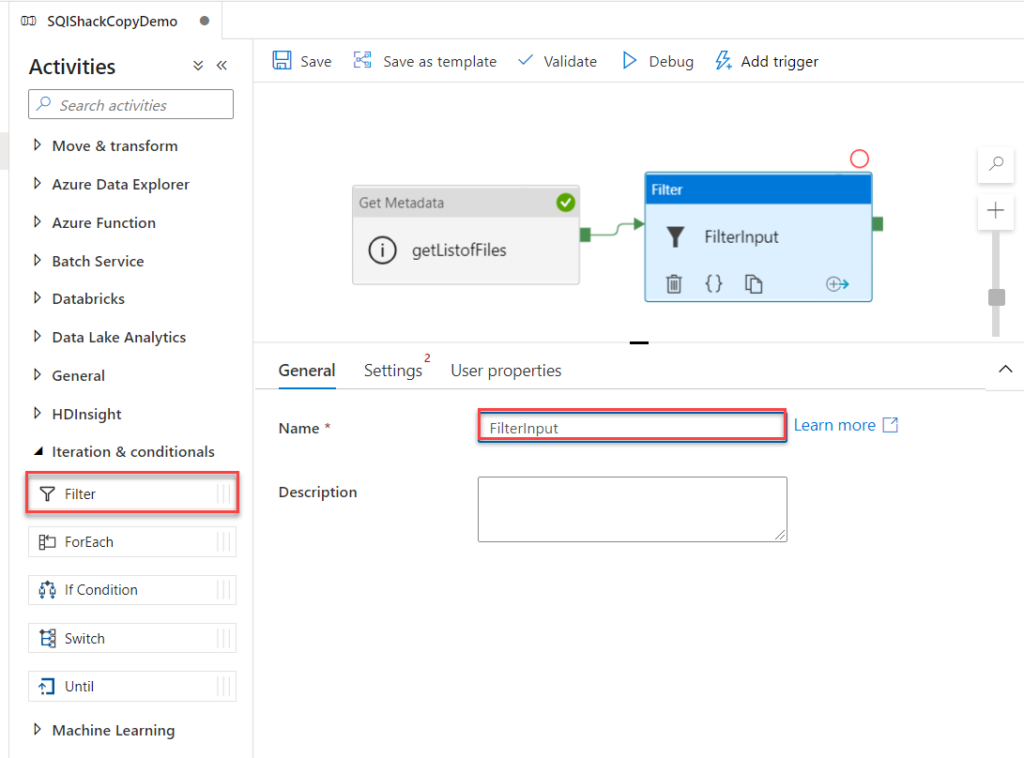
The next activity that we will add to the pipeline is the Filter activity, which will be used to take the name of the files from the Get Metadata activity and pass only the files with CSV extension.

The Filter activity can be found under the Iterations and Conditions activity list then dragged and dropped to the pipeline designer surface. After adding the Filter activity, drag the output of the Get Metadata activity to be the input of the Filter activity, then provide a meaningful name for the Filter activity, as shown below:

In the Settings tab of the Filter activity, specify the Items option value as @activity().output.childItems to return the list of files from the Get Metadata activity and the Conditions option value as @endswith(item().name,’csv’) to pass only the files with CSV extension, as shown below:

Let us test the Azure Data Factory pipeline until that point. Click on the Debug button to execute the pipeline under debug mode and confirm that both activities are executed successfully, and that the output of the Filter activity is the files with CSV extension, as shown below:

Now, we will add to the Azure Data Factory pipeline the ForEach activity that will help in iterating through all files passed from the Filter activity and check the size of these input files, if the size of the file is equal to or larger than 1KB, the file will be written to the Azure SQL Database table, otherwise, the file will be deleted from the source container.

Expand the Iterations and Conditional activities then drag and drop the ForEach activity to the designer surface. Once added, drag the output arrow of the Filter activity and drop it as an input to the ForEach activity and provide a meaningful name for that activity, as shown below:

In the Settings tab of the ForEach activity, check to loop the input items Sequentially and provide the @activity(‘filterInput’).output.Value in the Items option to take the value returned from the Filter activity as an input to the ForEach activity, as shown below:

Inside the ForEach activity icon, click on the pencil icon to add a new sub-activity inside the ForEach activity. Here we will add a new Get Metadata activity that will check all the input files and return the size of each file. First, provide a meaningful name for that activity, as shown below:

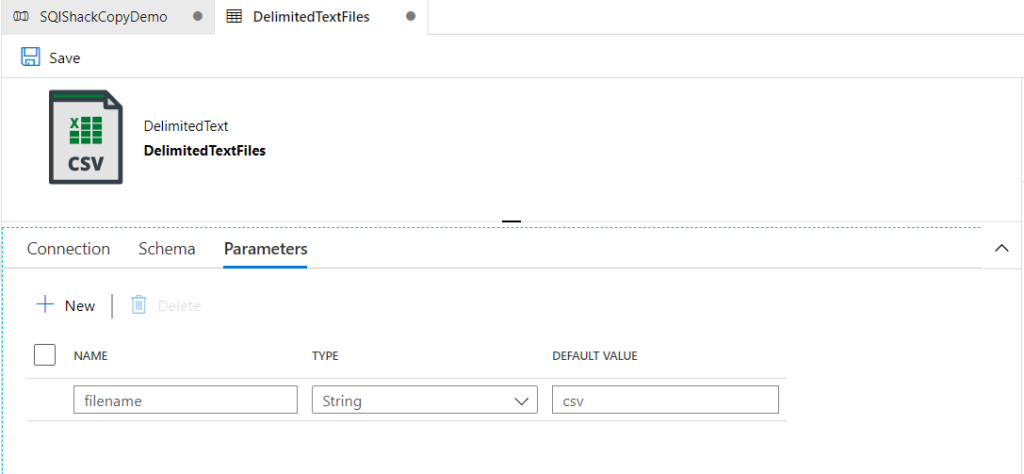
Under the Dataset settings, we will create a new Azure Blob Storage dataset with DelimitedText format and add “Filename” as a parameter for that dataset with “CSV” as a default value, as shown below:

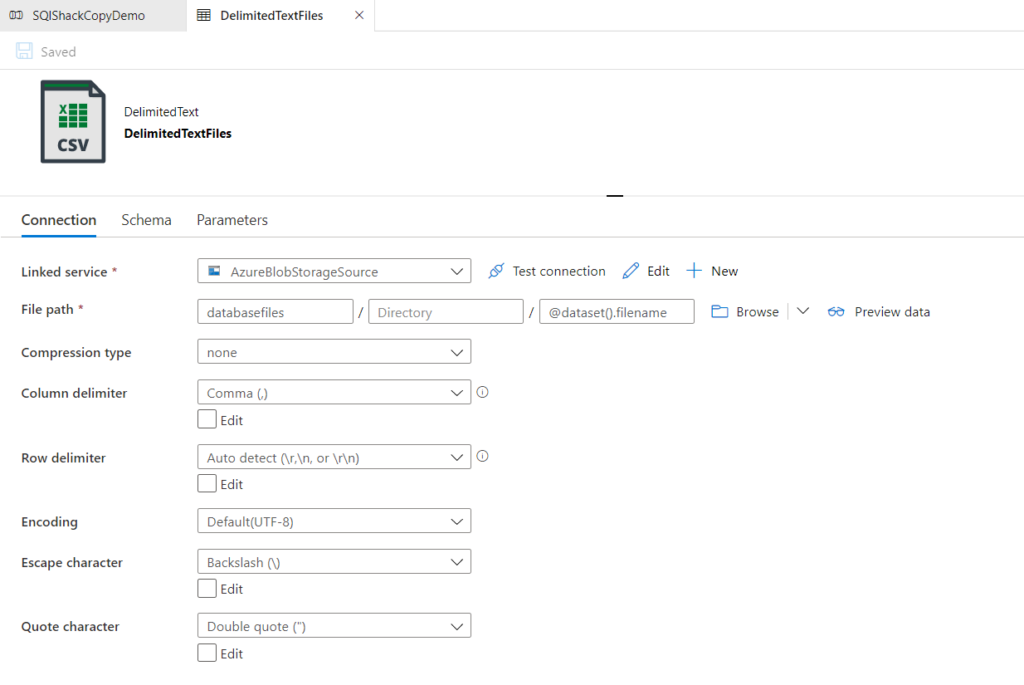
And set @dataset().filename as the file name value in the File Path setting of the dataset, as below:

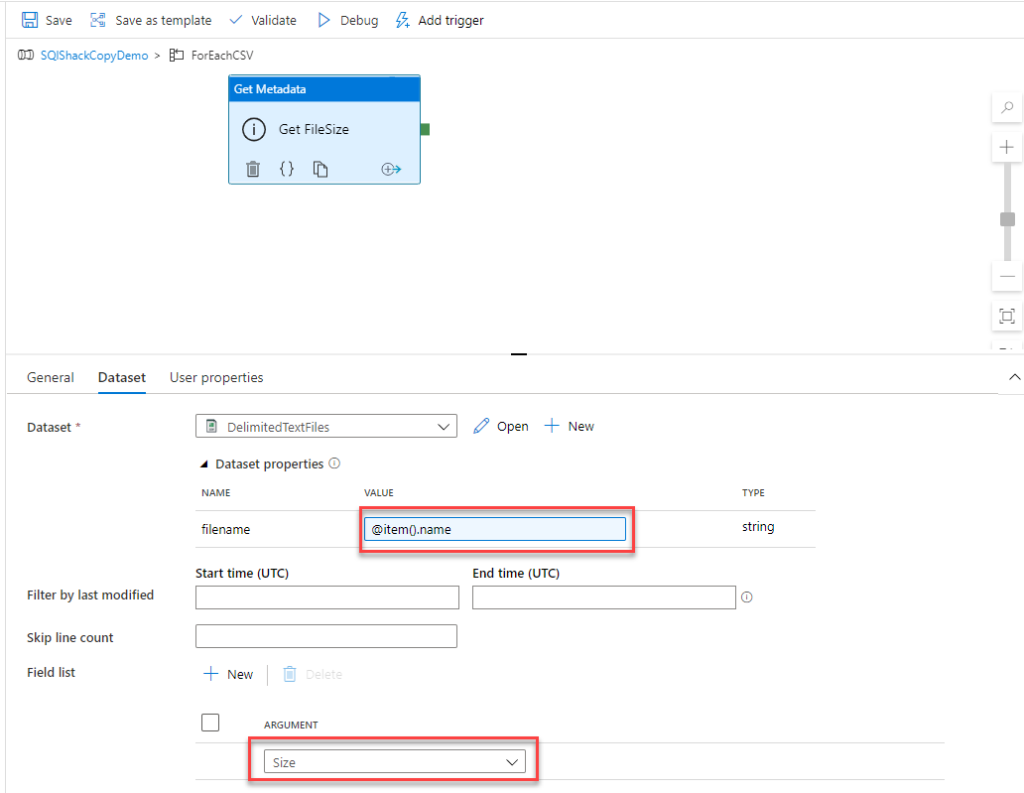
Once the Dataset is created, go back to the Dataset settings of the Get Metadata activity and set the filename parameter value as @item().name to parse the name of the files that are returned from the dataset, then from the Field List, add a new argument and select the Size as an argument, to return the size of the files that are pointed by the source dataset, as shown below:

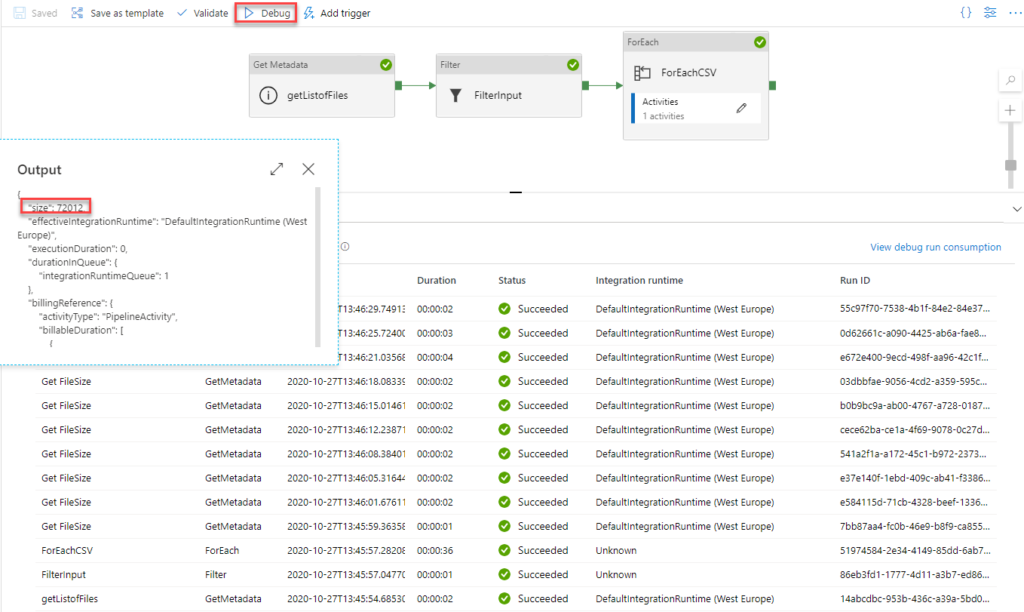
Let us test the Azure Data Factory pipeline execution till that point, by clicking on Debug to execute the pipeline under the debug mode, and check the output of the Get Metadata activity, where you can see that it is executed inside the ForEach activity number of times equal to the number of files in the source container, and return the size of each file, as shown below:

Now we will add a new activity to the Azure Data Factory pipeline inside the ForEach activity that will be used to act based on the source file size, where we will copy the data inside the file if the file size is larger than or equal to 1KB and delete the file that is smaller than 1KB.

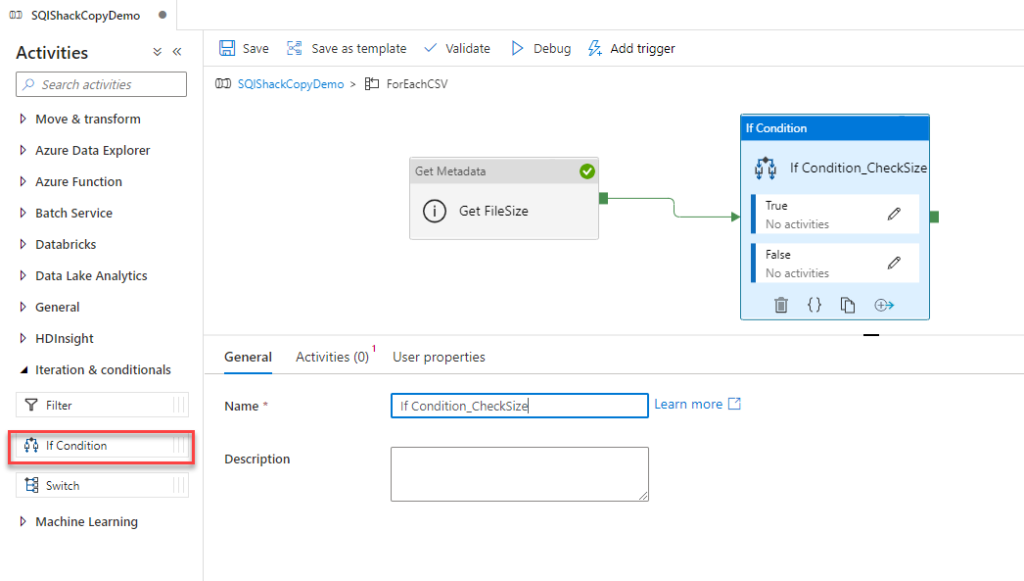
The best activity that will help in that scenario is the If Condition activity under the Iterations and Conditional activities list that will take the input of the Get Metadata activity and check the returned size. After dragging the If Condition activity and drop it inside the ForEach activity then drag the output arrow of the Get Metadata activity and use it as an input for the If Condition, provide a meaningful name for the If Condition activity, as below:

In the Activities tab of the If Condition activity, provide this Expression: @greaterOrEquals(activity(‘GetFileSize’).output.size,1024) as the Boolean condition of the If Condition that will be used to evaluate the size of each file and ensure that it is equal to or larger than 1 KB, as below:

Now, click on the pencil icon to add a Copy activity when the condition evaluates True, where you need to provide a meaningful name for that copy activity as below:

And select the previously created Dataset that points to the Azure Blob Storage container as a source for the Copy activity, making sure to provide the @item().name as a value for the filename dataset parameter, as shown below:

Then select the Azure SQL Database dataset as a sink for the copy activity, as below:

Again, we need to add a Delete activity for the False If Condition evaluation, to delete the files that are smaller than 1KB, where you need to provide first a meaningful name for that activity as shown below:

And select the previously created Dataset that points to the Azure Blob Storage container as a source for the Delete activity, considering to provide the @item().name as a value for the filename dataset parameter, as shown below:

Then selecting the Azure Storage account that will be used for the Delete activity logging, as below:

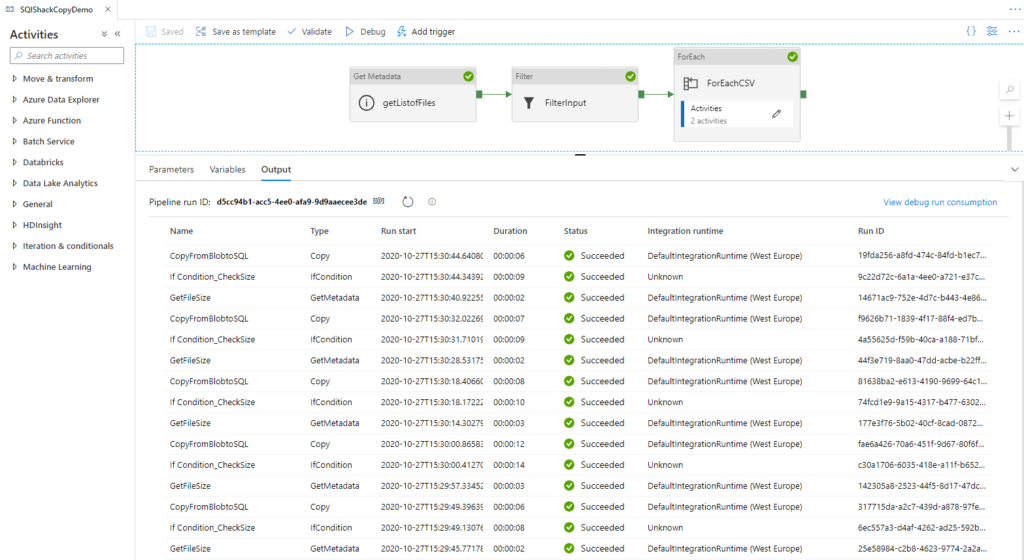
Now, the Azure Data Factory pipeline is ready with all loops and conditions. Let us execute it under debug mode, using the Debug button, to confirm that it is working as expected and you can later create a trigger to schedule it.

After executing it, you will see that, as we have 10 files in the source container that meets both CSV and 1KB size conditions, the files will be copied to the Azure SQL Database successfully, as shown below:

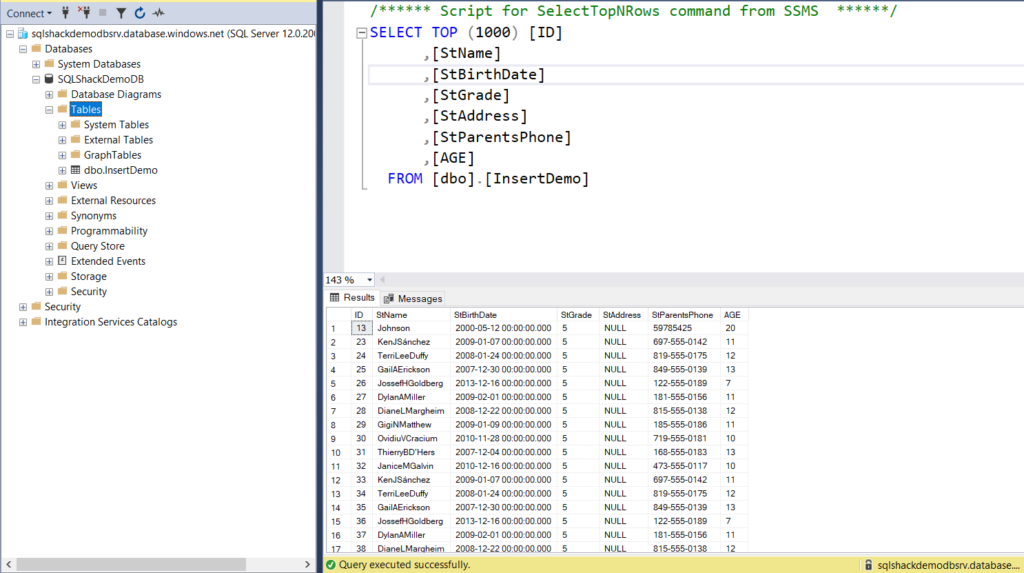
Also, we can confirm that the data is copied successfully to the Azure SQL Database by connecting to the database using SSMS, and querying the data, as shown below:

How can we load multiple(50)tables at a time using azure Data Factory?

Here are the important steps to create this solution:

  1. Select the watermark column: Select one column for each table in the source data store, which can be used to identify the new or updated records for every run. Normally, the data in this selected column (for example, last_modify_time or ID) keeps increasing when rows are created or updated. The maximum value in this column is used as a watermark.
  2. Prepare a data store to store the watermark value: In this tutorial, you store the watermark value in a SQL database.
  3. Create a pipeline with the following activities:
    • Create a ForEach activity that iterates through a list of source table names that is passed as a parameter to the pipeline. For each source table, it invokes the following activities to perform delta loading for that table.
    • Create two lookup activities. Use the first Lookup activity to retrieve the last watermark value. Use the second Lookup activity to retrieve the new watermark value. These watermark values are passed to the Copy activity.
    • Create a Copy activity that copies rows from the source data store with the value of the watermark column greater than the old watermark value and less than the new watermark value. Then, it copies the delta data from the source data store to Azure Blob storage as a new file.
    • Create a StoredProcedure activity that updates the watermark value for the pipeline that runs next time.

Here is the high-level solution diagram:

Prerequisites
SQL Server. You use a SQL Server database as the source data store in this tutorial.
Azure SQL Database. You use a database in Azure SQL Database as the sink data store. If you don’t have a database in SQL Database, see Create a database in Azure SQL Database for steps to create one.

Create a data factory

  1. Launch Microsoft Edge or Google Chrome web browser. Currently, Data Factory UI is supported only in Microsoft Edge and Google Chrome web browsers.
  2. On the left menu, select Create a resource > Integration > Data Factory:

In the New data factory page, enter ADFMultiIncCopyTutorialDF for the name.

The name of the Azure Data Factory must be globally unique. If you see a red exclamation mark with the following error, change the name of the data factory (for example, yournameADFIncCopyTutorialDF) and try creating again.

4. Select your Azure subscription in which you want to create the data factory.

5. For the Resource Group, do one of the following steps:

  • Select Use existing, and select an existing resource group from the drop-down list.
  • Select Create new, and enter the name of a resource group

6. Select V2 for the version.

7. Select the location for the data factory. Only locations that are supported are displayed in the drop-down list. The data stores (Azure Storage, Azure SQL Database, etc.) and computes (HDInsight, etc.) used by data factory can be in other regions.

8. Click Create.

9. After the creation is complete, you see the Data Factory page as shown in the image.

10. Select Open on the Open Azure Data Factory Studio tile to launch the Azure Data Factory user interface (UI) in a separate tab.

Create self-hosted integration runtime:

As you are moving data from a data store in a private network (on-premises) to an Azure data store, install a self-hosted integration runtime (IR) in your on-premises environment. The self-hosted IR moves data between your private network and Azure.

  1. On the home page of Azure Data Factory UI, select the Manage tab from the leftmost pane.

2. Select Integration runtimes on the left pane, and then select +New.

3. In the Integration Runtime Setup window, select Perform data movement and dispatch activities to external computes, and click Continue.

4. Select Self-Hosted, and click Continue.

5. Enter MySelfHostedIR for Name, and click Create.

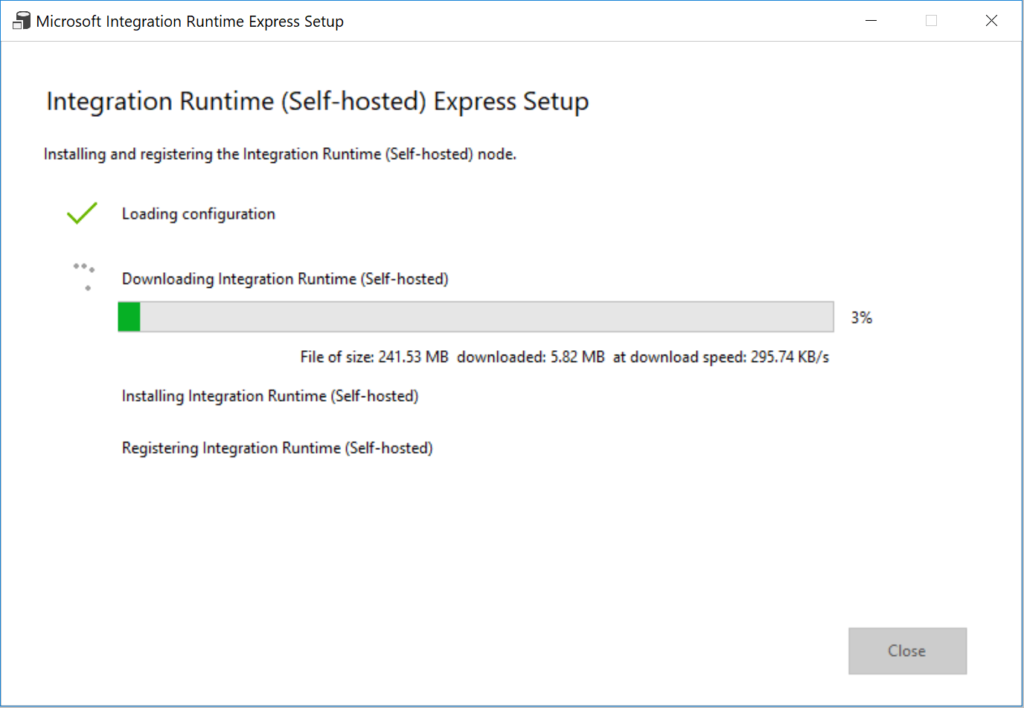
6. Click Click here to launch the express setup for this computer in the Option 1: Express setup section.

7. In the Integration Runtime (Self-hosted) Express Setup window, click Close.

8. In the Web browser, in the Integration Runtime Setup window, click Finish.

9. Confirm that you see MySelfHostedIR in the list of integration runtimes.

Create linked services

You create linked services in a data factory to link your data stores and compute services to the data factory. In this section, you create linked services to your SQL Server database and your database in Azure SQL Database.


Create the SQL Server linked service

In this step, you link your SQL Server database to the data factory.

  1. In the Connections window, switch from Integration Runtimes tab to the Linked Services tab, and click + New.

2. In the New Linked Service window, select SQL Server, and click Continue.

3. In the New Linked Service window, do the following steps:

  1. Enter SqlServerLinkedService for Name.
  2. Select MySelfHostedIR for Connect via integration runtime. This is an important step. The default integration runtime cannot connect to an on-premises data store. Use the self-hosted integration runtime you created earlier.
  3. For Server name, enter the name of your computer that has the SQL Server database.
  4. For Database name, enter the name of the database in your SQL Server that has the source data. You created a table and inserted data into this database as part of the prerequisites.
  5. For Authentication type, select the type of the authentication you want to use to connect to the database.
  6. For User name, enter the name of user that has access to the SQL Server database. If you need to use a slash character (\) in your user account or server name, use the escape character (\). An example is mydomain\\myuser.
  7. For Password, enter the password for the user.
  8. To test whether Data Factory can connect to your SQL Server database, click Test connection. Fix any errors until the connection succeeds.
  9. To save the linked service, click Finish.

Create the Azure SQL Database linked service

In the last step, you create a linked service to link your source SQL Server database to the data factory. In this step, you link your destination/sink database to the data factory.

  1. In the Connections window, switch from Integration Runtimes tab to the Linked Services tab, and click + New.
  2. In the New Linked Service window, select Azure SQL Database, and click Continue.
  3. In the New Linked Service window, do the following steps:
    • Enter AzureSqlDatabaseLinkedService for Name.
    • For Server name, select the name of your server from the drop-down list.
    • For Database name, select the database in which you created customer_table and project_table as part of the prerequisites.
    • For User name, enter the name of user that has access to the database.
    • For Password, enter the password for the user.
    • To test whether Data Factory can connect to your SQL Server database, click Test connection. Fix any errors until the connection succeeds.
    • To save the linked service, click Finish.

4. Confirm that you see two linked services in the list.

Create datasets

In this step, you create datasets to represent the data source, the data destination, and the place to store the watermark.

Create a source dataset

  • In the left pane, click + (plus), and click Dataset.
  • In the New Dataset window, select SQL Server, click Continue.
  • You see a new tab opened in the Web browser for configuring the dataset. You also see a dataset in the tree view. In the General tab of the Properties window at the bottom, enter SourceDataset for Name.
  • Switch to the Connection tab in the Properties window, and select SqlServerLinkedService for Linked service. You do not select a table here. The Copy activity in the pipeline uses a SQL query to load the data rather than load the entire table.

Create a sink dataset

  1. In the left pane, click + (plus), and click Dataset.
  2. In the New Dataset window, select Azure SQL Database, and click Continue.
  3. You see a new tab opened in the Web browser for configuring the dataset. You also see a dataset in the tree view. In the General tab of the Properties window at the bottom, enter SinkDataset for Name.
  4. Switch to the Parameters tab in the Properties window, and do the following steps:
    • Click New in the Create/update parameters section.
    • Enter SinkTableName for the name, and String for the type. This dataset takes SinkTableName as a parameter. The SinkTableName parameter is set by the pipeline dynamically at runtime. The ForEach activity in the pipeline iterates through a list of table names and passes the table name to this dataset in each iteration.

5. Switch to the Connection tab in the Properties window, and select AzureSqlDatabaseLinkedService for Linked service. For Table property, click Add dynamic content.

6. In the Add Dynamic Content window, select SinkTableName in the Parameters section.

7. After clicking Finish, you see “@dataset().SinkTableName” as the table name

Create a pipeline

The pipeline takes a list of table names as a parameter. The ForEach activity iterates through the list of table names and performs the following operations:

  1. Use the Lookup activity to retrieve the old watermark value (the initial value or the one that was used in the last iteration).
  2. Use the Lookup activity to retrieve the new watermark value (the maximum value of the watermark column in the source table).
  3. Use the Copy activity to copy data between these two watermark values from the source database to the destination database.
  4. Use the StoredProcedure activity to update the old watermark value to be used in the first step of the next iteration.

Create the pipeline

  1. In the left pane, click + (plus), and click Pipeline.
  2. In the General panel under Properties, specify IncrementalCopyPipeline for Name. Then collapse the panel by clicking the Properties icon in the top-right corner.
  3. In the Parameters tab, do the following steps:
    1. Click + New.
    2. Enter tableList for the parameter name.
    3. Select Array for the parameter type.
  4. In the Activities toolbox, expand Iteration & Conditionals, and drag-drop the ForEach activity to the pipeline designer surface. In the General tab of the Properties window, enter IterateSQLTables.
  5. Switch to the Settings tab, and enter @pipeline().parameters.tableList for Items. The ForEach activity iterates through a list of tables and performs the incremental copy operation.

6. Select the ForEach activity in the pipeline if it isn’t already selected. Click the Edit (Pencil icon) button.

7. In the Activities toolbox, expand General, drag-drop the Lookup activity to the pipeline designer surface, and enter LookupOldWaterMarkActivity for Name.

8. Switch to the Settings tab of the Properties window, and do the following steps:

  1. Select WatermarkDataset for Source Dataset.
  2. Select Query for Use Query.
  3. Enter the following SQL query for Query.
    select * from watermarktable where TableName = '@{item().TABLE_NAME}'

9. Drag-drop the Lookup activity from the Activities toolbox, and enter LookupNewWaterMarkActivity for Name.

10. Switch to the Settings tab.

  1. Select SourceDataset for Source Dataset.
  2. Select Query for Use Query.
  3. Enter the following SQL query for Query.
select MAX(@{item().WaterMark_Column}) as NewWatermarkvalue from    @{item().TABLE_NAME}

11. Drag-drop the Copy activity from the Activities toolbox, and enter IncrementalCopyActivity for Name.

12. Connect Lookup activities to the Copy activity one by one. To connect, start dragging at the green box attached to the Lookup activity and drop it on the Copy activity. Release the mouse button when the border color of the Copy activity changes to blue.

13. Select the Copy activity in the pipeline. Switch to the Source tab in the Properties window.

  1. Select SourceDataset for Source Dataset.
  2. Select Query for Use Query.
  3. Enter the following SQL query for Query.
select * from @{item().TABLE_NAME} where @{item().WaterMark_Column} > '@{activity('LookupOldWaterMarkActivity').output.firstRow.WatermarkValue}' and @{item().WaterMark_Column} <= '@{activity('LookupNewWaterMarkActivity').output.firstRow.NewWatermarkvalue}'

14. Switch to the Sink tab, and select SinkDataset for Sink Dataset.

15. Do the following steps:

  1. In the Dataset properties, for SinkTableName parameter, enter @{item().TABLE_NAME}.
  2. For Stored Procedure Name property, enter @{item().StoredProcedureNameForMergeOperation}.
  3. For Table type property, enter @{item().TableType}.
  4. For Table type parameter name, enter @{item().TABLE_NAME}.

16. Drag-and-drop the Stored Procedure activity from the Activities toolbox to the pipeline designer surface. Connect the Copy activity to the Stored Procedure activity.

17. Select the Stored Procedure activity in the pipeline, and enter StoredProceduretoWriteWatermarkActivity for Name in the General tab of the Properties window.

18. Switch to the SQL Account tab, and select AzureSqlDatabaseLinkedService for Linked Service.

19. Switch to the Stored Procedure tab, and do the following steps:

  1. For Stored procedure name, select [dbo].[usp_write_watermark].
  2. Select Import parameter.
  3. Specify the following values for the parameters:
NameTypeValue
LastModifiedtimeDateTime@{activity('LookupNewWaterMarkActivity').output.firstRow.NewWatermarkvalue}
TableNameString@{activity('LookupOldWaterMarkActivity').output.firstRow.TableName}

20. Select Publish All to publish the entities you created to the Data Factory service.

21. Wait until you see the Successfully published message. To see the notifications, click the Show Notifications link. Close the notifications window by clicking X.

Run the pipeline

  1. On the toolbar for the pipeline, click Add trigger, and click Trigger Now.
  2. In the Pipeline Run window, enter the following value for the tableList parameter, and click Finish.
[
    {
        "TABLE_NAME": "customer_table",
        "WaterMark_Column": "LastModifytime",
        "TableType": "DataTypeforCustomerTable",
        "StoredProcedureNameForMergeOperation": "usp_upsert_customer_table"
    },
    {
        "TABLE_NAME": "project_table",
        "WaterMark_Column": "Creationtime",
        "TableType": "DataTypeforProjectTable",
        "StoredProcedureNameForMergeOperation": "usp_upsert_project_table"
    }
]

Monitor the pipeline:

  1. Switch to the Monitor tab on the left. You see the pipeline run triggered by the manual trigger. You can use links under the PIPELINE NAME column to view activity details and to rerun the pipeline.
  2. To see activity runs associated with the pipeline run, select the link under the PIPELINE NAME column. For details about the activity runs, select the Details link (eyeglasses icon) under the ACTIVITY NAME column.
  3. Select All pipeline runs at the top to go back to the Pipeline Runs view. To refresh the view, select Refresh.